Monday, February 13, 2012

Ranger Designers Challenge

I was excited to once again be invited to participate in the Ranger Designers Challenge for CHA.  For this year's challenge, we were each provided with a paper mache dress form and asked to use Stickles and Liquid Pearls on our projects.   When my dress form arrived she was like a drunken sailor...totally off kilter so I  decided right away I needed to cut off the base and create a new one.  After that I wasn't sure what I wanted to do.  I talked to Deb when we were driving back to the airport after the booth set and she said, why don't you sew her a dress?  That seemed like a great idea.  
Here's how she turned out.
I cut a basic dress pattern out of tracing paper.  I guess all the years working at House of Fabrics finally paid off for me! 
I had a dish towel that I use in the dryer when I dye cheesecloth (it helps soak up the excess tea when the dryer is spinning) and it was more than enough fabric for the dress.  All I had to do was iron it with a little spray starch.
Note: I created a pattern on paper shown above, then moved to working with the actually fabric pieces I had cut out.

Stamping the pattern:
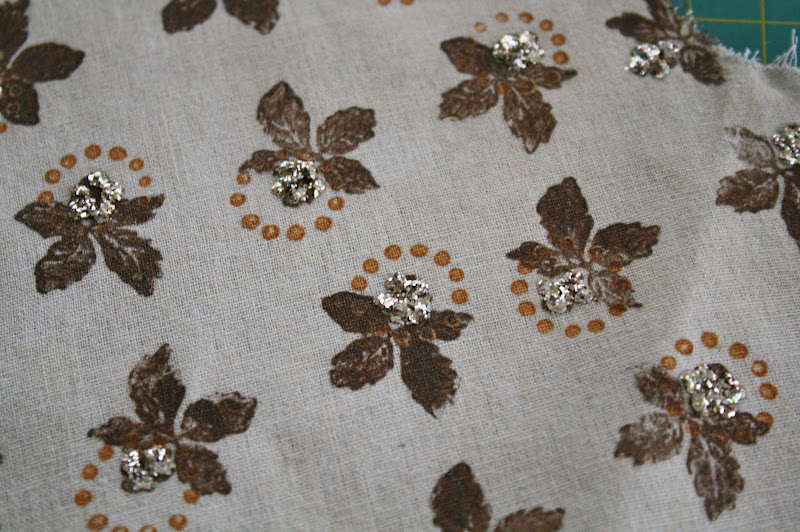
I squeezed out some Liquid Pearls -Dark Chocolate onto the craft mat then smeared it till I got a even surface.
 Like this...
After that I just started stamping.  Some are lighter and some darker depending on how thick the Liquid Pearls was on the craft sheet.  I stamped in lines across the fabric until I had the entire piece covered.
I let the paint dry for a while while I worked on something else.  Then came back to it and added Ice Stickles - Platinum to the flower portion of the stamped image.  The Stickles need to dry overnight.
Next day...
I decided the fabric needed a bit more detail, maybe another color.  I found a small stamp of just a circle with dots I thought would be perfect and followed the same method of stamping as previously described. 
Liquid Pearls -  Copper Pearl for the dotted detail.
I finished sewing the pieces of the dress together and dressed the form.   I added vintage buttons down the back of the top (but forgot to take a picture, darn it) to finish it off.  Then I set about on the little details.

These were bright red Christmas berries that I painted then added the Stickles detail with a paint brush almost like petals.  I used a green floral block to hold the berry wires so the berries could stand up to dry overnight. 
Once dry, I wrapped each with a small leaf shaped piece of Tims tissue, added gold leaves that I painted with Liquid Pearls - avocado to finish it off.
Berries painted with Liquid Pearls - Onxy Pearl
Center dot is Liquid Pearls - Gold Pearl
Glitter Petals - Ice Stickles -Platinum
Leaves - Liquid Pearls - Avocado and Ice Stickles - Gold 
 
Necklace is made from a vintage ladies watch. I just cut off one side of the black band. The metal heart charm is covered in Ice Stickles - Platinum.  The collar is cut from wool felt.
Trinket chains are made from Tim's lace chain and jump rings.   Heart with spinner - Ice Stickles - silver.  Hanging from the chain is a large Facet I painted green with Alcohol Ink then added a silhouette rubbing of a man from 7gypsies.  I added the word, "darling" cut from a book.  Also hanging is a metal Fleur de lis and Type charms.

 Stand is made from a dowel, old wooden door knob I picked up for a dollar and two candle holders turned upside down.  My sister is totally going to recognize the candle holders... I had put them in the junk bin last fall when she helped me purge the junk cupboard.  She talked me into keeping them and she was right.  I didn't end up using them for their intended use, but it worked out just the same.  Thanks Patty!  The metal candle holders have been painted with Liquid Pearls - Onyx Pearl
And here she is at the show.  Deb was very nice to walk over with me to snap a picture before the show started one morning.  
Tim's was fabulous of course.
The dress form was really a labor of love since there are soooo many steps that are not included in this post.  Just figuring out how to attach the dowel to the form once I cut off the base was a huge thought process.  But once I figured out how to do it, it only took 10 minutes to do, then a little drying time.  Many of the steps were not photographed because I was working on this at night time...a really terrible time to photograph step outs. 
Of course it all may have turned out totally different if my very nice next door neighbor (not the one that cut the vine down) did not have a drill press and the exact size bit to drill into the wooden door knob so I could add the dowel.   We didn't know he even had a drill press in the garage, my husband just took a chance and walked over to ask.  It's great having a good neighbor.

All the dress forms were shown last week on the Ranger blog.  Here are links to the four posts.
Day 1
Day 2
Day 3
Day 4

cheers!
paula

Thursday, February 9, 2012

Mary Poppins Carpet Bag

So I thought I might talk today about display.
When we do the show booth, each wall has a 4ft ledge across the top where we create a vignette that shows a 12 x 12 layout or speaks to the product that is shown on the wall below.  Most pieces come from our houses, with the exception of a few pieces that I rented this time from Ruby Rose, my local vintage store.
This is one such ledge at the show.
The bird print is mine, of which I took the glass out in case it fell down (you never know when someone with a motorized cart is going to run into the booth wall), the artist pallet came from Ruby Rose.  The paint brushes and books are mine and the large photo is blown up from a small black and white photo that is part of the Trousseau line.  Totally my favorite ledge in the booth.
When I got home on Friday at 6:30pm I had to unpack everything in less than 24 hours because of a party we were having at our house on Saturday night.  Hence the title of this post...it was like Mary Poppins carpet bag, things just kept spilling out.

After the clothes, I started on the display bags.  So much to put away but when I pulled out the pallet I knew I was going to have to buy it, not just rent it.  And after a few minutes everything came together for a fun display on my mantel.  Big white corbels, old books, the artist pallet and paint brushes.  Some little wooden pins from a children's game and a real birds nest.  I am not sure I would have ever thought of it had Deb not put together the ledge in the booth.  Super simple gathering of items with similar colors that all work together to make a great mantel vignette.  I do know Valentines day is coming next week so it probably should be a red theme  right now, but there were no red valentines in my suitcase!

Next...

Okay, so remember when I made the glass dome with the butterflies?
Here it is at the show advertising the color rubbings...
And now at my house.
Don't you need a few of the new standing clips?
I have a cabinet in my small entry way and decided to change it up and make it a neutral/black color scheme so the butterflies would fit in and really be a focal point.  So after a bit of gathering from the junk cupboard...pulling anything creme, black or metal that would fit in the spaces, the shelves now support the idea of the curiosities dome.
Items I frequently use in displays: metal frogs to hold vintage pictures, clocks and old books.
Anything in multiples is good, especially when grouped together.  You can make a powerful design statement with ordinary items when they are in quantity.
Love adding quotes to give a bit of soul to a display.
I have a stack of quotes on the same kraft paper.  I switch them out when I need a new personal pep talk.  I also took a small frame that fit the space and adhered it directly to the cabinet with foam tape to frame the quote, just to give it a little more importance.  It really brings the eye to the space and  almost says, read me.
The 1, 2, 3 jars are from Anthropologie and the books with the gold lettering are from an estate sale ($1 each).
The quote reads:
"When we talk about settling the worlds 
problems we're barking up the wrong tree.
The world is perfect.  It's a mess.
It has always been a mess.
We are not going to change it.
Our job is to straighten out our own lives."
-Joseph Campbell

An the last thing I will mention is books.  I can never have enough little books.  I particularly like small black leather books.  Really doesn't matter the subject, just that it is small enough to fit with the collection.  In the booth they were stacked backward so the pages showed but here the black leather works.
And the last item from the show.
The new Vintage stand with a beautifully created book by Sande Krieger.  You can see inside the book here (prepare to be inspired because no one does a mini book like Sande)
So my take on the stand since I don't Sande's fabulous book.
I cut a piece of book board to fit the width of the stand, painted it black then added a quote I created.
The stand has a small hole right below the flat part.  I used an S hook from this set and added a bit of junk just for fun.
I know the stand doesn't come out for a bit but if you are interested in the quote just send me an email (paula@2gypsygirls.com) and I will send you the PDF.   Just type "This is the Day" quote in the subject line and I will know what you want.

Update: Many of you have questions about the new Vintage Stand after this post.  It is 13" tall and 5" wide.  It retails for $19.99 and is being released in the second wave of products with Trousseau, which means April/May.  Sorry about the wait! 

I hope today's post gives you some inspiration to try something different.  It doesn't have to be expensive and you might not even have to leave the house.  Just think... one color story, the use of multiples, or inspirational quotes.

cheers for a great day!
paula


Tuesday, February 7, 2012

We're Home

Hello everyone!
It is great to be home again from the show!  Deb and I had such a fun time seeing old friends and even meeting some of you.  All the booths were great.  So much fun product out there.  Wish I could have seen more but we were so busy.  We really only saw other booths if we showed up an hour early before the show opened.  Sad but true.
 moving in day...love this picture of the rolls of carpet pads waiting to go into the hall.
When Deb and I got to the convention center our booth was already set up by our fabulous guys, Jorge and Hector.   Jorge and hector built the booth and for every show they set it up for us during pre-set at the warehouse, create anything we ask for with just a sketch, take it down, pack it up and then do it all again at the show.  Won-der-ful.
Hector, me, Deb and Jorge
Now time to hang all the samples.
The night before the show we are always in the hotel room making something...last year it was giant tissue paper flowers.  This year paper airplanes and a small banner using the new postal line.  Good thing I brought some extra product in my "just in case" box.
 And then the show...orders, orders, orders.
 And people snapping pictures of the displays and projects.
In fact people everywhere.
Here's the girls Lindsee, Sierra and Deb packing catalogs with order forms the morning before the show opens.
We even got to meet Robin Dudley-Howes who visits our blog quite often.  She is definitely a gypsy girl.
The following are just some random shots of the booth. 
A 4 ft long waterfall made from vintage pictures I borrowed from my friend Stephanie at Ruby Rose and copied.  They are all strung together with brown and white bakers twine and tiny staples.  I added in the affirmations cards to give it some punch.  The "Gallery Entrance" sign also came from Ruby Rose, love it.
Here is the paper airplanes we made in the hotel room.  I took this at the end of the show so they are a little disheveled after 4 days of people touching them.
Postale also had a laundry cart full of brown paper packages and letter bundles.
Trousseau had a 4 ft long pin board for inspiration.  Would you believe all this junk came out of the drawers in my craft room?  Deb made the fab sign that announced the collection name and which brought the feeling of the collection perfectly.  You can see more of the pin board in this You Tube video from Paper Clippings that shows many of the new items.
Another of my favorite walls.  A mass of paper chains create a curtain (sorry about the glare from the light).  I went through a lot of staples to make this one!

Well, that's it for today.  I will be back soon to show you more display ideas from the booth and how they can translate to home.
cheers!
paula

Thursday, January 26, 2012

CHA 2012 Sneak Peak {structures-part 2}

So lets continue with the last of the structures that were created for winter cha.   This is super fun...an 8 x 8" shadowbox frame.  It is called a shadowbox because it is deeper than the trays we make.  I think this one is about 1 1/2" deep so you can add larger items along the bottom.  
You can use the shadowbox as is or add a layer into the box.  There are two different layers available, one has round holes and the other has square.
Here is a close up that I shot before it was sent off to the Gypsy office.  I used the new flea market charms along with vintage pieces and the new tag inserts - Trousseau.  You loose the scalloped edge but they work great for the size of the holes.  The bottles are 7gypsies with this colored rubbing used for the labels.


 Here is the square insert.  Ranjini was given the task to create something made from the just the square layer.  I can't wait to see this at show.  Love all the clothes pins holding the pictures on.
We also made a 12 x 12" shadow box that comes in black.  Here you can see a fabulous project created by the ever lovely, Vicki Boutin.  Love the ruler on the book cover...and the heart?  fabulous.  The background paper is from Postale.
So I have the last two items that really don't belong under the heading, "structures" but they just happen to be here at the end.  First are tickets...two new ones.
Sorry about the color, it is early morning here and the light is a little gray.  But I hope you can see the scale on these tiny tickets. 
Vintage Tickets
And these guys...reminiscent of 7gypsies past tags.  Love all the fill in the blank spots!  The package has 12 tickets (2 each of 6 different designs).
Journal Tickets
 And the very last thing is these metal clips. 
Super cute with a little rubber tip.
 I thought you might need a visual on the scale of these clips too.  Love the size, don't you?


My personal thanks goes out to the fabulous 7gypsies design team for the extraordinary effort in the projects turned in for cha.  We are a small group but boy can we pack a punch!  Without the fabulous creations the booth would never come close to what it is with them and it would make our job even more difficult.
Thank You girls for all your time and creative talent!
Sande Krieger
Vicki Boutin
Ranjini Malhorta
Mou Saha
Ann Mabee
Kerry Lynn Yeary
Janelle Smith
and special guest, Connie Fong

Now you know, after cha I will have more photos of projects these ladies created as well as the booth.  So sorry to make you wait but some things have to be a surprise!   I also participated in the Ranger Designer challenge again and I will share that project as well once I get the okay from Ranger. 

Thanks to all of you who have followed this week as we revealed the new lines, especially those that left an encouraging comment, we both appreciate that.  We are looking forward to meeting some of you at the show as well as seeing old faces that we love.  Please stop by the booth (were way back in the right hand corner) if you have the time!  

Now the real work begins...packing the car.
cheers everyone!
paula