
I was excited to once again be invited to participate in the
Ranger Designers Challenge for CHA. For this year's challenge,
we were each provided with a paper mache dress form and asked to use
Stickles and Liquid Pearls on our projects. When my dress form arrived she was like a drunken sailor...totally off kilter so I decided right away I needed to cut off the base and create a new one. After that I wasn't sure what I wanted to do. I talked to Deb when we were driving back to the airport after the booth set and she said, why don't you sew her a dress? That seemed like a great idea.
Here's how she turned out.

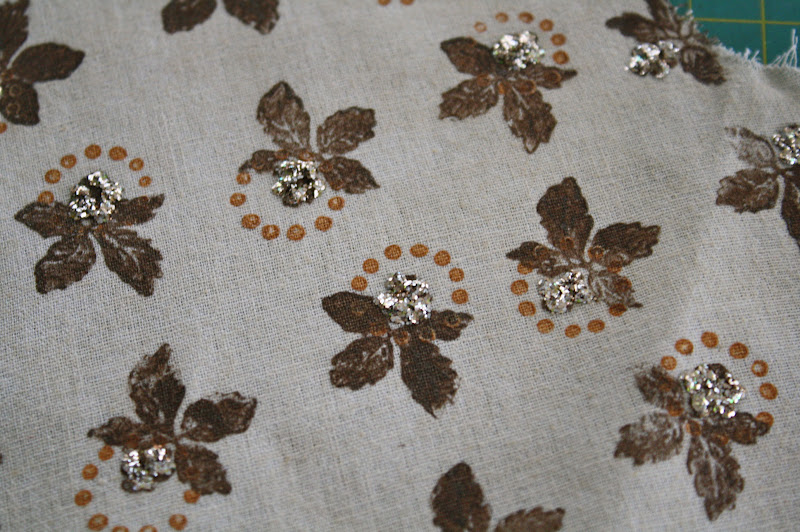
I had a dish towel that I use in the dryer when I dye cheesecloth (it helps soak up the excess tea when the dryer is spinning) and it was more than enough fabric for the dress. All I had to do was iron it with a little spray starch.

Stamping the pattern:
I squeezed out some Liquid Pearls -Dark Chocolate onto the craft mat then smeared it till I got a even surface.


I decided the fabric needed a bit more detail, maybe another color. I found a small stamp of just a circle with dots I thought would be perfect and followed the same method of stamping as previously described.

These were bright red Christmas berries that I painted then added the Stickles detail with a paint brush almost like petals. I used a green floral block to hold the berry wires so the berries could stand up to dry overnight.
Once dry, I wrapped each with a small leaf shaped piece of Tims tissue, added gold leaves that I painted with Liquid Pearls - avocado to finish it off.

Berries painted with Liquid Pearls - Onxy Pearl
Center dot is Liquid Pearls - Gold Pearl
Glitter Petals - Ice Stickles -Platinum
Leaves - Liquid Pearls - Avocado and Ice Stickles - Gold
Center dot is Liquid Pearls - Gold Pearl
Glitter Petals - Ice Stickles -Platinum
Leaves - Liquid Pearls - Avocado and Ice Stickles - Gold
Necklace is made from a vintage ladies watch. I just cut off one side of the black band. The metal heart charm is covered in Ice Stickles - Platinum. The collar is cut from wool felt.


Stand is made from a dowel, old wooden door knob I picked up for a dollar and two candle holders turned upside down. My sister is totally going to recognize the candle holders... I had put them in the junk bin last fall when she helped me purge the junk cupboard. She talked me into keeping them and she was right. I didn't end up using them for their intended use, but it worked out just the same. Thanks Patty! The metal candle holders have been painted with Liquid Pearls - Onyx Pearl

Tim's was fabulous of course.

Of course it all may have turned out totally different if my very nice next door neighbor (not the one that cut the vine down) did not have a drill press and the exact size bit to drill into the wooden door knob so I could add the dowel. We didn't know he even had a drill press in the garage, my husband just took a chance and walked over to ask. It's great having a good neighbor.
All the dress forms were shown last week on the Ranger blog. Here are links to the four posts.
Day 1
Day 2
Day 3
Day 4
cheers!
paula
I saw this on the sneak peeks and THIS was my favourite- i love it, so elegant!! Thank you for the deets!
ReplyDeletethis was also my favorite!
ReplyDeletethanks for showing how you created the "fabric"
I had no idea you could stamp with liquid pearls and stickles. This is so darling. Thanks for sharing the details!
ReplyDeletethanks so much for sharing your process on making this lovely creation. Your "girl" is one of my favorites for this challenge. The Peter Pan collar and the full skirt remind me of photos of my mother. Just an outstanding job!
ReplyDeleteYours was by far my favorite! Good job!!
ReplyDeleteJust lovely!
ReplyDeleteFantastic job you did on her! Love it. That dress is simply adorable. She would look so cute in my sewing room, I may have to make one for myself!
ReplyDeletePaula,
ReplyDeleteAs soon as I saw this at CHA I recognized it as yours..and by the way my favorite...
I am so happy your dressmaking skills paid off..this is pure genius...every little detail.
I would however like to peek inside your junk cupboard..for purely inspirational purposes..perhaps in a future post we could get a quick look ...for all of us collectors, gatherers(aka hoarders)
thanks for sharing the process...
Never thought of that! Thanks for sharing!
ReplyDeleteThis was one of the ones I oohed & aahed over for ages when I first saw the dress forms, it's completely gorgeous. I love the vintage feel to it - very 1950's. Every detail is perfect.
ReplyDeleteLove seeing the process you went thru to create your piece. I asked on the Ranger blog but they didn't answer. Do you all get your designs back or does Ranger keep them?
ReplyDeleteAlso, were your ears burning last Saturday? I ran into the Wonderful Miss Jill from Whim So Doodle in St Pete at ScrapFest, Clearwater and she told me you guys had a fabulous conversation at CHA about what a pest I am making of myself in trying to get you to come do some classes for us. We don't bite, Jill's girls make the best snacks and we'd LOVE for you to come. PLEASE?! With whipped cream and a cherry on top!
Love what you created Paula - and DARTS on the dress no less - you are detailed! Enjoyed seeing the other creations, which seem to be very true to each artists' personalities. Felt like an episode from Project Runway:). Love to see how one can "re-purpose junk" and get something so beautiful (which I enjoy so much more than some of those scary ones!!)
ReplyDeleteI saw this dress form on one of the sneak peek videos and just loved it! I can't believe you did this. What a fabulous job - such talent!!
ReplyDeleteAh, Sue!
ReplyDeleteYou are right we did talk about you at CHA. Deb and I said, there is this lady that trying her best to get us to come to Florida to teach!
We know Jill from Ranger U and now have her card. Maybe we'll be in Florida in 2012?
paula
Cathy,
ReplyDeleteYou are right, it is like an episode of project runway! Everyone has a favorite of course and a few that are not their taste.
paula
Sue,
ReplyDeleteI forgot to answer you about Ranger. Last year we got our canvas back after the show. This year it is optional. It is up to us to let them keep them in their teaching room for Ranger U, which is right in the factory at Ranger.
I hope that answers your question.
paula
Love, love, love the dress. Of course my sewing spot is even bigger than my scrapping spot.
ReplyDeleteYours is my favorite. You did a great job.
That has to be one of the cutest things I've seen! I love the dress. Yours was by far my favorite. Thanks so much for sharing your details of the dress. Feeling a bit envious of your talent!
ReplyDeleteYour project was my favorite and now having seen a little of what you did to achieve this gorgeous creation I'm floored! Thanks so much for sharing.
ReplyDeleteToo cute Paula! Love your directions for creating this darling project.
ReplyDeleteHappy Valentines Day! HOpe your day is sweet!
Blessings & hugs, Sherry
Love it Paula! We were so happy to get together with you girls! Totally made out trip awesome! Hope to see you at Farm Chicks!!!!
ReplyDeleteNice...unique way to use the LPearls and Stickles~
ReplyDeleteLove the attention to details. Would know your work anywhere.
ReplyDeletePlease do come to Florida......
Is the dress form available from Ranger?
Thanks again for all the inspiration and tutorials. Joy
this was amazing in person as was the 7G booth!
ReplyDeleteJoy, I am not sure where the dress form came from. Seems like I have seen them at Michael's craft but it doesn't seem like it had a base (which might be better). You might try Hobby Lobby if they have those in Florida...we do not have them here in CA.
ReplyDeletepaula
Paula: Thanks for the info. (I do love the one at Pottery Barn - but it is larger.) Hopefully you and Deb will have some kits for us soon....I am having withdrawal.
ReplyDeleteAll my best. Joy
Unbelievably gorgeous. It shows that this was a labor of love...and indeed a work of art.
ReplyDeleteIt never ceases to amaze me that the "junk" we find & are just about to throw away become the PERFECT base or...!
ReplyDeleteBefore I was married, had children & a house to fill with all kinds of broken, out of date, not antique or vintage or sentimental just "interesting" junk, I put a time limit on things that I found & thought "this could be....?" 1 month & then cool or not I tossed it! It was amazing how just as I was in the process of throwing it away I could SEE what it was!!!
I guess the message & now is " NEVER stop looking", use your creative abilities, keep your eyes" NEW"! That's how this BEAUTIFUL piece of ART was created!
Thanks for the reminder & the lesson!
Barbara