Wednesday, June 29, 2022

Thoughts of the Past

Hello friends,

I have created a mixed media piece for Simon Says Stamp, using lots of idea-ology + Foundry Wax (one of my favorite product of 2022).  You can find the full tutorial over on the SSS blog, just click HERE to find it!


Now carry on,
paula


Thursday, June 23, 2022

Choose to Shine - Uncharted Mariner

Hello friends,

I have a tutorial featuring the new Distress Color, Uncharted Mariner, over on the Ranger Projects Page.  I hope you will stop by to see all the details to this colorful wood panel!  It's the perfect size for a work desk or a small space. Really, anywhere you need a little encouragement reminder!


now carry on,
paula

Tuesday, June 21, 2022

Make Today Count

 Hello Friends,

I'm here today to share another Uncharted Mariner project!  This one showed up so much better in the Live.  Probably because it is so hard to photograph projects with metallic shine.  No matter, I'm here to show the step-outs to how I created the background for the Etcetera Tag.  So lets get started!

Use Collage Medium to adhere Entomology Collage Paper to a small Etcetera Tag (5.5 x 10"). With clean hands, press paper down to secure the paper to the surface. Add another layer of Collage Medium over the surface to seal. hen set aside to dry completely.
Once the Collage paper is dry, sand away excess paper.
Paint over the Collage Paper with Antique Linen Distress Paint.  Use a wet wipe to remove enough paint to see the images.  Let dry.
Use a small palette knife to spread Distress Crackle Opaque over the Burlap Layering Stencil.  This stencil is an oldie but a goodie!  Once the paste is dry, the cracks will appear in the pattern and give a great surface to work with for the next step.
Squeeze the eye-dropper of the Uncharted Mariner re-inker at the top of the crackle paste.  Stand tag up and spritz with water to let the ink run down the surface and into all the cracks.  Dry with a heat tool, while pouncing over the surface to remove any excess ink.  You can add more ink, then repeat the spray, dry, ink, spray, dry until you are satisfied.  I worked on the right side and then the left, then repeated the steps again.
Once the ink was dry, I added Walnut Stain Distress Crayon around the edges and rubbed it in with my finger.  Pounce over the top of the crayon to muddle the color and make it look more organic.
So that is how I created the surface to build on.  Any color or stencil will work but I highly recommend the Crackle Paste Opaque.  Ranger has made an exceptional product that just works beautifully every single time.
So lets talk about what I did with the die-cuts and embellishments.
1. Die cut the Leafy Thinlit out of Mixed Media cardstock.
2. Clip the Leafy die cut at the 5 cut lines (show here) to easily separate the panel into two distinct sides. Super easy to do and it gives a great effect.  They can both be used as I did or use just one!
3. Randomly add Uncharted Mariner Distress Embossing ink (using the Dabber) to the larger side of the Leafy die-cut, then heat emboss with Uncharted Mariner Embossing Glaze (the piece was added to the top of the tag using Collage Medium).
For the focal point, I used a Paper Doll from the Solos pack, 2 Baseboard pieces from Junk Drawer, flowers from Layers Botanical, and small toadstools and a red label from Field Notes Snippets.
Vintage lace and a button were added to her skirt.
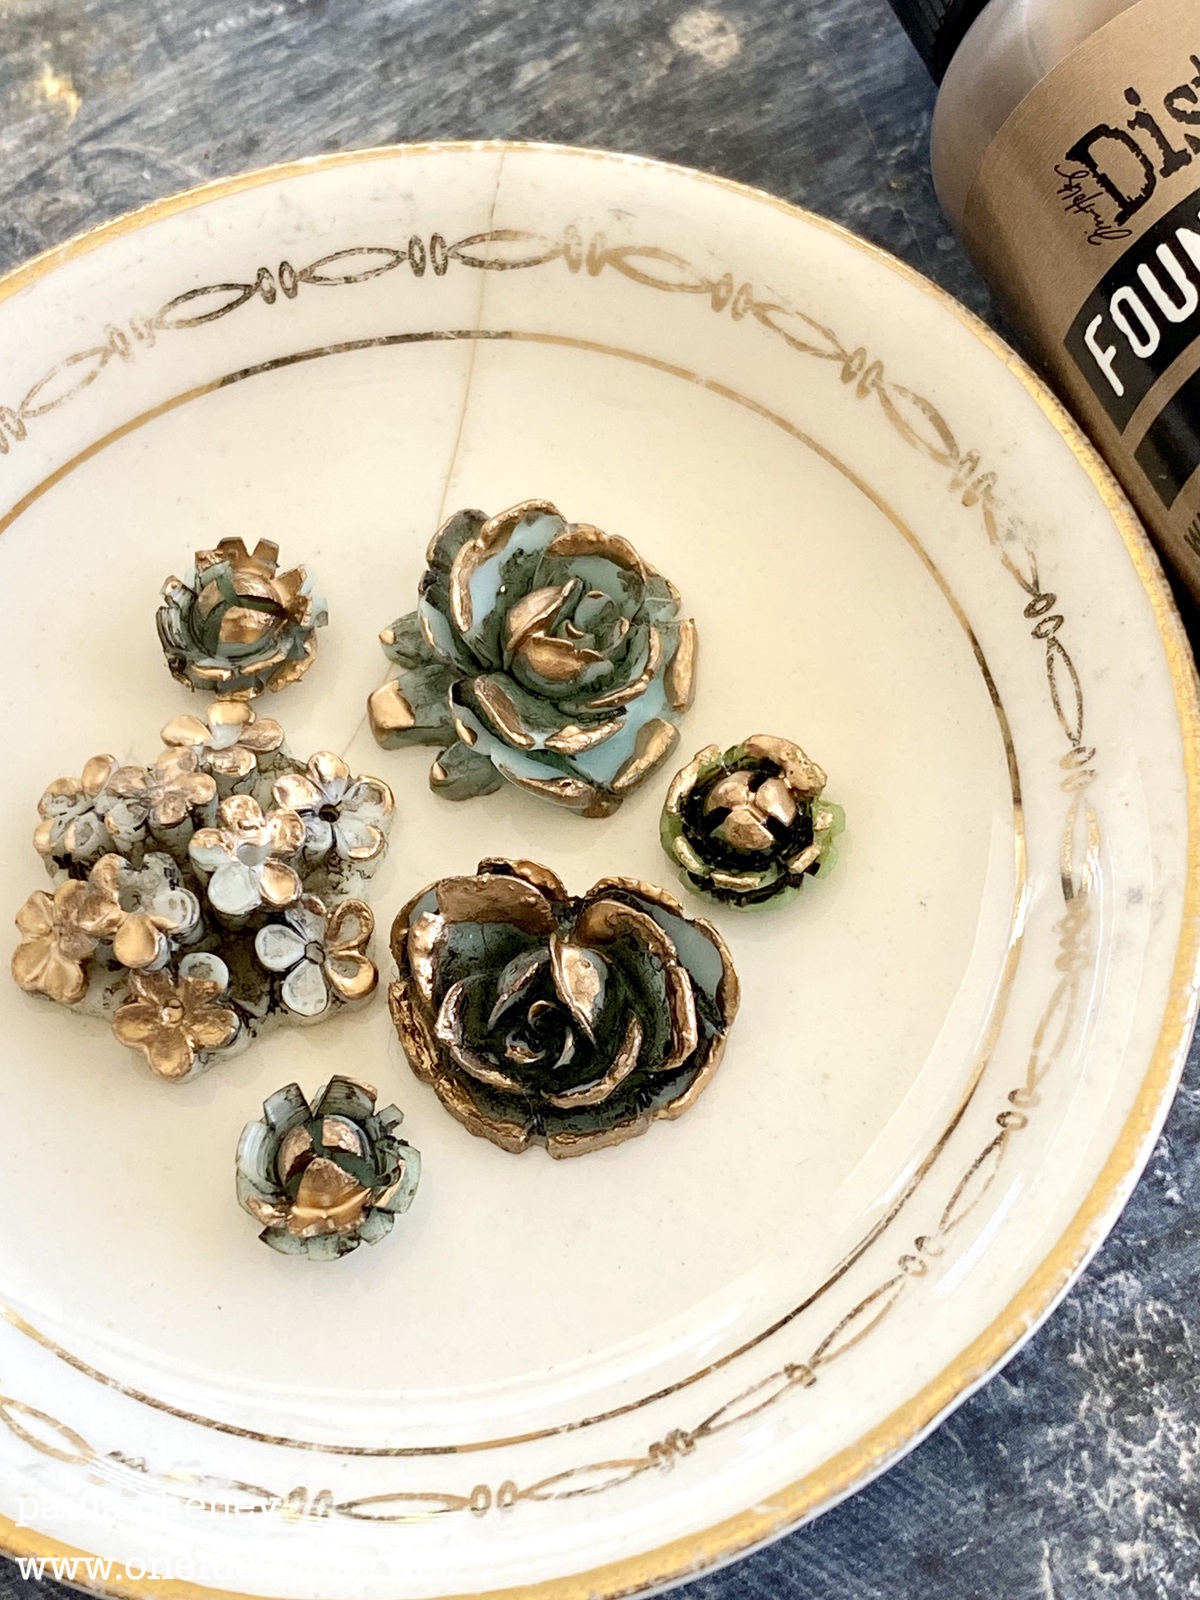
4. Fussy-cut small flowers - glue one directly to her dress and layer the second on top using THIN 3D foam squares by Scrapbook Adhesives.
5. Add shredded Mummy Cloth behind the Paper Doll.
6. Add toadstools to the end of the Baseboard piece for balance.
7. Adhere red label and stamp with date (Stampers Anonymous Eccentric stamp) in Ground Espresso Archival Ink (I masked off the rest of the stamp to only get May).
8. Emboss the second part of the Leafy die-cut with two layers of Embossing Glaze to give it a rich feeling.
9. Die-cut Sizzix Bold Text with Metallic Gold paper. 
NOTE: I cut two sets of letters with Sizzix Permanent Adhesive on the back, so I could combine to make thicker letters.   Also, remember to save the leftover die-cut negative to use for letter spacing.
10.  Use Collage medium to add a sentiment from the Clippings Sticker book.

I sure am happy with this new color. It is a color I have wanted for a long time!  I love how this turned out with Uncharted Mariner and the gold metallic words.   

I still have a few projects coming this week using the new color.  I'll be on the Ranger Projects page on Thursday the 23rd. That will be followed by the idea-ology Divided Drawer back here on my blog.
now carry on,
paula


Saturday, June 18, 2022

New Distress Color - Uncharted Mariner

 Hello Friends,

Exciting to be here today because that means the new Distress color has been released!  Uncharted Mariner is an exciting blue with a hidden deep turquoise color.  I say 'hidden' because the color in the bottle just does not do it justice!  So, so beautiful!

Today project was shown on Tim's YouTube Live - I will link the replay once it becomes available.  This project started as an experiment in color with the large piece on the right side.  I loved the way it turned out, so I went with it!  Then building the collage around it, consciously trying not to cover up the beautiful Uncharted mariner ink color!  Follow along and I will show you what I did to create the panel.

An idea-ology 9 x 9" wood Vignette Panel was used for the substrate.

1.  Cut a piece of Mixed Media cardstock the width of the Stampers Anonymous Bubbles stamp.
2.  Use Embossing Ink to stamp the image on the cardstock (keep the stamp near the top, leaving open space at the bottom 1/3 of the cardstock.
3. Pour Antique Linen Embossing Glaze over the top, slide excess back into the jar and emboss with an embossing gun.  TIP: I stamped about a 1/2" down from the top of the cardstock because I wanted the top to have open space like the bottom.  Once the embossing powder was on the stamped image, I used a small brush to sweep away some the embossing powder edge before actually embossing. This gave it an organic feel at the top rather than a hard stamped edge.
4. Once embossed and cooled, I pressed Uncharted Mariner Distress Ink + a small amount of Worn Lipstick and Gathered Twigs onto the craft mat. Spray ink with water and press the cardstock into the ink.  Dry, then press into ink again, repeating as many times as necessary.

FYI: Here is the Bubbles stamp.  It's big, so it's perfect for the space I wanted to cover.  If you compare to the project above, you can see exactly how the Bubbles stamped and were embossed before adding the Distress ink.


I filled in the left side of the panel with paper from the Backdrops 3 pack.
For the sides of the panel I decided to use the highly detailed Sizzix 3D folder, Intertwine + Ranger Metal Foil.  I only used the metal sheet which might be too thin for some (please read NOTE below for a compromise).
Once the foil was embossed, I painted it with Uncharted Mariner Distress Paint.
NOTE - I wanted a worn look for the metal, so that if there were small pieces were missing and you could see the wood panel underneath.  If that is not your jam, adhere the Metal Foil to the piece of cardstock, then put it in the folder and run it through the machine.
Next, I lightly sanded the surface.
Then pounced Mushroom Alcohol Ink over the top.  The Alcohol Ink might take away some of the paint so be careful with how you put it on.
I needed strips to add to the sides of the panel so I used my rotary cutter to do that.  You can get three strips per sheet with a little piece left over (save that for any patches).  You will need 6 strips plus a tiny piece and about a 1/2" long.
I added a thick layer of Collage Medium to the surface and then added each strip, butting them up against each other.  I folded the strip around the corners and just kept adding strips until covered.  Like I said is was short about 1/2" so I patched it with one of the leftover pieces that I had saved to the side.
So lets go through the building of the focal point.  I took step-outs so you can see the entire layering process.  If I used foam squares, I tried to add that to the photo so you would know.

1.  idea-ology Salvaged Tag sprayed with Uncharted Mariner Oxide Spray (eyelet and string added)
2. idea-ology Window Frame + Junk Drawer piece (fine pencils).  
3.  Black book board piece from idea-ology Junk Drawer + idea-ology Quote Chip (words) + Hardware Heads on each end.
4.   idea-ology Stencil Chip number one.  I added the "JUST" from the Metallic Sticker Book to make it read, "Just one" to go with the sentiment.  Two foam square used under the top portion of the stencil chip.
5.  Large Pocket Watch -still one of my favorite products in the line!  The watch is filled with vintage lace and pearls + Mini Flair (butterfly).  I did age the watch body with white paint, mushroom alcohol Ink and a Walnut Stain Distress Crayon.  The 354 sticker is from the Clippings Sticker Book.
5. I added a bingo chip to the back of the Pocket Watch to raise it up.  It needs the stability of the bingo chip rather than stacked foam squares.

7. Next is the large metal corner to the top right of the window.  I did rub some white paint over the to give contrast and a similarity to the Pocket Watch.  Set aside to dry while you work on the flowers.
Foundry wax is a favorite product from the Ranger Distress Line.
I picked Statue, but any of the 4 colors could be used.  I had more than one package of the Heirloom Flowers left over from a project, so I had enough to test to see what worked best.  
Here I dripped the wax (after shaking) onto the craft mat.  The wax is creamy when it drips out, but dries quickly, so work fast!  Here I used a small brush to add the wax to many colors of the flowers, then used an embossing gun to make the wax turn to a shiny metallic.  It only takes a few seconds to make the change.
In the end, I decided that for this project:
1. Use only use white & blue (possibly green) flowers
2. Drip a small amount of Mushroom Alcohol Ink (or better yet, brush it on) so the flowers have dark parts that make them look old. The brush really helps to get it where you want it. NOTE: Ranger sells Alcohol Ink brushes that have synthetic bristles specifically for use with Alcohol Ink.  Very easy clean up with Isopropyl  Alcohol.
3. Use my fingertip instead of a brush to add the wax.  I was able to dab it just where I wanted and also scrape my finger against the edges of the roses to add a thickness that I couldn't seem to do with the brush. I have never had any type of allergic reaction to touching the Foundry Wax, but you should make that decision for yourself since Ranger recommends using a brush.

For the Bouquet flowers, I sprayed 2 bunches of flowers with water, then with Uncharted Mariner Distress Stain, followed by Antique linen.  They will always look darker when wet so know that the color will fade a bit when dry.  I also have no patience so I dry mine with a heat tool, scrunching the flowers as I dry or right afterward.
The rest of my photos are of the finished project.  I added all flowers, + vintage tulle with Collage Medium.
The 1879 came from the Snippets pack.


Thank goodness the Pocket Watch covered up the angry girl in the background!


Uncharted Mariner makes a statement with the beautiful turquoise blue.  I love the contrast with the Antique Linen Glaze that almost appears as gold in the finished piece.  One of my favorite projects! 
There are two more project to come in the next week so stayed tuned for more Uncharted Mariner!

now carry on,
paula