Showing posts with label idea-ology. Show all posts

Tuesday, April 21, 2026

Make this Journey Your Own

Hello friends, 

Just a quick pop-in today to share a small project that reminded me of an important lesson: creating a collage doesn't have to be a mountain to climb. It can simply be a collection of things that tell a story.

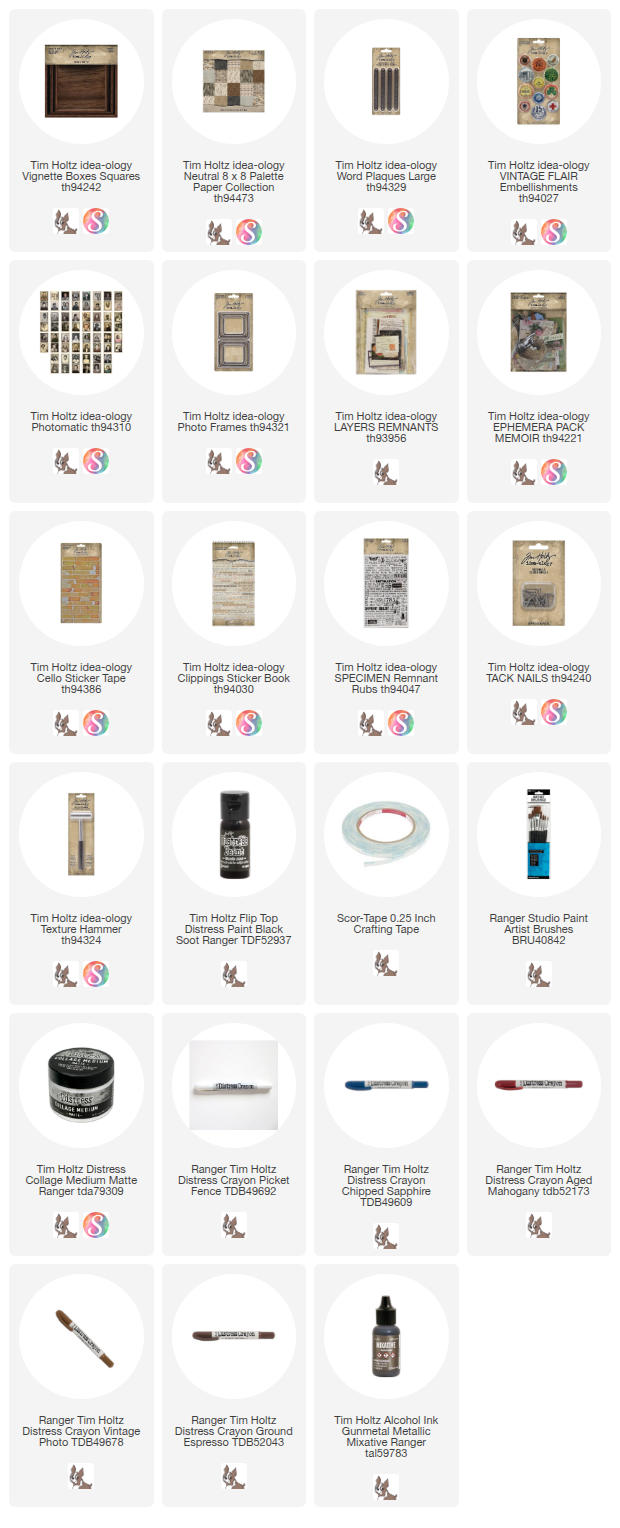
I gathered some favorite pieces from various idea-ology packs—like Vintage Flair, Layers Remnants, and Memoir Ephemera. It’s the little details, like a scrap of Cello Sticker Tape, a Remnant Rub, or a well-placed Clipping Sticker, that really finish the look. Sometimes we get so caught up in making a "masterpiece" that we forget the joy of just putting pieces together.

Paint the sides of the largest Square Vignette box with Black Soot Distress Paint. 
After the paint is dry, sand to smooth the painted surface then add a coat of Collage Medium to seal the paint and give the box a more finished appearance.
Cut a piece of Backdrop paper to fit the top of the square Vignette. If you are a sewer, use a ruler to mark a 1/4" line on the edge of the paper. Using the pencil line as a guide, stitch around the edges (I went around twice)
Tear, smoosh, roll, and bend the edges of the paper. I also inked the edges then spritzed with water to make the paper malleable. If you so use water, just dry it with a heat tool before adding the paper to the Vignette.
Make a ink puddle, then splatter the paper with ink. Once dry, it won't look as dark as it does when wet.
I added Scor-tape along the seam on the box so the paper edges will NOT be glued to the box and the black painted edges will be seen. I added Collage Medium to the center before adding the paper.

Once the paper is secure you can manipulate the edges of the paper as much as you want. I smashed and ripped it just a little bit more and it looked better. I do love the ink splatter on the paper - I think that helped bring the ink from the edges into the center.
Choose a Photomatic image from the pack. I chose this guy because I just loved his hat! 
I used Distress Crayon to tint the Photomatic. Vintage Photo for his jacket, Chipped Sapphire for the background, Aged Mahogany for his cheeks.
I added three layers of Gunmetal Mixative to the Photo Frame (drying in between). Once dry, I added Ground Espresso Distress Crayon to the metal frame and rubbed it in.
I also added a piece of Cello Sticker Tape and a rubbing from the Specimen Remnant Rub sheet. 
Use Picket Fence Distress Crayon to fill in the back ground of the Large Word Plaque. Rub with your thumbs to heat up the crayon so it melts into place in the background.
Gather the things you have created, along with a postcard from the Remnants Layers pack and a flair button from the Vintage Flair pack.
Create a collage with the pieces.
Use Tack Nails to secure the Large Word Band.
Add a Clippings sticker to the Photomatic.
And some string for texture
And some ephemera...really, anything goes.


Don’t feel pressured to create a Magnum Opus every time the creative bug strikes; sometimes, keeping it simple is the best way to play.

Now carry on,
paula

Tuesday, April 7, 2026

Do All the Good You Can

Hello friends,

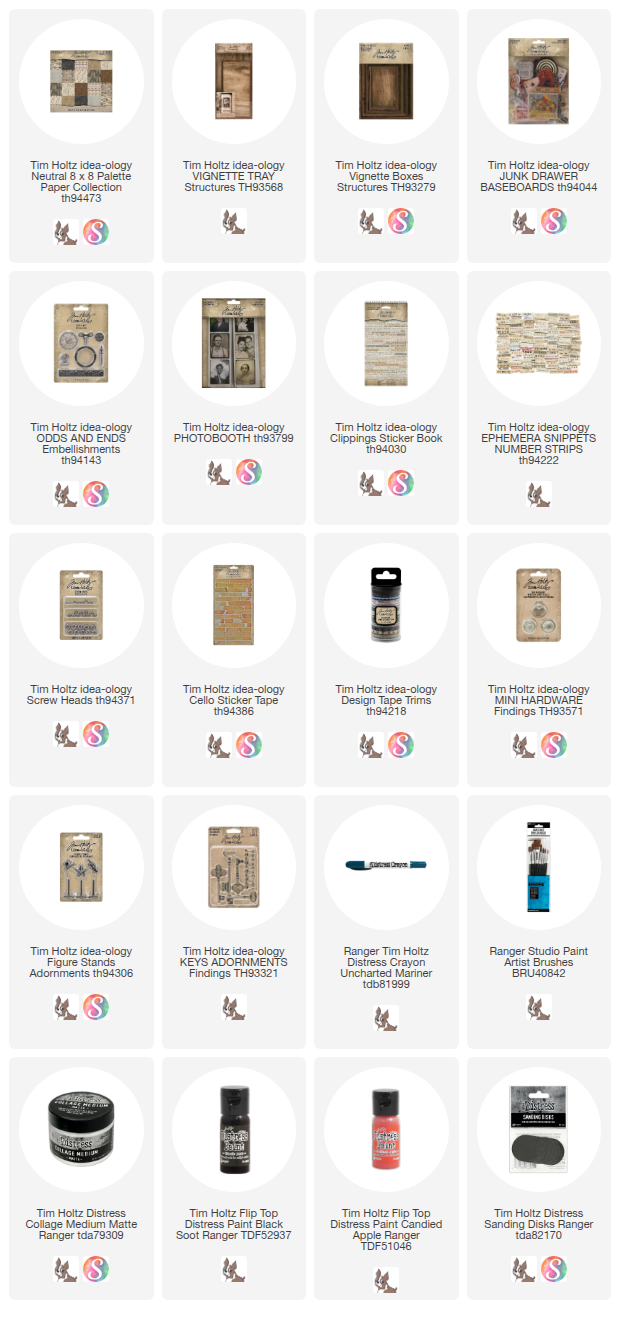
Stopping by with another Vignette project this week. I dug out an old SKU called Baseboard Junk Drawer for this one. I have always loved that SKU but only used pieces here and there over the years. Well today is different because I have use 7 pieces from the pack! Can you find them all before we get started?
Cover the small Vignette Tray with Palette Neutral Paper. This is one of my favorite packs because I truely love all the prints that come in the pack. I chose the Collage paper and the Map paper for the inside of the Tray. 
NOTE: the tape on the lip edge is from Design Tape Trims.
I chose the black gears paper for the sides and most of the back.
I created my own patchwork on the back to show off some of the other prints.
Once the Collage Medium over the paper was dry, I was able to add Walnut Stain Crayon over the seams between the paper inside the Tray.
I also painted two Vignette Boxes in Black Soot. At this point I wasn't sure how I would use them so I just painted the entire box. NOTE: these are the two smallest boxes from the Vignette Boxes pack.
Then sanded the edges with a Blending Tool with an added Sanding Disk.
So now that I have had some thinking time, I decided to add paper to the inside of the larger box and the "back" of the smaller box.
I used Collage Medium to glue the Vignette Boxes into the Tray. There are more way you could add them but this seemed like a good configuration for my purposes. Set aside to dry.
This little by will be my focal point. He is from the Photobooth pack.
I added the boy to a piece from the Baseboards Junk Drawer pack that fit nicely inside the larger box. A Clippings sticker was added to the bottom. 
Before I placed him in the Vignette Box, I added a bingo chip to the back so he sits forward in the box.
Now let me show you how I added all the other elements that make up this piece. There are SEVEN pieces from the Baseboards Junk Drawer pack (including the piece behind the boy). The others are: the elephant, the universal dominos, 65 tag, the black ruler piece, red star in a circle and the pencil case. 
I had the idea to have the elephant look as if he is turning the wheel with his head to raise the chain to bring the star up to him. I hope you can visualize it too!
Another pack that I used three pieces is: Odds and Ends. That includes the wheel, the porthole at the bottom and the metal Transfer Button on the Dominos Baseboard piece.
The 65 tag was added with Collage Medium then two Screw Heads were added to appear as if the tag is screwed into the box.
The strip of paper is from the snippets pack - Number Strips. I added some Cello Tape to the top of the strip.
The star is painted Candied Apple and is from the first Figure Stands pack. Again, the wheel that I painted bloc is from the Odds and Ends pack.
The bottom half is simple.
The jumble in the right corner is just that, a jumble. I cut the pencil case shorter so it would fit in the box. The key was just scribbled on with Distress Crayon and the string wrapped multiple times around the neck and tied in a bow. I glued the red star to the metal "porthole" that also had scribbled on with crayon. Then with decent amount of Collage Medium I piled everything together and just let it dry. Could not be any easier than that!
For the little boy I added the ruler at the back and some paper at the bottom for more interest. I might go back an add something else here, but for now I can't seem to thing of what. Maybe something from my vintage stash? I guess it's going to the be a work in progress.


Now Carry on,
paula
 

Friday, February 27, 2026

Bright Hopes

Hello Friends,

Hello everyone! I’m so happy to be here sharing a new Springtime make with you. It actually felt more like Summer on the Central Coast today—we hit a gorgeous 85 degrees!

Lately, I’ve been immersed in a nature-inspired project behind the scenes, and I just couldn't shake that organic vibe... probably because my desk was still covered in leftover bits and pieces. I decided to lean into it and ended up reaching for some windows I created last year. They didn't make the cut for my previous project, but the moment I slid them into place here, I knew they were perfect for creating this little nook. A quick touch of Alcohol Ink on the transparency was all it took to bring it all together. Let's get started so I can show you all the details!

Paper
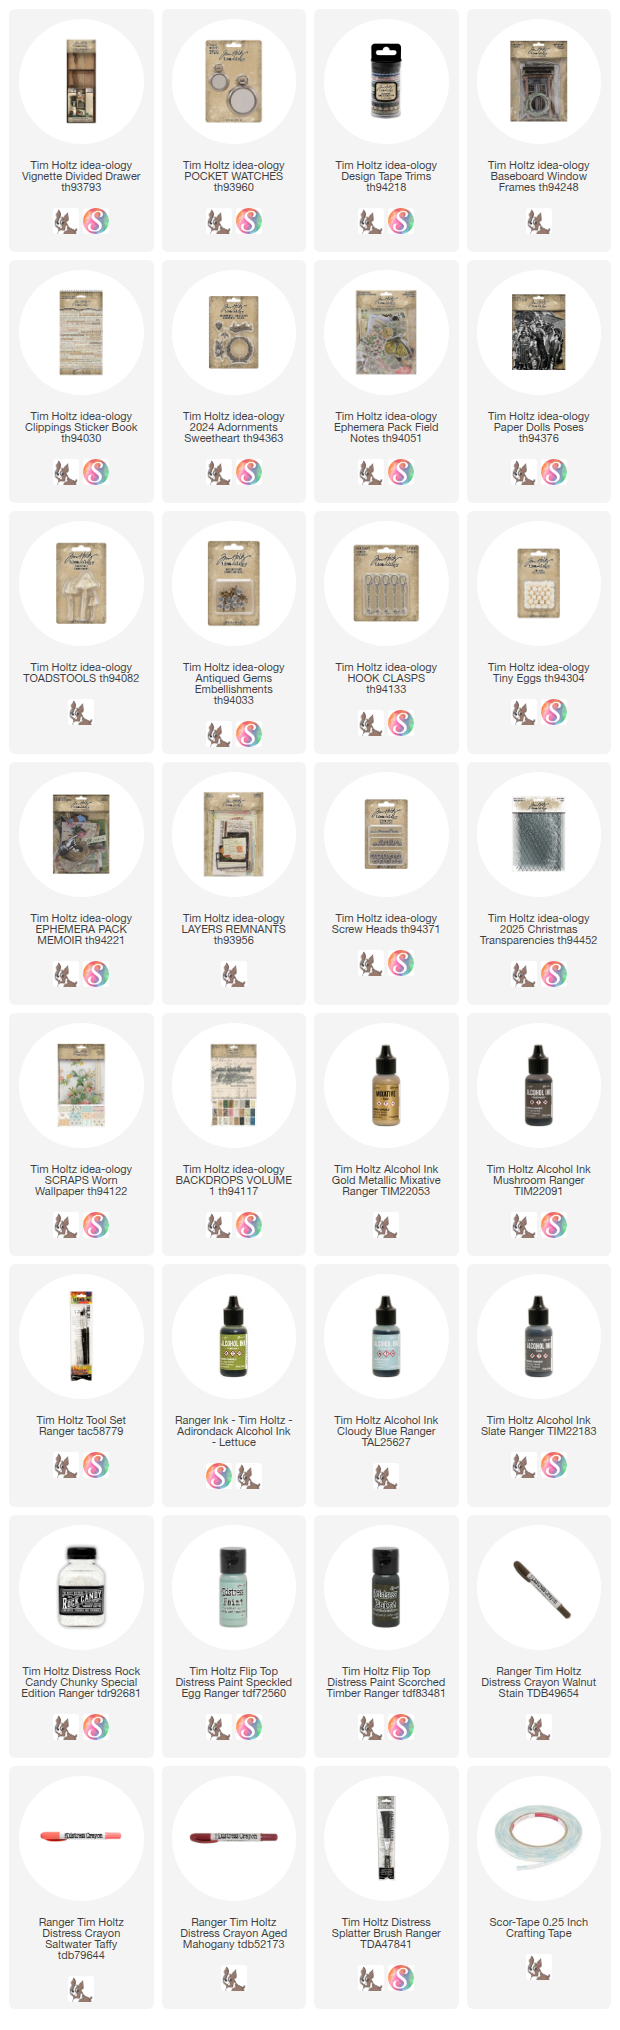
I always start with the paper. I suppose it doesn't really matter what paper you use, but I'll tell you about my choices. First, the green floral paper on the outside of the Vignette Drawer is a favorite from Backdrops 1 pack. I liked that it has a garden vibe! The paper on the inside is from the Worn Wallpaper Scraps pack. I picked it because it looks like wallpaper from someones house and that is the feel I want for the top compartment. 
Pocket Watch
Once the box was covered, I needed to make a hole for the eye screw. I used a poke tool to make a pilot hole about halfway back. I chose to make the hole a bit off center.
Making the pilot hole, makes adding the eye screw very easy. The eye screw came from the idea-ology Vignette Hardware pack.
Pocket Watch
I added Gold Mixative over the large Pocket Watch and a Hook Clasp. Once dry, I dripped Mushroom Alcohol Ink over the top and rubbed it around with a cotton swap. Love how it aged the gold.
NOTE: I did end up cutting off 4 links of chain (and reattaching the jump ring), to get the right length for this size box.  
Rock Candy
I colored Chunky Rock Candy Glitter with Slate Alcohol Ink. 
How To: Pour Chunky Rock Candy into a plastic/disposable tasting cup. Squeeze a few drops of Slate Alcohol Ink into the glitter and stir with a craft stick.  Pour out onto a paper plate or disposable paper to dry.
Add the Chunky Rock Candy to the back of the Pocket Watch before closing.
Red label - Field Notes Ephemera pack
Words - Clippings Stickers
+ Cello Tape Stickers
Windows
Window from Baseboard Window pack. Use a metal ruler and knife to cut in half.
Paint the Windows black - you can use Distress Paint or black craft paint.
Once dry, sand with steel wool to remove some of the paint.
Use a Walnut Stain Distress Crayon to scribble over the black paint - don't worry that it is covering all the areas that you just sanded away!
Spritz with water and use a wet wipe to pounce over the surface to remove a bit of the crayon.
Here is how they look when they are done. Aged wooden windows!
I wanted to take it a step further and add a transparency to the windows. NOTE: I took mine from a Baseboard pack I had, but you could also get them from the Christmas Transparencies pack.
I added Cloudy Blue and Lettuce Alcohol Ink to a few of the panes. It's easy to do. Just paint the Alcohol Ink on the back side using a brush made for use with Alcohol Ink (easily cleanable with isopropyl Alcohol).
Paper Dolls
I did a mix of colors for the lady's dress. I could have gone with blue tones but then decided I wanted her to stand out from the background.
I was trying to think of something for her to hold in her hand and I decided on some flowers. These were previously dyed with Antique Linen Spray Stain. I simply glued them to her hand with Collage Medium.
Eggs
The eggs were easy to color. I just put them in a small bag and squirted Speckled Egg paint into the bag and squished it around. Once coated, I dumped them out onto a silicone mat and let them dry. I came back about a hour later and added speckles with a Splatter Brush and some Scorched Timber paint.

Tiny Books
The last thing I did before assemblage was make three little books. The book covers came from the Memoir pack. I used this easy method:
1. Cut strips of old book paper the same width as the front of the cover. (1 1/8 or 1 1/4")
2. Fold paper back and fold (fan fold) until paper runs out. Repeat till you have enough to fill the book.
3. Even out the papers on one side. 
4. Use a Binder Clip to hold the opposite side.
5. Add hot glue to the open side and slip into the pre-scored book cover.
6. Ink with Gathered Twigs Distress Ink and a Blending Tool.
If you would like to watch a tutorial - Tim has one on YouTube. He made tiny books for Halloween 2025. If you click to the time stamps, there is a direct link at 1:38:50 minute mark. 
Finished Project Photos
The window frame was added like a folding screen. Because the Pocket Watch was hung a bit to the left, I needed to fit the window in accordingly. In person it is pronounced and looks good at this angle + it fills in the background since the Vignette Drawer is deep.
You can see that I not only hung the Pocket Watch, but I also added a tiny bird from the Sweetheart Pack + a Antiqued Gem. The camera has caught the light so it looks white, but it is a clear gem.
I added a 3/8" block to the back of the Paper Doll (Poses) so she can stand freely. I just added Collage Medium to the bottom of the block to glue her into place.
I covered the center shelf with an ephemera piece from Memoir Ephemera pack. There are two sizes - this is the smaller one. 
The bottom compartment is all about nature. I added the tiny books, then made a nest from a bit of wire, spanish moss and Collage Medium. It wasn't hard to do, but a bit messy as you need to keep squishing the spanish moss into the center to make the indentation for the eggs. I used a heat tool to dry the nest/glue so it sped the process along. Bits of natural colored moss were added once the nest was in place on top of the books. 
The Speckled Egg Toadstool (largest size) was added on the right, tucked up next to the edge of the books. Once that was in place, I added moss, eggs and another flower. Then in a last step, I added touches of Collage Medium then sprinkled additional Slate color Chunky Glitter. I love the bit of shine!
I also added Screw Heads to each end of the ruler
I hope you like this project as much as I do! I love the whimsical nature of the garden scene, the Toadstools growing wildly, and the lady sitting there calmly in the midst. All so fun!
I also hope that you never give up on something that didn't work out. I saved the windows for months, only to have them be the perfect backdrop for this project!

Now carry on,
paula