Wednesday, February 22, 2017

A Time of Wonder

Hi all!
Hope you have had a productive week!  It is still raining here in California (something we haven't said in a long time around here).  The hills are as green as they have ever been and our "drinking water" Lake Cachuma has risen from an all time low of 8% to 41.2% as of today.   Now I know this because my husband sends me (and a few other people who asked) a "lake totals" text every morning.  I admit it has been fun seeing the lake total go up this week!
(photo taken last week on Highway 166

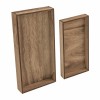
Well on to today's Plexiglass project.  This one really is limitless in what you can do.  I ordered 2 pieces of 8 x 10" plexiglass (ebay) then sandwiched the paper ephemera between the plexi.  I slipped the plexiglass into an Adjustable Easel to make a great home decor piece!
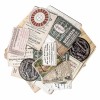
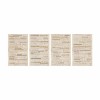
You can see I used Memoranda Paper Stash for the background piece then layered other ephemera from the Collector pack (blue receipt), Paper Dolls (people), the Botanical pack (flowers + corsage).  The corsage was larger piece and I just clipped off two of the flowers to make it fit on her coat lapel.
Tinting was done with Distress Markers, Faded Jeans, Victorian Velvet, Aged Mahogany and tiny bit of Fossilized Amber.  I love this Paper Doll image because she is so fun to tint...that plaid coat and the hat are my favorite!
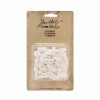
The Snippets pack (all tiny ephemera) included the 15 cents ephemera piece that I stapled to the top of the blue receipt (yes, I did add Crazing Medium).
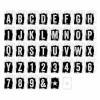
Clippings were used to add the number 175 by the feet and the saying, "a time of wonders" at the top.  Because I could not add actual depth to the paper elements (like foam squares), I tried my best to give it 'visual depth' by folding the blue receipt card then sanding and inking the lines to make it look like an old folded piece of paper.  I also ripped and bent the edges and sanded the flat parts.
The Transparent Tile number five was added to represent the boys age. 
Once my design was complete, I added it to the Plexiglass.  I used a self healing mat board (that I work on everyday to protect my desktop) to make sure the the paper was straight on the plexi, then added the top piece to sandwich the artwork. 
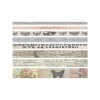
Once they are together - hold on tight so it does not move!  Then add the Design Tape of choice around the edge of the two pieces (it might seem hard but it was quite easy).  After the two pieces were secure, I used the Blending Tool and Walnut Stain Distress Ink to age the tape.
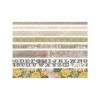
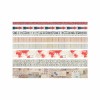
Just a little side note on Design Tape...I got a few emails about how I store it.  I am currently using a plastic case I purchased at Michaels called a 'Divided Storage Bin' that has a flip-top lid. The case allows for removal of the plastic dividers which create the absolutely perfect space for each of the Design Tape sets (each set has 7 different tapes).  I also used a label maker to add the names so I could keep track of what I use the most.
 
Well I sure hope you take a chance with today's project.  Its an easy one and better yet, when you get tired of something you made, the tape can be easily removed and the artwork changed out.  The Adjustable Frame is perfect for display and making your artwork seem much more 'elevated' shall we say? (no pun intended, lol).
Now carry on,
paula 


Friday, February 10, 2017

A Stitch in Time

Rain, rain....lots of rain coming down here in California.  It has been a loooong time since we have had such a rainy February! The rain is welcome due to the long drought that has had some lasting effects on our beautiful state.  It's a nice change to see vibrant green hills in our valley...I feel like I've moved to New Zealand, except no one has the great accent!
I am sharing an easy project today made from a new Vignette Tray.  This is a large tray (6 x 12") that has been painted with Weathered Wood Distress Paint to match the Memoranda Paper that was used in the background.  What's unique about the tray is that I used a piece of plexiglass to cover the front, thereby enclosing it.  I found there are many places on Ebay that have pre-cut pieces of 1/8" thick plexi and one of them was exactly the size of the tray.  So for about $1.50 + shipping I was able to get a precut piece and I didn't even have to leave my house except to walk to the mailbox.
I started with the Typography letters since that would determine the spacing for the Pocket Watch to hang.  There are 73 pieces in the pack including multiple vowels (plus numbers and stars).  I can't even tell you how much I love this alphabet!  They look just like chalk letters that were used in old signs, but these don't break!
The letters were added to the tray with Collage Medium.  I'm going to tell you that stuff is like cement once it's dry!  I tried to remove one after the glue had dried (on another piece I was making) and it would not budge!

I created the Pocket Watch using scraps of fabric, a vintage button, string and a tatting.  The words and number came from the the Clippings Sticker sheet.
I used an idea-ology Eye Screw and chain to hang the Pocket Watch.  I did secure the watch with a foam square.
Once I was ready to close up the box, I filled it with all kinds of sewing junk: buttons, thimble, sewing needles, thread...really anything I could think of that related to sewing. 
The Box Corners had been prepared the day before by rubbing Weathered Wood Distress Paint over the metal and letting it dry.  Once the paint was dry, I added the brads (also painted) and glued them in place with Collage Medium on the underside.  Then I let them dry overnight. 
The finished Box Corners were added to the Tray with E6000.
Hope you like today's "plexi" project.  I've got one more to share with you next week...so hold that thought.

Now carry on,
paula


Friday, February 3, 2017

A Trio of Boxes

Hi all!  I am sharing my second project using Vignette Boxes - but with a very different take than my last post.  This time I turned the boxes over and used the back side to create a Home Decor piece. Since each Vignette Box is a hard surface, it's easy to cover and (my favorite part) you can use tack nails to add things like a Hinge Clip and a Mini Pocket Watch.
This trio of boxes was enhanced using the new Vignette Finial Set (two sets are needed to complete the trio).   The largest set was used with the largest Vignette Box and the smaller finials were used with the remaining two boxes.
Each set was painted with Weathered Wood Distress paint (2 coats).  Once dry, I sanded off a bit of paint then added Crazing Medium over the top.  Once that was dry, I added Distress Ink with my Blending Tool then sprayed it with water so the ink would run into the cracks that were creating with the Crazing Medium.
When the Finial sets were to my liking, I adhered them to the finished pieces with Collage Medium and let them dry over night.
Memoranda paper was adhered to each of the Vignette Boxes with Collage Medium, then a layer of Crazing was added over the top of the paper.  Once the Crazing was dry, I added Walnut Stain Distress Ink and a bit of water to fill in the Crazing cracks. 
Design Tape Rose and Postal, Clippings, and Ephemera Snippets were added to each box.  The Snippets are super tiny pieces of Ephemera (so useful in tight spaces).
Ephemera - Snippets

Design Tape -  ROSE

 Design Tape - Postal
On the smallest one, I added a Mini Pocket Watch (without the back) and a tiny butterfly from the Snippets pack.  The number and the words come from the Clippings Sticker sheet.
Well, I hope this weeks Vignette Box posts have given you a reason to try them if you have been putting it off.  I think we have just scratched the surface of what can be done with the boxes - so here's to new ideas and definitely more creativity! 
Have a great weekend!
Now carry on,
paula