I posted this picture on Facebook a couple weeks ago. This is my husband cutting 1200 grungeboard letters with the Vagabond machine. He had a whole system worked out that included his portable garage work table, a bin of pre-painted grungeboard, and a golf match on the TV. Gotta love him...he made it through, then moved on to 275 leaves and another 275 postage stamp frames. He is a keeper.
Enough about what I have been doing as of late...
Lets get started making an easy card today. I couldn't decide what colors, so I made two #8 colored tags using Distress Stain and water technique.
First up the warm group - ripe persimmon, milled lavender, and squeezed lemonade
yum.
Next up - mustard seed, peacock feathers, seedless preserves
wow, that came out brighter than I thought it would...but I like it.
I'm going to use the Sizzix Writing Desk Bigz die - that feather was calling my name!
The feather runs diagonal across the die so my tag needed to run that way. I just laid the tag on the die and clipped the corners so it would run through the Vagabond machine. Easy solution.
It's hard to see the lavender color on screen but it is a great contrast to the orange and yellow. Love the green too. I think I will go with this one today and save the orange for another day next week.
I glued some Core'dinations Kraft core cardstock to a piece of chipboard and cut out the ink bottle with the same die. Use the sanding grip to sand away some of the black to reveal the kraft color underneath.
Next I cut a piece of cardstock for the center of my card. I painted it with Bundled Sage distress paint.
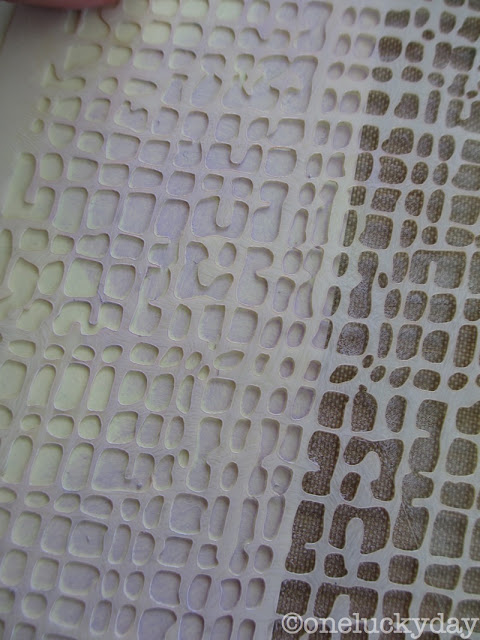
Before letting go of the stencil, I used the tip of my finger to rub over the stencil...basically wiping away the color from the middle of the burlap....
And transforming the burlap texture, into "faux croc". My, oh my, I love this look. Can't wait to try it with darker colors.
Once dry, I stitched the cardstock piece to the card front. I used a standard size 14 needle (sharp not ballpoint) for the stitching.
I used Archival Ink - Watering Can (grey) and the Tall Text stamp set to add a message. As you can see, I use the lines on the mat board and a ruler to keep my text straight. Once I have the top line done, I use the bottom of the stamped text as a visual line for the second row.
I added the stamped label from the Mini Halloween 3 set (Aquamarine Archival ink). And there you have it...super simple! Still love that feather!
So I am now off to Inspiration Unlimited! I have a tutorial coming up on Sunday over at Simon Says Stamp as part of STAMPtember...I will send out a reminder post so you don't miss it. Then I will be back next week using that orange feather I made. I that that one is going on a layout I have in mind.
carry on,
paula


Interesting technique...gonna have to bookmark or pin that one! Thanks Paula!!
ReplyDeleteCool! Have a fun weekend Love your husband helping out.
ReplyDeleteThat is so absolutely gorgeous!!!
ReplyDeleteJust love the Writing Desk Bigz die....and your husband, too. Aren't we both so lucky we have such 'keepers'.
ReplyDeleteHi Paula! in front of all your work I am always amazed, they are absolutely perfect, funny, absolutely balanced and also imaginative! You are really an amazing creative mind full of feeling! Barbarayaya
ReplyDeletej'adore les techniques, un très beau rendu!
ReplyDeleteNeat card! Like the two layers of color combos! :)
ReplyDeleteWhat a cool Thank You! So different, using the feather as an old fashioned pen.
ReplyDeleteI didn't realize the beauty of that burlap stencil until seeing it like this! Thank you for the technique. Beautiful feather, too.
ReplyDeleteoh my..the feather..i need that! love the colors you combined!
ReplyDeleteHi Paula, Love the croc and thanks for even telling us what needle you used to sew it with. I need all the help from you I can get! Enjoy your Inspiration Unlimited time.
ReplyDeleteP.S forgot to give your husband a pat on the back for all his work. He gets to watch his football and be a star too.
ReplyDeleteCute card Paula! Have fun at Inspiration Unlimited!
ReplyDeleteWonderful card, I love that stencil. Can't wait to hear all about your news in the coming year.
ReplyDeleteAwesome card! Love that feather.
ReplyDeleteLove your work....and you are right...that hubby is a keeper!
ReplyDeleteThat stencil reminded me of faux croc too, and I used it last week to make a croc luggage look for some Italy projects! Love how you think...LOL! That feather is too cool!
ReplyDeleteLove the card and tell your hubby he ROCKS!
ReplyDelete