Showing posts with label tag book. Show all posts

Wednesday, January 8, 2025

Palette Red

Hello friends and WELCOME to a new year on One Lucky Day blog!

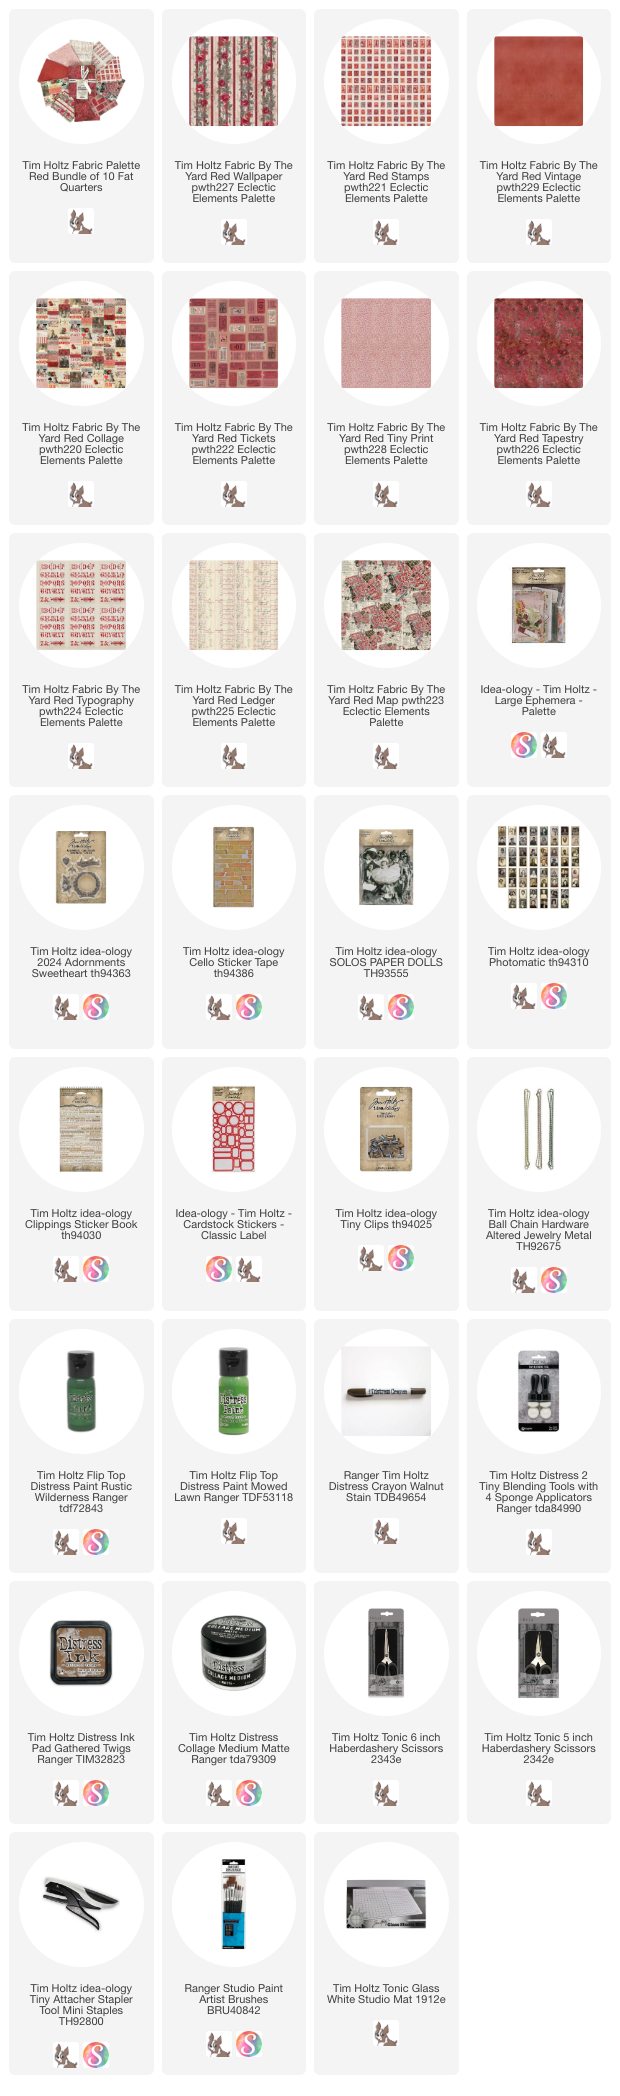
Today I'm talking all about Eclectic Elements Palette - specifically Red, that was released at the end of 2024. It is the second of the 12 colors to be released this year.
Today I'm sharing a tag book all around the idea of LOVE! Perfect for the red fabrics!
I used the red Palette fabric as the background, along with some essentials from idea-ology, like Clippings, Palette Ephemera, and Paper Dolls. 
Lets get Started!
I started with five #8 tags. I sprayed the tags with Antique Linen Spray Stain, then wiped them with a paper towel to get rid of the spray pattern. I like to repeat this step, then dry with a heat tool.
There are 10 red Palette fabrics. They are varying shades of red, but they work together seamlessly. I've listed the names from left to right so you can match up the pattern with each name. I think the one with the roses called Wallpaper is my favorite, but Stamps and Collage are favorites too. Together or separate they are all beautiful!
Tapestry
Vintage
Typography
Map
Wallpaper
Ledger
Stamps
Tickets
Tiny Print
Collage
Start by cutting 5 fabrics for the backgrounds. I intend to sew these pieces to the tags so I added a whisper of Collage Medium to each tag before adding the fabric. NOTE: I did not add Collage Medium out to the edge so my needle would stay clean as I sewed around the outside.
*you could do this entire project with just glue. If you do, just ignore my sewing and use Collage Medium instead. 
Okay, all tag backgrounds are sewn into place. I used my very sharp 5" Tonic Haberdashery Scissors to clip the threads.
Once I had the background's in place, I just started gathering all things red. I may or may not used what is pictured, but the fact that it's on the desk out in front of you, gives you choices.
All ephemera came from the Palette Ephemera pack.
Metals are from the Adornments Sweetheart pack.
I used both Paper Dolls (Solos) and Photomatic.
I also repeated the use of Clippings and Cello Tape Stickers for continuity.
You may have different things in your stash than I do, so your pile might look very different than mine, but it does not matter. Just gather what you have, then see where it might be used. And remember, you do not have to use it all.

TIPS:
Inking and Fraying
I found that by using the Tiny Blending Tools to ink randomly around the edges of the tag that I could easily fray the edges of the fabric as I inked. I purposefully used an old ink pad that is not very dark.
Patches
I used the Stamps fabric as individuals rather than using a whole strip of fabric. The "Handle with Care" patch came from the Collage Fabric. Again, all were glued on with a bit of Collage Medium, dried with a heat tool, then sewn into place.
Metals
There are 5 Sweetheart Adornments in the pack, so I used one on each tag. Some I painted with Distress Paint, like the flower (Candied Apple and Rustic Wilderness) and  the word Sweetheart (picket fence).
The wreath is a combination of Rustic Wilderness and Mowed Lawn, with Walnut Stain Crayon added after the paint was dry.
Now just start adding what you have gathered! I worked on a couple tags at a time so if paint was drying, I could be working on something else. 
I used thin foam squares under all Paper Dolls except for the girl with the Teddy Bear. That one needed regular 3D squares to bridge the thick metal wreath behind her.
Each tag used similar products but they look different when they are shown all together.
I bundled them with a piece of Tim Holtz Ball Chain so I could add more. It would be wonderful to have a set of tags made with one tag per color! Maybe I'll have to think about that!
Tag 1:
Tapestry + Stamps fabric
Palette Ephemera
Sweetheart Adornments + Picket Fence Distress Paint
Photomatic + cotton batting
Tiny Clip
Cello Tape Stickers
Clipping Sticker Book
Tag 2:
Tiny Print + Ticket fabric
Paper Dolls 
Distress Crayons to color Paper Dolls (Walnut Stain, Aged Mahogany and Uncharted Mariner)
Sweetheart Adornments + Candied Apple and Rustic Wilderness Distress Paint + Walnut Stain Crayon
Cello Tape Stickers
Clipping Sticker Book
Tiny Attacher
Vintage pearl for center of flower
Tag 3:
Wallpaper + Stamps fabric
Palette Ephemera (including red heart cut from a playing card)
Sweetheart Adornments
Photomatic
Cello Tape Stickers
Clipping Sticker Book
Tiny Attacher
string
Tag 4:
Collage fabric
Palette Ephemera (ephemera ripped for bottom edge)
Sweetheart Adornments + red sewing thread and needle
Paper Dolls
Distress Crayons to color Paper Dolls (Chipped Sapphire, Aged Mahogany and Mowed Lawn)
Cello Tape Stickers
Clipping Sticker Book
Classic Labels
Tiny Attacher
Tag 5:
Ledger + Stamps + Collage fabric
Sweetheart Adornments + Rustic Wilderness and Mowed Lawn Distress Paint + Walnut Stain Crayon
Paper Dolls
Distress Crayons to color Paper Doll (Uncharted Mariner + Aged Mahogany)
Cello Tape Stickers
Clipping Sticker Book
Vintage lace
*tiny gold heart was cut using the Sizzix Sidekick Side-Order "Love Notes" + Metallic Kraft Stock
I am super HAPPY with how these turned out. I love using the fabric mixed with idea-ology because of the texture the fabric bring to each tag. The long strings and the frayed edges really make them fun. 

I'm excited to see what comes next when I start working on orange (the next Palette color)!
now carry on,
paula

Tuesday, March 1, 2022

"Just Hold On" with Saltwater Taffy

Hello Friends,

Happy to be here today to begin sharing the first of three projects I created for the new Distress Color.  This is a color I have been waiting for all year!  I knew this color was missing from the palette of Distress and I am so happy it is here to fill the void!  If you missed Tim's reveal of the new color, you can watch it HERE (swatches, samples and all).

Saltwater Taffy


Lets get started with the project for today!
Start by coloring at least five #8 tags.  I always like to color a few extra so I have a choice when putting the tags together.  The extra can always be stashed away for later. 
I use the Ranger Distress Heavystock tags that hold up to most wet mediums like ink and glue.  My colors of choice today are Salvaged Patina, Saltwater Taffy and Fossilized Amber but many combinations will work for the tags.  I have to say, this combination is one of my absolute favorites.
Once you have your tags colored and they are dry to the touch, put them in order as they will appear in the book. Then one by one, stamp and emboss the tags using the Floral Outline Stamp.  You only need small portions of the stamp (any of the three in the set will work).  The Saltwater Taffy Embossing Glaze looks mighty orange in the jar but as you can see, it's perfect once melted on the tags.
Once you have the embossing done it's time to sew the tags together.  I added a 1" strip of paper on the backside to keep the tags together before sewing (make sure you leave a bit of room so the tags can fold up).  Once tags are secure, sew down both sides.  Repeat, combining all five tags in one long strip.
NOTE: My sewing machine sews great on the top, but the back always looks terrible (need to have my machine serviced) so I know full well that I will be covering the sewing on the back with linen tape.  I'll show that part a little bit later.
Next, I cut and scored two pieces of Mixed Media Heavystock - you can make these any size you wish and they do not have to be even (meaning the fold does not have to be in the center).  Once cut, I stamped the Ornate background stamp using Saltwater Taffy Oxide Ink and let it dry completely.  
I stitched the edges of the insert, then stitched the insert directly into the seam (if you are a sewer, "stitch in the ditch" is the correct term).  I made two inserts, stitching them between tags 2-3 and tags 4-5.  If you are confused where to stitch the inserts in, fold your book up and the book will let you know, since they have to be sewn in the "valley" not the "mountain".
So here you go.  There is the paper strip (on the left) I used to connect the tags - bad stitching and all.  The Linen Tape on the right, wide enough to cover the paper and the stitching, giving me a cleaned up back as well as supporting the fold.
Once you have all your tags together, you can add any embellishments or words you wish.  You can use family photos or Paper Dolls like I did.  Ephemera, letters, numbers, Remnant Rubs, stickers, really anything!  
To keep the tag book closed, I wrapped rust colored idea-ology Velvet Ribbon around the book.  Here is the trick to making the knot smaller when using thick ribbon:
  1. Wrap ribbon around book so that it overlaps about 1".  Cut ribbon.
  2. Use a small amount of hot glue to connect the overlapped ribbon.  You should have created a "band" that slips off and on the book with ease.
  3. Cut another piece of ribbon about 3" long.
  4. Slip the 3" piece under the band and tie a knot.  Trim ends.
And there you have it.  You get a smaller knot that is easy to control.
I sewed the outside edge of the front and back tags so it matched the rest in the series.  
Create small collages with Worn Wallpaper cut out flowers (they come pre-cut in the package), ephemera and a photobooth photo.  I used a POSCA paint pent to add details to all the people.  Here, I added a pearl necklace.
Worn Wallpaper was added to the insert.  A piece of ephemera was folded over a stapled on).
Inside the insert I started a phrase that will continue onto other pages.  
I used 1/4" Scor-tape to keep the letters in place, then pressed them onto the insert.  You can sew across the top like I did or leave them as is.
Back of the insert.
Ephemera + Worn Wallpaper floral
Notice the pen work on her dress?  I love adding details like this.  A pink Classic Label makes a great halo.
I wasn't sure how to connect the ampersand and the word Grace, so I hand-cut a large flower from Worn Wallpaper and added it under the ampersand and over the word Grace. That gave the two things connectivity, so the ampersand didn't look as if it was just floating around on the tag.

For the second insert, I added more Worn Wallpaper (greens and blues) and another photobooth photo. BTW: all the seam binding/rayon ribbon was white and I have sprayed it with Saltwater Taffy!
I found this saying in the Clippings Sticker book so I felt she needed a crown on her head.  I cut this one using the Metallic Kraft-Stock from idea-ology.
This is something that I did BEFORE I ever sewed the insert into the book.  I used the new Bold Text 1 Thinlit die to cut a sentiment into the page.  I did add a piece of vellum over the back to obscure the view of the final tag.  Worn Wallpaper was added to the top of the page, combining the wallpaper sheets with a cut piece.
Here is a view of the back of the book once I finished adding all the Linen Tape strips.  You can see where I stitched the Mini Marque words to the pages and I'm fine with that!
I have made MANY tags books over the years and I will continue to make more because I just love them.  They are easy, forgiving, and can become almost anything you want them to be.  I think it was the perfect way to show off the new Distress color, Saltwater Taffy!  Don't you?

now carry on,
paula

Tuesday, May 18, 2021

Vintage Ring Book for Simon Says Stamp

Hello Friends,

I am happy to report that today I am sharing a tutorial over on the Simon Says Stamp blog!  I created a Ring Book with Distress Mixed Media Heavystock cards, Worn Wallpaper Scraps and Paper Dolls.  I hope you will follow the LINK to the Simon Says Blog, to see the easy to steps to create this cute book.  Truth be told, I've also spelled out lots of tips and tricks about working with Distress Crayons.  Hope you will stop by.

now carry on,
paula


Friday, May 1, 2020

In My Heart of Hearts Tag Book

Hello friends,

Tim and I were having a conversation this week about an often asked question he gets, "what do I do with the tags I make?"  So I guess that was still in my mind when I decided to make a tag book, since really any background will work for this project. Follow along and I'll show you all the layers.
I chose five #8 Distress Heavystock Tags for the book but you could use as many as you like.  The Heavystock tags are made for holding up under multiple wet mediums.  They are by far my favorite tags for this kind of project where you want something that can take the inking, stamping, paste, and glue.
I placed all the tags next to each other and sprayed Antique Linen Distress Stain.  I quickly rubbed the excess away with a paper towel, because I wanted all-over color instead of the speckles the spray makes.  Once the tags were dry, I sprayed them with Bundled Sage, Iced Spruce, and just some small drops of Tumbled Glass. Let dry completely before moving onto the next step.
I chose two stamp sets, Flower Shop and Baroque, to stamps images using Archival Ink in Faded Jeans and Ground Espresso. It's important to use a permanent ink like Archival to maintain the stamped image.
Next step...Crackle Texture Paste using a palette knife and three different Layering Stencils: Mosaic, Digits, and Plus.
Once the Crackle Texture Paste is dry (about 30 minutes), use the Ink Blending Tool to add Walnut Stain Distress ink to the edges of each tag.  Then take the ink pad and rub directly over the raised surface of the texture paste.  If you get a bit on the background that's okay!
 It should look something like this when you are done.
Now take your Collage Brush and brush Collage Medium over the surface.  The wet medium will let the ink seep into the cracks in the paste and make the tag nice and sturdy when dry.  By added the Collage Medium it will also allow us to use Distress Crayons if you want to add more color over the Texture Paste.
 This is just a comparison between a tag with no ink and with ink/collage medium.
Next were going to add Fabric Tape to the backside to combine the tags into one long strip.  I left a VERY small break in the tags so they would fold easier.
 Done.
EMBELLISHMENTS
So I folded up my tag book and determined that I wanted at least 3 collages inside.  I chose three Photobooth pictures, one for each collage.
I used Distress Crayons to color each Photobooth then set them aside to gather the rest of the embellishments.
I thought I might use a few tickets from the new Ticket Book.  These tickets are perforated so you just rip out what you need.  I keep the leftovers (that I don't use this time) in a small plastic photo bin.
We've got tickets and photos so far, so let's add some flowers from Botanical Layers.  I picked a few flowers and a butterfly.  The butterfly was only black and white from the package so I colored it with Distress Crayons to give it some life.  All four pieces have Antique Linen Embossing Glaze added over the surface to add a vintage feel.

I gathered a few more things to use in the collages.  Stitched Scraps, Field Notes Snippets (much small than the regular Field Notes Ephemera), Clipping Stickers, some cheesecloth and vintage buttons.  Again, still guessing at this point what I will end up using.
Before I started the inside, I decided to sew along the edges of each tag to add texture/strings and secure the Fabric tape.  The tape is very sticky, but since I am going to be folding and unfolding I thought it might be a good idea.  I left all the sewing threads long - i'll trim them later if needed but I really like them long!
I found a skinny ribbon in my stash and tied up the book - leaving room for adding stuff inside!
I untied the bow and held on tightly as I stitched the ribbon to the front tag!
With that done, I'm ready to start the collages.
Collage Number One:  Everything is here...tickets, flowers, ephemera snippets, cheesecloth, only added the Tiny Clip (my favorite little addition).
Collage Number Two:  same M.O. + vintage button.
Collage Number Three: Hard to see the Stitched Scrap in the bottom left of the collage, but it's there.
Please click on the photo to see the entire tag book.
I just love the mix of materials, from the stamping to the Crackle Texture Paste...it just all works together!  I could see this book being much longer than it is because the tags are so fun the make.  This is definitely one of those "use up your scraps" kinda project because anything goes.

Thanks for stopping by!  
Now carry on,
paula