
With the introduction of the New Large 3D Texture Fades from Tim Holtz and Sizzix, I knew it was time to get to work to see what all the hullabaloo was about! The new size is awesome - something I have dreamed of for a long time. It opens so many possibilities for larger projects or more than one card front from one pass. Today I used a 6 x 8 1/2" Etcetera Panel and it fits perfectly!

Foundry
Botanical
Lumber
Typewriter
Entangled

*Please note that an A5 Cutting Pad is required for use with these large-format embossing folders so the machine can grab onto the cutting pad.

Paint the entire surface with Salvaged Patina Distress Paint.


Step 1: Paint windows with Salvaged Patina Distress Paint.
 Step 2: Once dry, paint with Black Soot Distress Paint
 Step 3: Once dry, sand with a sanding block to reveal the color under the black.
 Step 4: Scribble heavily with a Walnut Stain Crayon so the window is totally covered. Rub with your fingertip to smooth it out, then pounce over the top with a wet wipe to reveal the colors underneath.
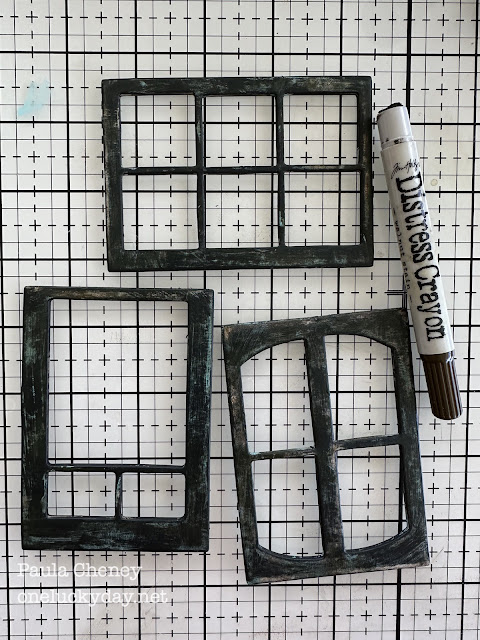 This shot might be better to show the finished result. A little Salvaged Patina showing through the black paint and a little brown crayon to soften the black.
 Use a combination of 3D Foam Squares and THIN 3D Foam Squares + Collage Medium to adhere the windows to the panel.
 For a centerpiece, I chose a large butterfly from the Transparent Things pack. I turned it over and pounced Gold Mixative on the BACK to create the metallic gold border around the butterfly.
 I also sprayed Salvaged Patina Distress Spritz over the butterfly. Distress Spritz will dry on plastic (and other slick surfaces) unlike most Distress products (like Spray Stain or ink). I did use a heat tool to dry the Spritz, I just kept the tool at a distance so the butterfly would not melt. The transparencies are tough!
 Once the Distress Spritz was dry, I used 3D Foam Squares to add the butterfly to the panel.
 I added Screw Heads to the corners of the windows, then worked on the gears. You could add as many or just a few. Totally up to your taste. I focused on adding Long Fasteners and Mini Fasteners to a few Mini Gears and Sprocket Gears. Then just moved them around till I got the configuration I liked. NOTE: The solid gear that looks like the sun is from the Sprocket Gears pack...the rest are from the Mini Gears pack.
 Again, here is the same combination of gears on the left side of the panel. You can see where I have pounded the Long Fastener in the center of the Sprocket Gear with my Texture Hammer. I love that the pebbled side of the Texture Hammer will smash a Long Fastener like this! I also sanded the edges of the Sprocket Gear so the gold came through on the edges of the sunburst.
 I chose a quote from the Quote Chip Labels and added it to the Label frame. Then it was adhered to the window frame with Collage Medium. I also added a string bow on the left side with Collage Medium.


And that's a wrap!

Now carry on,
paula


Tim hosted a Live all about the new folders. The techniques he shares are quite amazing so if you missed the live I would suggest watching it now. It is absolutely inspiring!! Here is the link to his BLOG.
paula
I absolutely love this, Paula!!!!
ReplyDeleteLove this thank you for such great instructions and inspiration x
ReplyDelete