HI everyone! I am here today with my tutorial for the Tim Holtz Media Team.
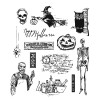
You knew Halloween could not pass by without using THIS group of kids in a Halloween project, right?
It is no secret that I LOVE using Found Relatives! I
find them easy to work with (
nice heavy paper) and even easier to make
up a story about.
Today is no exception.
I hope you will
follow along as I show you how to combine something new (
Tim Holtz
product) with something old (
ephemera) to create a project for Halloween.
I started with the Found Relative card of course, since that gives me a direction (or story) for the entire project. I cut out the kids using small fussy cut scissors. No matter how
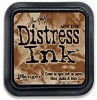
careful you are, there are always places that will show the cut edge. I have found that Pumice Stone Distress Ink will NOT “color” the photo,
but it will hide the white edge (works really great around the faces). I can
always go back in with a brown Distress Ink later if I want to age the
photo.
The House
I wanted to create a little “house” for the Found Relatives. I thought about what I could use: Altoids Tin (too small), make a box from scratch (doable, but not enough time today), a very small gift box (didn’t have one). So I sat for a minute and thought. Then I glanced into a small bin of new Christmas stuff and there was the answer. The Found Relatives box itself.
I taped the box together, then cut off the "hanger" leaving the rectangle box.
I pierced the center of the box and cut out the entire top.
I added Tissue Tape - Laboratorie to the sides of the box (
inside and outside).
For the background, I created a monoprint on a #8 manila tag using the Shatter Layering Stencil and Crushed Olive, Dusty Concord and Ripe Persimmon Distress Ink (
the perfect Halloween combination). I was apprehensive about using Shatter, as I thought the lines of this Layering Stencil would be too thin. But really, it could not have come out any better.
Once it was dry, I added a little Vintage Photo over the top of the tag to age it just a bit.
If you need a refresher on Monoprinting- see this
post.
Trim the top and bottom to fit into the box, just make sure the spiderweb is in the left corner.
Once the tag was the right size to fit the small box, I used the children as a guide to gauge the placement of the spider stamp (
love that spider!) which I stamped with Archival Ink.
Now just glue the tag into the box.
I wanted to add something dimensional to the bottom to "ground" the children so they don’t look like they are floating in the house (
although, that might had been another interesting Halloween idea...floating children!)
I added some Multi Medium to the lower half of the box.
Then added the last of the Distress Stain dyed cheescloth. I love the texture of the raw edges that hang over the edge.
You can use Distress Markers to “color” the Found Relatives. Here I used Wild Honey to color the dress. This may seem like I’ve lost my mind - Wild Honey looks like School Bus Yellow! But the cards have a slick surface which works as a resist to the Distress Ink. I find that by starting strong....
Then using a very small piece of paper towel or even lightweight fabric (my friend mr. cheesecloth works beautifully) you can work the ink around. What I never use is my fingertip...way to easy to leave a fingerprint right in the middle of your ink work and surprisingly hard to control because it does not soak up the ink, it just moves it around. In the end, the color should be very subtle. Let it dry and then go over it again later to add another layer of color.
Next, I die cut a piece of Grungeboard using the Pediments die. I couldn’t decide which of the 3 Pediment shapes to use, so I cut a couple then painted them with Black Soot Distress Ink.
Sand away some of the Distress Paint, then ink the Pediment with Vintage Photo. I usually do this step multiple times...sanding, inking, sanding, inking, to get a really good aged effect.
I used another stamp from the same set as the spider that looks like a old pharmacy sign. I colored it with Distress ink and used black embossing powder on the edges.
I used MM to add the Pediment to the top of the box. Then added the Pharmacy sign with foam tape.
I needed a surface for the house of children. I could have used a Burlap Panel but I wanted something larger so I could add words from the Paper Stash. I used one of my favorite wood panels from Michaels - You might remember it from these two past projects -
Big Top and
Found.
The paper in from the stash is 8 x 8" but the board is about 9 x 7", so I cut off the excess paper at the bottom as well as the spot where the "house" will go.
I used Multi Medium to adhere the paper to the board.
Then filled in the empty space on the side with the previously cut pieces.
Now just trim off the excess paper and sand all the edges with the Sanding Grip. Again, the blank spot will be covered by the house.
I painted a layer of Multi Medium over the paper to seal it. After it was dry, I added Black Soot Distress Paint to the edges.
I liked the Halloween paper as it was, but I didn't want the brighter colors to compete with the letters I plan to use. Adding the paint will allow me to tone it down just a bit.
Use a wet wipe to move the paint around until you are happy with the result. Remember, because I added the MM to the surface I can always remove the paint until it is dry. Then it becomes permanent.
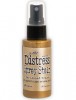
Once the black paint was dry, I sprayed the parts of the surface with Distress Stain Tarnished Brass (
no added water and no blotting away), then dried it with the Heat Tool. Love how the splatter looks across the vintage look paper!
Okay, so the surface is done.
I decided to use some vintage paper to cut out a couple paper hats for the children. When I was cutting, I realized the paper had tiny little names on it.
I just couldn't help myself...I added a name to each child (
I am saving Jumbo, Jr for another project). You could easily repeat this step by typing out names on your computer.
I decided to change up the boys hat so the hats would be different and add some pen work to the girl's.
I prepared a Timepiece and Game Spinner with a mixture of Iced Spruce and Black Soot to age it. Then set it aside to dry while I worked on the letters.
The Letters
I glued the Halloween words from the Mini Stash to a piece of chipboard using a Collage Glue Stick.
Cut out the word or words that will fit the space. I chose Trick or Treat. The word "or" was not included on the sheet, so I just cut an O and R from other words on the page.
Use the Sanding Grip to sand the edges of each tile.
Then ink the edges with your favorite Distress Ink.
Add foam squares to the back of each tile.
Add the letters tiles to the board along with the Timepiece. Can you see all the Tarnished Brass splatter in the background?
I added the House to the board but it needed a little something. I noticed out my window that the roses in my front yard needed to be deadheaded, so I got my clippers and made a few extractions (
now to find the time to do the rest!).
Perfect for a little texture in the corner of the house. Yes, I realize that the dried rose is very delicate and it may only last for this year, but if I pack it right it may last longer.
please click on photo to see the entire project
I had a great time making this project. Love how the background turned
out...just dark enough so the letters stand out, yet still show the
Halloween images.
And those names...love when a surprise piece of vintage ephemera makes new product even better.
Hope you enjoyed today's project and that you will try mixing old with new, to create something fun.
now carry on,
paula
products used in this project


Oh it's fabulous Paula! I do love the flower also!!
ReplyDelete(wonder if you taped a card box to the left side bottom of your box if it would protect it so it wouldn't get squished and then you could wrap and store it as you normally would...just a thought)
TFS Paula! again...awesome! :D
Very clever! Love how you searched about your stash instead of running out to buy something...that maybe wouldn't have been what you wanted anyway but would do. The added touch of your own dried rose is awesome!
ReplyDeleteSo so cute Paula!
ReplyDeleteThis is so cool, Paula! The Doodle just posted your classes for December. Now I have to decide which ones to take!
ReplyDeleteEEEEK! I LOVE THIS!!!!!
ReplyDeleteffabulous as always Paula xxx
ReplyDeleteI LOVE this, Paula, as I do with everything you create. I also love how you use things you have on hand in a creative way rather than run to the store for them. (The box, the rose) What a genius idea to use that dried rose. Perhaps there is some sort of spray fixative to help make it more stiff and sturdy? Thanks for the inspiration. I always love visiting your blog.
ReplyDeletePaula you blow me away with your whimsical creativeness ( I wanna be like you when I grow up...lol ) ... I got so tickled reading through the post ... and you KNOW how I love details ! Just so fun !!
ReplyDeleteI love this even if I'm not so much into Halloween. I like how your projects look like heirlooms from the attic. :)) The rose idea is the perfect finishing touch, and I always learn something from your tutorials.
ReplyDeleteYou are so creative and inspiring Paula, thank you! I always love seeing what genius project you've inspired us all with, you never disappoint! I was just thinking what Rea said "I wanna be like you when I grow up...hehehe" :)
ReplyDeleteI freaking love it !!!!!!!!!!!!
ReplyDeleteAwesome...love the names and I always loved the witches/dunce hats on old pics. So much fun.
ReplyDeleteI adore it!!!!!!!!!!!!!!
ReplyDeleteWow, another awesome project Paula! TFS!
ReplyDeleteFabulous and what a find with those names!!
ReplyDeleteto say amazing it is not even enough! i LOVE it!!!!
ReplyDeletexoxo ZOey
This is adorable but most of all I just love the hats and names! You are really on the roll this Halloween! Hope you never "grow up!"
ReplyDeleteFun project Paula! Love the found relatives and their names!!! Thanks for sharing.
ReplyDeleteThis is just too cute!! Thanks for sharing :)
ReplyDeleteOh my goodness this is fabulous! Thanks so much for the inspiration
ReplyDeleteThis is an amazing project - love it! Thanks so much Paula - your work is so cool!
ReplyDeletelove-love-love!
ReplyDeleteOh Paula, another absolutely awesome project. Love, love, love it.
ReplyDeleteI have to try mono printing now! :)
Amazing project! Love those found relatives.
ReplyDeleteNot enough time?!! You wouldn't have thought it with all of this going on! FABULOUS Paula...just fabulous!
ReplyDeleteLike Anita has already said - it is fabulous, love the mono printing background especially, it really sets the children off well.
ReplyDeleteAWESOME, Paula!! LOVE the Tarnished Brass splatters along with EVERYTHING else on this wonderful Halloween décor piece!! OH...Aqua Net hairspray is wonderful for lacquering dried flowers :) and high Halloween hairstyles ;) LOL!! Thanks for sharing another fabulous project!! Happy Friday!! XOXO-Shari T.
ReplyDeleteI'm soaking it all in.... Wow! Love, love, love it!!
ReplyDeleteIvette
Wow Paula! I love your posts and this one is no exception. What a great make. I really love the distressing you did on the background (Distress Paint -- awesome idea!!) and those names and hats on the children -- perfect details. Aren't we all thankful for packaging? Great use of the found relatives box. Love this decor piece. Definitely inspired to create this weekend :) -- Mary Elizabeth
ReplyDeletePaula you amaze me! I love seeing how your creative mind works on your fantastic projects! Thanks so much for sharing you talent with us. Love ya' Patricia B
ReplyDeletePaula, amazing project! Love how you used the found relatives box as a shadow box and the details are perfect. Providing the found relatives was another genius idea. I don't hesitate at all when it comes to cutting them, unlike some of my old photos. Now, I am searching my house for small boxes that I can cut...You always wake up my muse and I'm super thankful :) Laura S.
ReplyDeleteboo still my heart!! I love this project! the added flower from the garden.... clever!!
ReplyDeleteWow Paula! What a fantastic spooktacular project! Love all the details! Thanks for sharing your creative process!
ReplyDeleteWhat an unbelievable talent you are! That is gorgeous and so creative. All of the design team just ROCKS big time. TFS your talent with us.
ReplyDeleteAnother amazing creation Paula. I love the re-purposed packaging, you really "thought outside the box"... ;) I love the vintage Halloween look you create and you've talked me into the pediments die and cheesecloth.
ReplyDeleteSeriously genius! Even packaging becomes a thing of spooky beauty in your creative hands. Jenny x
ReplyDeleteFABULOUS Halloween project! I am continually amazed at how you can pull all of these elements together to create such amazing stuff. I am in awe. :)
ReplyDeleteWow, this is a cool project. Thanks.
ReplyDelete