Hi Everyone! Tons of stuff going on here (
really all month long). I have finished about 98% of what needs to be done to be ready for the Inspiration Unlimited Event in Las Vegas next week and have begun the kitting process for the classes in Waxahachie, TX in Oct. Because of the type of classes I teach, it takes some work to get everything ready for an event or store visit which includes planning, ordering, prepping and prepping some more; writing instructions, making copies, shipping and finally teaching. Lots of preparation that really starts a couple months ahead of a store visit. Suffice it to say, we have been busy over here but happy with the work that has been done! Super excited to be in Vegas with my best friend Liz who will be filling in for my husband who needs stay home to work. Too bad for him.
Well enough about that...on to today's super easy project. This is adaptable in so many ways. Follow along and I'll show you how I did it....
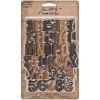
I opened a package of Letterpress (
one of my very favorite products) and dumped them out on the table. I began to create a few words from the set (
kinda like playing Bananagrams but with limited vowels!).
I had a wood board in my stash from a previous project that was 6" tall x 7" wide (
now lets see if it works). I went ahead and painted it with black Distress Paint and let it dry.
NOTE:
If you don't have a board to work with, then a heavy weight chipboard or another rigid surface will do. The surface I am working with is about 1/4" thick but 1/8" thick would be perfectly fine. Nothing fancy.
Once I decided on the placement of the words. I started filling in the "frame" with
the letters and numbers left from the package.
Can you see the words travel, find and go? It is a bit of a puzzle
since the letters are different widths but it worked out pretty well in
the end. I chose to leave a 4 x 4" space in the middle for my photo.
If
you choose the picture first, then you have the opportunity to
personalize the frame. I chose generic travel words that could go with
many pictures, but some other ideas are:
- numbers for a specific date (wedding or baby birth) or year
- add a name - first or last
- place you vacationed
Once you are happy with the layout, take a picture with your phone or camera. When you go to
put the letters back on the board after painting, you can use the photo as a reference.
You might notice that once I used up all the Letterpress, my board needed to be about 1/2" narrower. I'm going to be very honest here. To solve the problem I waited for my husband to get home from work and said,
"please cut on this line". He did, which left me with a perfect 6 x 6 1/2" surface to work with.
I choose some Distress Paint to color the words I chose. I went with different shades of blue but they really could be any color you have on hand. In the end, Evergreen Bough turned out to be my favorite.
Once dry, I sanded each letter with the Sanding Grip. I have no idea why I never used a Sanding Grip for the first part of my crafting career - I seriously love this tool.
Sanding is complete so I darkened up the letters with Gathered Twigs Distress Ink.
Letterpress blocks are 1" high, so my 6 letter word
"travel" worked out perfectly for the 6" tall board.
When I first put the word travel down, I had it right next to the picture, I decided to move it over one row to break up the brown and black tones.
So here is my final version - now I just need to glue them down.
Multi Medium does the trick. It takes a bit of finessing if you want the edges nice and straight but I just worked fast adding the Multi Medium one row at a time, then adjusted as I went.
Now for the picture.
Paris in the Spring of 2012 - the trees were blossoming...it was magical!
Mine was a tight fit so really no need for glue.
Because I used the 1/4" wood as a base I had no problem at all standing the frame up - nice and sturdy.
I love the way it looks on the shelf in my family room. This is such an easy project that anyone can do! I also think it would make a great personalized gift for a birthday or Christmas.
now carry on,
paula


Oh Paula! This gives me a wonderful idea for one of the 986 pictures we took in Japan! Heck, I might even do TWO pictures!
ReplyDeleteSue you better get started!!! 986!
DeleteSuch a clever and easy to achieve idea here Paula and as you say, it can be used for so many occasions. Love it! Jenny x
ReplyDeleteYou have solved a problem for me Paula, now I know how to use up all those left-over letters..... love this idea and yours looks brilliant. Anne x
ReplyDeletethis project is perfect for that Redanne!
DeleteThis is a gorgeous piece and what agreat idea for all those left over letters x
ReplyDeleteLOVE this!! I am seeing so many ways this could be gifted!! LOVE LOVE LOVE it!!
ReplyDeleteFantastic piece of Art . Love it. Hugs Rita xxx
ReplyDeleteSo cool Paula! and it would make an awesome gift for sure :D TFS
ReplyDeleteWhat a great idea to not only use the Letterpress blocks as the frame but to accent specific words to fit your photo!
ReplyDeleteLove the idea of using the letterpress blocks for your frame, nicely done
ReplyDeleteWOW this is wonderful, amazing! I need to stock up on these. What a great gift too. Thank you so much for sharing.
ReplyDeleteFabulous idea! Amazing how the sanding and a little gathered twigs make those letters so vintage looking. Thanks!
ReplyDeleteWhat a wonderful idea! Thanks for sharing Paula!
ReplyDeletewow this is amazing...you are a clever girl Paula giving us an idea on how to use up all those odd letters...hugs kath xxx
ReplyDeleteamazing job!!!!!!!!! great!!!!!!!
ReplyDeleteThanks for sharing!
So THAT'S what you do with the leftover letters! Thank you for the inspiration!
ReplyDeleteI'm so intrigued by how this looks, each step of the way... just amazing !!
ReplyDeleteAmazing! And such a nice addition to a bookshelf, too!
ReplyDeleteWhat a stunning piece Paula - I have looked and looked at the Typepress letters and wondered what to do with them. Now I know … thanks for the inspiration. Oh and the colours are fabulous.
ReplyDeleteCool project Paula...Brilliant and love what you did.
ReplyDeleteLOVE LOVE LOVE!!!! Can you tell I LOVE IT? :)
ReplyDeleteI LOVE this! What a great idea! And sooooo easy too!
ReplyDeleteWhat a great idea thanks for sharing, doesn't look too difficult !!
ReplyDeleteLOVE it - very clever!
ReplyDeleteThis is fabulous! I can't wait to try it...maybe I'll even make it BEFORE I go on vacation!
ReplyDeleteI love this! I've had an old Eifel Tower postcard sitting in front of me all day, and I've been trying to find some inspiration so that I can make some art with it. Thanks to you, I am inspired!
ReplyDeletePAula , what a wonderful and clever project! I love this letterpress frame, as always a great inspiration! BArbarayaya
ReplyDeleteThank you Paula! This is a fantastic project and you are so right about it making a great gift. I haven't bought the Letterpress product yet but I can see now that I am going to have to get some. !!! X
ReplyDeleteOh, Paula, what a great project! Years (and years!) ago I worked in a print shop .... how I wish I had collected some of those old typesetting letters. Sigh. Roberta
ReplyDeleteWhat an awesome make and such a cool idea! Have you been to Cracker Barrel lately? All the menus and their new marketing adds have the colored letterpress letters as titles for everything. It's so awesome looking!
ReplyDeleteI like how you offset the frame opening to one side and emphasized words within the jumble. Your frame really turned out great.
ReplyDeleteOMG this is utterly awesome!!! I adore this idea and esp how you pulled out some words that match your theme. Genius at work!
ReplyDeleteBeautiful!!! That's all I got to say and Inspiring!
ReplyDeleteFabulous idea - Thanks Paula!
ReplyDeleteGreat idea Paula, Really would make a cool gift..TFS!
ReplyDeletethis is just gorgeous, I love how it turned out. I still haven't opened my letter press package, I have this fear that when I use them they'll be gone ;) lol Thanks for sharing.
ReplyDeleteWow, this is something else. Now I know what to do with mine ;)
ReplyDeleteWow - just Wow! This is AHmazing!
ReplyDeleteRight on! Such a beautiful way to use letters and I love to use letters on everything! Thanks for this idea.
ReplyDeleteTotally fantastic frame, Paula!! Great idea for personalizing anything!!
ReplyDeleteOH, Paula--I've got my compound miter saw ready! ;) :) I know how to work power tools, Baby!! :) ;) XOXO-Shari T.
What a fantastic project! Love this idea. Thanks so much for your detailed tutorial and photos!
ReplyDeleteAnother awesome project...you have a magic hands and a fantastic imagination!
ReplyDelete