Today post is the first of the small group of cards I made for Stamper Anonymous with the new stamps and stencils that were released this past weekend. I always love holiday stamps so it was quite fun to be able to get the new sets. Hope you will like what I have created.
I cut a piece of Ranger Watercolor paper. I used three colors of Distress Stain and water to create the background, then dried it with a Heat it Tool.
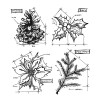
I stamped the image of the Poinsettia from the Christmas Blueprint 4 set in Archival ink.
Then cut it out.
Next I created a monoprint of the new Layering Stencil "Christmas" on another piece of Watercolor paper using Distress Ink in Pumice Stone, Tumbled Glass and Crushed Olive (both in kit #8). Pumice Stone mini is in kit #5- i just happened to have the larger pad on my desk so I used it instead. That is the reason why I ended up with so much gray in the monoprint. Using the mini size allows you to get much smaller doses of color.
I stamped the poinsettia image over the monoprint background of the card front.
Then used Distress Markers to color the green leaves.
The Detail Water Brush helps blend the colors together.
I also used Pumice Stone Distress marker to add in a drop shadow around the flower and box with the flower name.
I cut a card from Core'dinations Kraft-Core Cardstock,
then stitched it to the cardstock.
Then I simply used foam squares to add the cut poinsettia over the image.
You may notice I went back and added more red Distress Marker to some of the smaller shapes for a bit more detail.
I also colored a piece of Linen Ribbon with Iced Spruce (
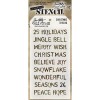
you know I had to work it in) Distress Stain. Once dry, I inked the linen with Crushed Olive Distress Ink. I used the Linen Ribbon to secure the Christmas Word Band to the card front.
One additional detail...a bit of Ice Stickles - Christmas Red to add dimension to the center of the poinsettia.
And there you have it...first Christmas card of the season! I sure love the coloring process. I find it very soothing working with the Distress Markers and Water Brush.
FYI:
For those of you in the Dallas area, I am teaching three classes at Stamp
Asylum in Plano on Aug 15th and 16th. You can contact the store for
more details.
carry on,
paula


Your card is beautiful Paula, I love how you coloured and layered up the Poinsettis and the coloured ribbon looks wonderful.
ReplyDeleteIt will certainly be one lucky day for the person who finds this in the mailbox!
ReplyDeleteThe best part of crafting for Christmas? STICKLES! And when they are ICE--even better. Another lovely creation, Paula, and the background stencil color combo of pumice stone, tumbled glass and crushed olive is really nice (not a combo I would think of).
ReplyDeleteSuch a gorgeous card, I am so in awe of this.
ReplyDeleteThe card is fabulous.
ReplyDeleteVery pretty! I love the dimension you added at the end with the Stickles.
ReplyDeleteBeautiful! I wasn't sure where you were going with the green poinsettia but once it came together I saw how clever it is. Loving your color choices.
ReplyDeleteGorgeous card Paula, I just love this layered poinsettia and coloured linen ribbon.
ReplyDeleteVery pretty card!
ReplyDeleteGorgeous! I love how you did watercolor on the leaves!
ReplyDeleteThis is such a beautiful and elegant card. I love the subtle background, the bow and of course the stitched edges. #155days ;)
ReplyDeleteWhat a wonderful card! Thanks for sharing your creative process Paula!
ReplyDeleteBeautiful card! I love the blueprint stamps♥
ReplyDeleteLovely poinsettia card! Yay, you're coming to Dallas! I will contact Stamp Asylum!!
ReplyDeletesuch amazing.. I love the effect !!!
ReplyDeleteCU hellerlittle
beautiful!!
ReplyDeleteOh so beautiful, I love all these xmas projects in the middle of the summer, they cool me off!
ReplyDeleteStunning card and I love pointsettia for Christmas... guess I am going to have to find those stamps now...
ReplyDeleteWhat a wonderful card - love all the steps and colors...and everything!
ReplyDeleteOh this is soooo pretty, Paula! So glad you figured a way to work in the Iced Spruce!
ReplyDeletePaula, I love the word band, "Have Yourself A Merry Little Christmas." I have to get that one! Thanks for making and sharing this beautiful card.
ReplyDeleteI generally use a "tree themed" for the basis of my Christmas card. but I think this year, I may have to buy this one. everyone for the birthday club, seemed to purchase that cupcake stamp too. This one is super cute too and I have been eyeing doing a poinsettia for years. thanks guys.
ReplyDeleteThis is a really gorgeous card!! Love the background ..have ordered this set cannot wait to play ! X
ReplyDeletevery nice card. the elements blend well together and it's not too fussy!
ReplyDeleteI am blueprint inept-but I think I can do this. Thank you for the fantastic card & tutorial!
ReplyDeleteBeautiful card. What a wonderful way to start creating for the holidays.
ReplyDeleteThese are absolutely gorgeous! So nice to see a feminine touch. LOVE these blue print stamps...must have. hehehe
ReplyDeleteWow, so so so pretty.
ReplyDeleteThe cards are beautiful and like the Christmas stamp set.
ReplyDeletebeautiful card Paula...I will be playing with my new christmas blueprints tomorrow...thanks for the inspiration hugs kath xxx
ReplyDeleteLovely card, the dimensional poinsettia is lovely as is your background. Tracy x
ReplyDeleteVery pretty card; loving the pumice stone, tumbled glass and crushed olive color combo. And yes the Victorian velvet, worn lipstick and fired brick is one of my favorite combos for "vintagy" rich red look !
ReplyDeleteBeautiful card Paula! Love the look of the layered flower and the background is stunning.
ReplyDeleteBeautiful & elegant Paula! How did you get your bow so perfect?! Mine always look wonky. Terrie Lightfoot
ReplyDeleteMiss Paula! You NEVER disappoint! What a GORGEOUS project! The dimension is fabulous! I love the stickles too!
ReplyDeleteWonderful!!!!!!!!!!
ReplyDeleteThese are really nice!
ReplyDeleteSo so so gorgeous Paula! I love the layered poinsettias!
ReplyDeleteWOW i love this, what a gorgeous card and I love your tutorial too!
ReplyDeleteI love the background on this! The poinsettia just pops! Beautiful!
ReplyDeleteFabulous and I just love what you did with the poinsettia!! Great background too, it sets it off so well!!
ReplyDeleteBeautiful. Love that poinsettia and what you did with it!
ReplyDeleteThe blueprints are some of my favorite sets! I love your card Paula!! TFS!
ReplyDeleteLovely Paula. I hope you are well :)
ReplyDeleteI can see why Kath was so inspired! What a fantastic creation Paula. Love the way you've used the monoprint as a background as it works perfectly with the painted green leaves. Jenny x
ReplyDeleteI love It, it's beautiful
ReplyDeleteGreat BP poinsettia card! Love the stenciled bkgrd. Beautiful color combo for the flower and the Stickled center makes it look so festive. I can barely wait til Sat. to use my new Xmas and Halloween word stencils for the first time! :)
ReplyDeletecould you explain the background a bit more. I really love it
ReplyDeleteI may sound stupid but what is the monoprint background
ReplyDeletePaper or stamp?
Thank you
Susan
susan, the monoprint was created using a stencil that I inked directly with the Distress Ink pad, sprayed with water and then flipped over onto watercolor paper. You rub the surface with a paper towel and lift the stencil leaving the stencil image (in this case words) free from color.
DeleteThis is so beautiful. Thank you for sharing how you made it.
ReplyDeleteCould I get more details on how you created the background? I need more help than just the three colors used.
ReplyDelete