
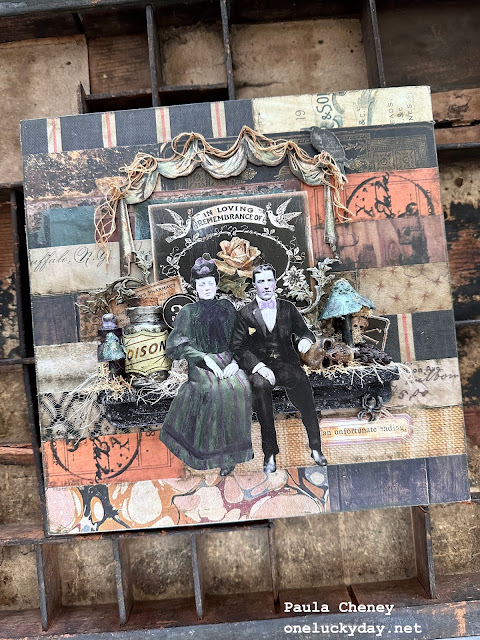
I'm here with a fun Halloween project to day. All made from Tim Holtz Halloween idea-ology and a few vintage things from my stash. Lets get started so I can show you how I created this panel.


To cover any white edges between papers, I scribbled Distress Crayon over the seams.


Next I created a shelf with Etcetera Trims. You could just glue it together and paint it black, but I added Grit-Paste and Crackle Paste before I painted to get a really crusty, textured finish. Once everything was dry, I sprayed it with Distress Mica Stain, Lost Shadow to give move dimension to the black surface.


Then added them to the panel along with a card from the same pack.

Picking a Paper Doll can be hard, but I decided that I liked this couple that could sit on the edge of the shelf. That would give me room to not only add things beside them, but also in back of them.
NOTE: she did not have a bow at her neck so I just drew on one with a pencil, then added color inside the lines.

These two wood blocks are going to help the Paper Dolls stay in place.

I glued the two blocks to the shelf, then added the Paper Dolls. Totally hidden behind the people and a very easy way to prop things up.

I created to bottles for the scene using Coked Vials. For the larger bottle, I wiped Collage Medium over the bottle. Working quickly, I sprayed Specimen Distress Mica Stain over the wet glue and dried it with a heat tool. Once dry, I squirted Silver Mixative into the bottle to coat the inside. I love this effect.

For the second smaller bottle, I rubbed the bottle with collage medium and let it dry. I pounced Amethyst Alcohol Ink over the bottle, then stuffed it with Mummy Cloth. I also added a Hitch Fastener to the top of the vial (I did not use the cork).

NOTE: I did trim the bottom and the back edge of the cap of the Large Toadstool, so it would sit flat on the back of the panel.

 I colored a couple yards of vintage string (crochet cotton) with Distress Ink. Then I wiped a glob of Collage Medium on the glass mat. Working quickly, I smooshed the string into the glue, making sure it was coated.
 Then I added it to over each pin. I tried to let it be as free form as possible, knowing that once the Collage Medium on the string dried, it would become permanent in the position I placed it in.

 While the string is drying, I worked on adding the pieces that I made earlier. Consider this the first layer, we will go back again and add more once the first layer is secure.
 Yes, those are Pinecones from Christmas idea-ology. I thought they went with the Toadstools quite well. You can really see the great texture on the shelf here.
 For the second layer. I want to add these metal leaves - they have such great dimension. I painted each white, then added Smolder Alcohol Ink Pearls. The color looks like decaying leaves.
 I added the leaves and small bits of ephemera tucked into the background.
 And on the right, more climbing leaves and the skull and crossbones (because you know its a poison mushroom)

 On and I couldn't forget this guy...perched on the corner of the curtains. He's the perfect little addition.


I sure love making for Halloween! This kind of make is my favorite. Remember it started because the 1" paper strips inspired me to make "something". I hope it inspires you to make something from your stash of Halloween goods!

Okay, one more thing before we start to assemble.
I hammered tiny vintage pins (I think they are called sequin pins) above the curtains. Another reason I like working on a wood Panel!


A spider (they come in the pack with the leaves) and a lavender label (ephemera pack) with a Clippings sticker from the Halloween Sticker Book.


Now carry on,
paula
No comments:
Post a Comment