
I'm sorry it has been so long since I have posted but there have been so many things going on behind the scenes preparing for all the summer releases! This is always an exciting time of the year! Two of the release dates have been announced with more to come!
Sizzix Chapter 3 YouTube Live - July 10th
Ranger New Color YouTube Live - July 17th
Todays tutorial is an easy one! It is for two cards I created for the Stampers Anonymous release using the Floral Outlines stamp set (CMS430). I decided to give you two versions of the same card, so depending on time and occasion, you have a choice on how far you want to go...just embossing or adding in the watercolor coloring. Follow along and I will show you what I did.
Start with a piece of Mixed Media Heavystock paper. Spray with Antique Linen Spray Stain. I am not a fan of large splotches of ink (for this kind of card) so I like to spray and wipe the dots away, leaving a smoother look (but you do you!). I like just enough to color the paper and give it a bit of interest.

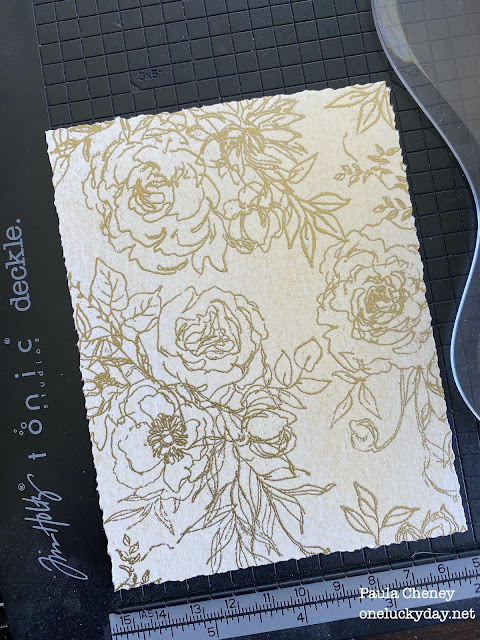
Once all the images have been stamped with Embossing Ink and the gold Embossing Powder has been poured over the top, you are ready to emboss with an embossing gun. I love how the flowers fit together even though they are each different shapes.

I used my Tonic Deckle cutter to cut the edges of the card. I knew I was going to use the Deckle Cutter, so I cut my original paper slightly bigger than I wanted my finished card to be, giving me just enough excess paper to cut away.
I added a bit of Walnut Stain Distress Ink on the edges of the card with a Blending Brush.

For a bit of shine I added gold Metallic paper. I like to create a crosshatch pattern across the paper by lightly skimming the top with sand paper. It gives the paper more interest (in what little you will see) and a little visual texture.

Once the pieces are put together on a grey cardstock backing (I used foam pads under the embossed card) it makes a beautiful layered card. My thought was wedding but it really could be for any occasion.

I used more the of gold Metallic paper to cut the letters LOVE using the Alphanumeric Bold die - I love this die set because its the perfect size for cards! To make it easier, I added a Sizzix Permanent Adhesive sheet to the back of the gold cardstock before I cut it, allowing me to just peel and stick the letters down. The grey cardstock strip was stamped and embossed with gold embossing powder to match (CMS394 Tiny Text) then added with thin foam pads.
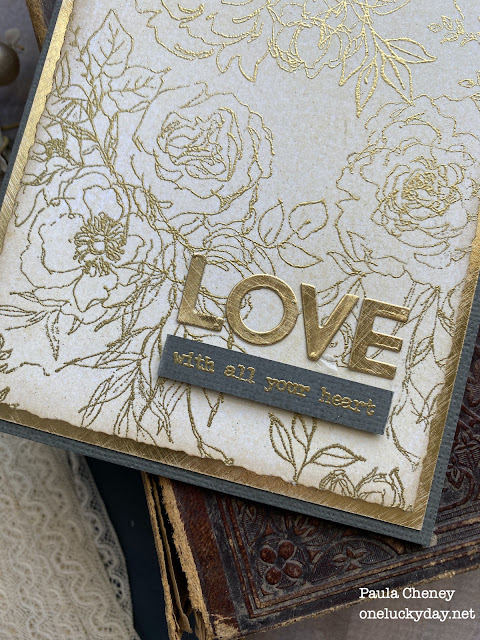
That Deckle edge looks great on the finished card. So glad I added that extra step.

Continuing on, I wanted to try the same exact card but this time use Distress Ink to watercolor the embossed flowers. So I repeated the steps to emboss the card, then created a palette of Distress Ink on my Glass Mat. A Detail Water Brush works best for coloring in tight spaces.
I colored all the leaves with Peeled Paint Distress Ink.

Then moved to the flowers. I used Kitsch Flamingo the most with a small bit of Milled Lavender and Fossilized Amber.

Once the flowers were colored, I flicked Speckled Egg Distress Ink over the background.

What an easy technique to create such a pretty card! The Floral Outline stamp is a standout - it is seeming perfect for so many uses and occasions.

Again, the Deckle edge is beautiful against the gold background and grey card. Loving this combination!

I hope you like the two easy cards. I can see making multiples of these to have on hand for weddings, birthdays and just a note of encouragement.
Now carry on,
paula
Gorgeous, gold embossing and love the coloring!
ReplyDeleteAbsolutely beautiful, Paula!
ReplyDeleteBeautiful work, I love how you did the leaves. So glad you're back inspiring us.
ReplyDeleteBlessings,
Marlene
Simply gorgeous cards! They're both beautiful in their own right. I love the tip about lightly sanding the metallic cardstock!
ReplyDeleteI love this card... simple yet so completely elegant and shabby chic yum! LOVE your watercoloring too!
ReplyDeleteSimply BEAUTIFUL! Thank you for the tutorial.
ReplyDeleteHi Paula, my name is Susan and i am leaving this comment to say how beautiful your work is . Those tags Tim showed us are stunning. I am not a maker for a company, i just dabble in crafts for pleasure but am looking to work with idea-ology materials on a clipboard. Tim is brilliant and I love watching his Demo's on a Saturday. I always say hi to everyone but no one has ever responded, i remain hopeful. I can't wait to see your next designs! Best wishes, Susan Lee.
ReplyDelete