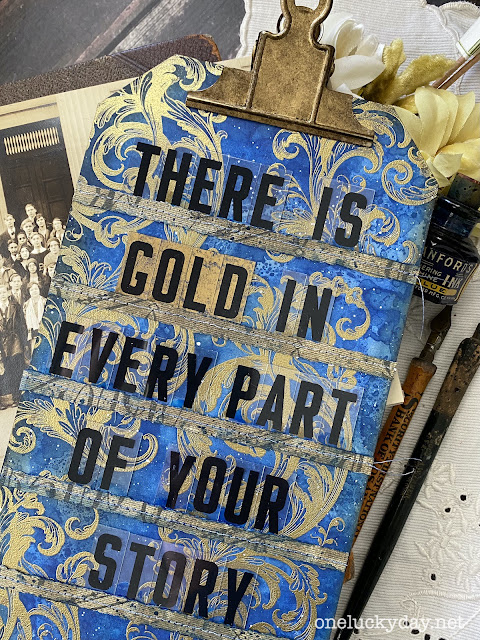
The project I am sharing today is something I had in mind since the first time we released the idea-ology Mini Marquee letters. YOU get so many letters in the bag that I could create this saying using 4 E's and still have more left. Total bargain in my opinion.
I cut a piece of Heavystock paper to fit the small Etcetera Tag. Using one of the images from the Baroque stamp, I repeatedly stamped and embossed with Ranger Super Fine Gold Embossing Powder.
I sprayed both Prize Ribbon Distress Stain Spray and Oxide Spray onto a craft sheet. I added a little water with the Distress Sprayer and pressed the embossed paper into the ink to create the bright blue background. I repeated the...press, dry, press, dry, a few times to make sure the ink covered the paper.
Just to give it another layer, I used the Ranger Splatter Brush to add a splatter of white Distress Paint across the blue ink.
Once the paint was dry (and it did take a bit) I adhered the embossed paper to the small Etcetera Tag with Collage Medium making sure all the edges were secure (a great time to break out your brayer). Once secure, flip the tag over onto a self-healing mat board and using the Tonic Craft Knife to remove any excess paper. Set aside.
I chose of piece of Backdrops paper that looks textured for this next step - you can find this piece in Backdrops Volume 1.
Stitch across the 6" length of the paper, five times. I kept the stitching of the five lines close so I only had to cut between the lines, but you can stitch as for apart as you are comfortable. Once I had the five lines of stitching, I used my Tonic Deckle Cutter to cut between the lines, creating five strips. You can see by the lines on the Deckle Cutter that the strips are just over a 1/4" wide.
I wanted to add a bit of Prize Ribbon to the color the paper and the neutral stitching, so I spritzed Prize Ribbon Spray Stain onto the glass mat and pressed the paper strips repeatedly into the small beads of ink. I love how the thread is now blue!
Next, cut the strips to the width of the Etcetera Tag, then add 1/8" double stick tape. You can use any brand like Scor-tape - this was just the one I had on hand. As you can see, I added the tape to one side of the stitching line so I could slip the plastic letters underneath (on the side with no tape).
The stitched strips are 1 1/2" apart. It was easy to see the placement using a ruler and the lines on the Glass Media Mat.
The Mini Marquee letters are so fun to use. Each letter has a little more plastic at the top so they can be clipped or sewn to something. In my case, I was slipping them just under the paper strip so I only had to make sure I spelled everything right and that the extra space was at the top.
For the word GOLD, I decided to use Ranger gold Mixative on the back to draw attention to the word. Super easy to do. Just add a pea size circle of gold to a Blending Tool with felt and pounce away. Let dry and then you are ready to use.
The Mini Marquee letters were added to the tag with Collage Medium.
Things to remember:
- Place the letters on the tag to get the right spacing before adding Collage Medium.
- You need less Collage Medium than you think.
- Only add the Collage Medium to the lower 1/4 of each letter.
I used the same gold Mixative and Blending Tool for the Vintage Clip.
Then added Mushroom over the top to take the edge off the gold. I left it to dry completely before adding it to the top of the tag.

I hope you like this project. It was easy and fun to do. You can use any quote you like and any size board. This could be super fun for a shower or wedding sign in table or so many other things since you can personalize it!
now carry on,


Your make was my favorite in Tim's line up! Love how the new blue plays with the gold!
ReplyDeleteThis is absolutely gorgeous and amazing.
ReplyDeleteI loved this & ALL your makes shared today in Prize Ribbon reveal. I especially loved your Field Notes booklet. Will you be sharing the blue/green colors & techniques used to make the AWESOME cover for your Field Notes booklet?
ReplyDeleteI will be posting the notes and photos on the small book later this week.
DeleteLove your Prize Ribbon makes, Paula. Thank you. Would also love some notes about the gorgeous book that you made. It was beautiful. Loved the cover, inside and out!
ReplyDeleteLoved your makes for Prize Ribbon. Thank you. Particularly liked the book. It was gorgeous! Some notes on the book would be wonderful if you have the time and inclination.
ReplyDeleteI will be posting the photos and notes on the book later this week.
DeleteGorgeous make, Paula! My Prize Ribbon is on pre-order from Everything Scrapbook and Stamp!
ReplyDeleteyou are going to love it.
DeleteWhat a fun project, thanks for the tutorial...
ReplyDeleteThis is beautiful! Will you be posting the gorgeous mini book Tim shared on the prize ribbon live? Stunning work!
ReplyDeleteI will be posting the book here later this week.
DeleteWhen you melt embossing powder, it becomes resistant to the ink. You might think the ink is sticking to it but it's not. Just wipe away and residual blue from the gold embossing with a paper towel (after inking).
ReplyDelete