
Hello Friends,
I'm back at my desk today after a wonderful week long holiday! Happy to spend some much needed time away from my desk and with my husband. We had a wonderful time traveling together.
I have made many Matchbox Trays over the years. So when Tim mentioned he would love to have one for the idea-ology Live, I knew I could do it before I had to get it to the mail the next day. The challenge was on! Needless to say, I do not have step-out photos since I was working at breakneck speed, but I do have close-ups of each section.
TRAY
This is a large Vignette Tray (6 x12"). I used Christmas Backdrops paper to cover the box, inside and out.
Problem: Backdrop paper is only 6 x 10" and the tray is 12" long!
Solution: Cut the paper (small poinsettias) into strips so the paper is actually only around the edge of the tray, not behind the Matchboxes at all. You can see what I mean if you go to my Christmas Tray 2020 - there is a shot of the tray before I put the Matchboxes in.
 The plaid tape on the lip edge is from the Christmas Design Tape pack. I love the diagonal plaid tape and it worked perfectly with the green stripe paper on the inside.
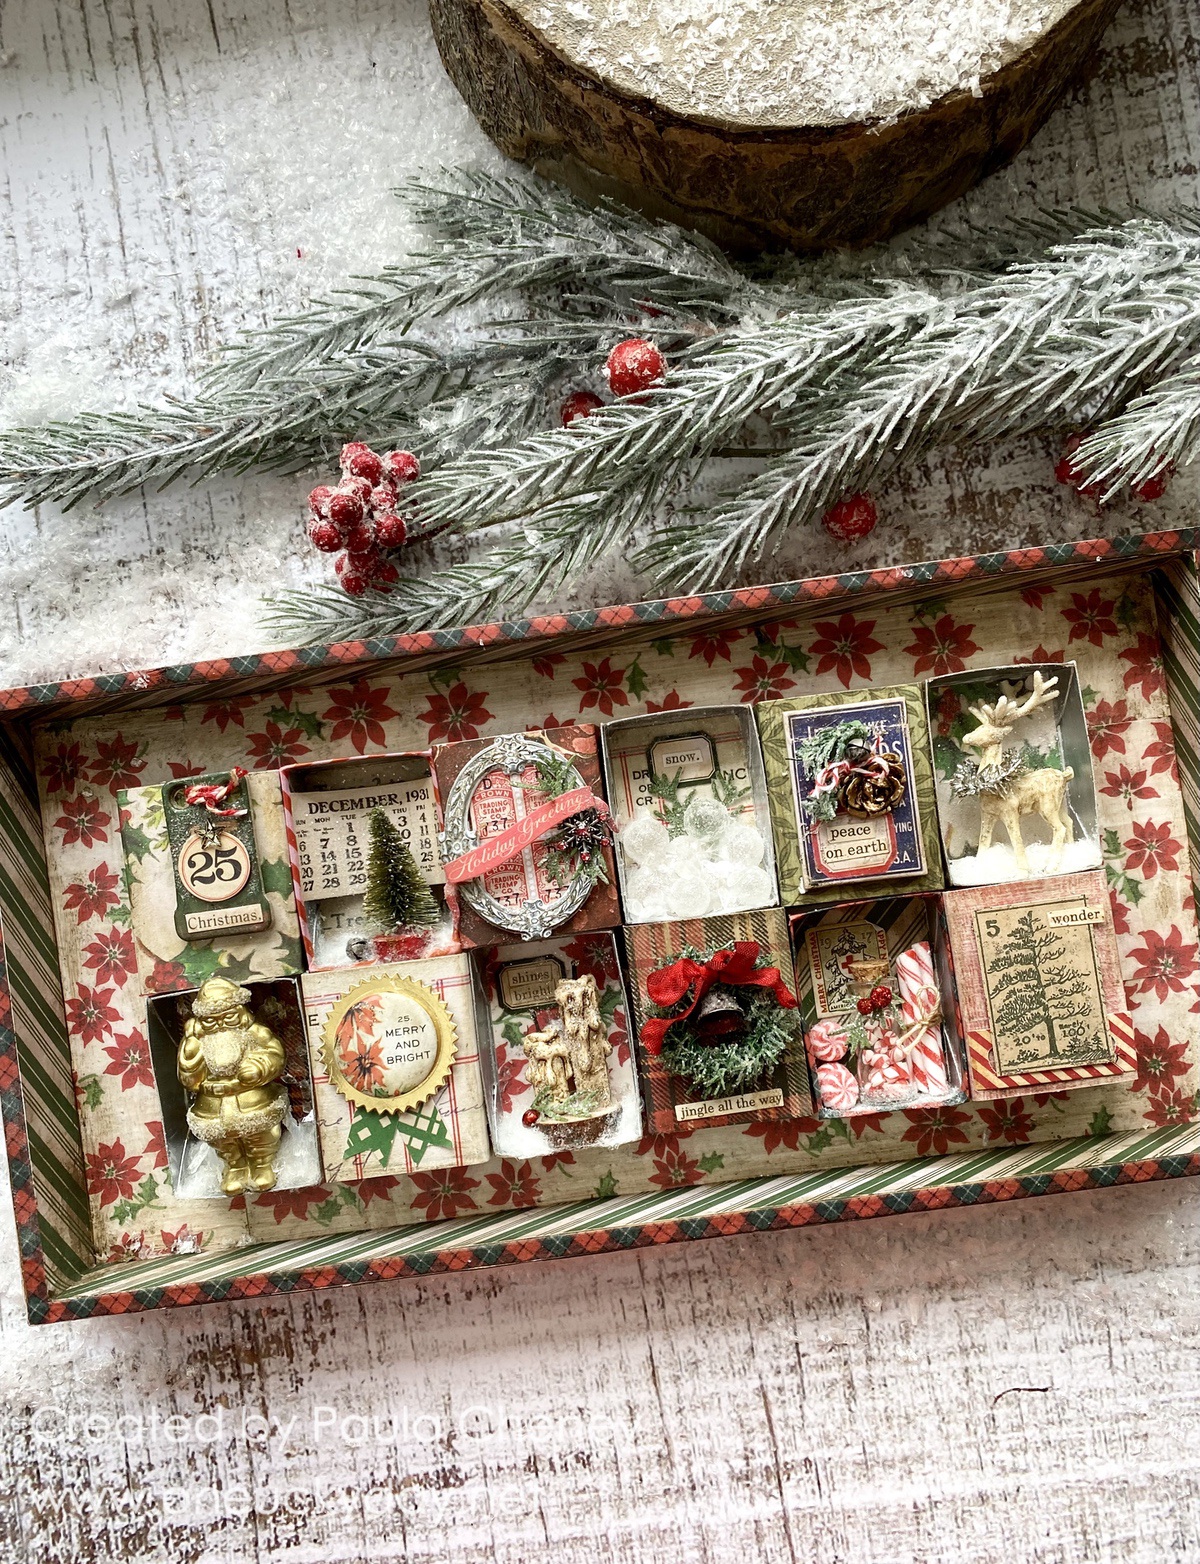
You need one set of 6 Matchboxes to make the project. All Matchboxes were separated into boxes and drawers. The boxes were covered in different Backdrop papers and the inside of the drawers were painted gold with Dina Wakley paint in Ancient (it's my favorite).

SNOW
All "snow" used in the Matchboxes is white cotton batting. I pulled small pieces of the batting and added to each box with tweezers. A small amount of Collage Medium holds it in place. I also used a small paintbrush to add CM to the top of the batting, then sprinkled with Mica Flakes and sometimes Rock Candy Glitter. to create some texture and sparkle.
GREENS

This is the die I use for all the greens in the project. Before I started, I cut about 8-10 in green cardstock and covered all of them with Rock Candy Glitter. Then I just set them on my worktable, ready to go!
WORDS
All words used in the tray were cut from the Christmas Sticker Book.
LEFT SIDE
Box 1 -
The green piece is from the Junk Drawer Baseboard pack...Don't forget about products that are in the everyday line that can be used for Christmas like this piece! There is a number printed on the piece, but I covered it with the 25 from the Christmas Ephemera pack.
A small Mirrored Star and a bit of red and white string, finish it off.
Box 2 -
Slightly bend the small calendar (ephemera pack) to fit into the Matchbox. Use a little Collage Medium to secure it to the box. Add stripe tape around the edge of the box.
Spray the tree with Bundled Sage Distress Spray Stain and paint the wood base with Lumberjack Plaid Distress Paint. Add the tree and a Tiny Bell to box with Collage Medium.

Use Foundry Wax to make Santa gold. Super easy...shake it up till you hear the mixing ball, squeeze out about a dime size, paint it on quickly, heat with an embossing gun. Once cooled, add a bit of glue to the "fur" and sprinkle with Rock Candy Glitter. Let dry.
NOTE: This is a new larger Santa - he does not fit into the Matchbox as easy as the previous Santa so I had to notch out the Matchbox around his hat. The older Santa was smaller and fit right into the Matchbox. You can tell the difference in the packs, because the smaller Santa was sold in a 2 pack (TH93747). The current larger Santa is sold with the Snowman TH94301. If you click on the link at the top of the 2020 tray, you can see the difference in size.


Box 4 -
Flair button added to gold seal (die cut with metallic paper)
Green Plaid tails are from the Sticker Book.


CENTER

This is the LABLES die I used for the gold seal. Its old die but still available!

CENTER
Box 5 -
Rub white paint over Deco Frame, then rub off excess paint. Let dry.
Add frame with stamps (ephemera pack) in the background to Matchbox.
Add Holiday Greetings banner (ephemera pack) to frame.
Use any red Alcohol Ink to color the rhinestones on the Snowflake. Add snowflake and some die cut greenery to the frame.
Cover Bubbles with Glossy Accents and drop them one by one into the Rock Candy Glitter jar. Shake the jar to coat. Remove to a disposable plate or paper to dry.
Once dry, pile into Matchbox using Collage Medium to glue them together. I will take awhile for this box to dry, so set it aside for a few hours. The Collage Medium dries clear.
Add small label the word snow to the background.

Use Collage Medium to adhere two Drippy Candles to a Wood Slice. Set aside to dry. NOTE: I used my Tonic scissors to cut off the back of the Wood Slice so it would fit into the box.
Add a small label with words to the background - this one says "Shines Bright".
Add candles to the Matchbox with Collage Medium.
Box 8 -
Cut 2 small pieces of Pine Twine. Wind both into circles and hot glue at the ends, create two separate circles. Combine the two circles with a just bit of hot glue to create a fatter/thicker wreath.
Wipe Stickles Glitter Glue over the wreath and dry with a heat tool. The heat will not melt the wreath material, but will make it move and become more realistic looking. It sounds strange but it very cool to see.
Add the bow and bell with hot glue.

Box 9 -
Blue background is from the same idea-ology Junk Drawer pack used in Box 1.
The gold piece has the look of a pinecone but it is really a flower from the Heirloom Floral pack that I covered in Foundry Wax.
The greens next to the flower is just a piece of Pine Twine with added Tiny Bell and some string.
Don't forget the red label and words, "peace on earth".
Box 10 -
Color the Salvage Deer with Walnut Stain Crayon. I scribbled the crayon on my mat, then picked it up the a slightly damp crayon and brushed over the deer.
You could add more Pine Twine around the deers neck but I went with silver Tinsel. I did trim the Tinsel inside and out, before adding to the Deer with hot glue.
 Box 11 -

Cut up a few Confections sticks to fill a bottle from the Corked Vials pack.
Glue three Confections sticks together and wrap with string so they will stand up in the corner of the box. The sticks and the round candies have been covered in Rock Candy Glitter.
Stamp in the background is from the Ephemera pack.
I did wrap Design Tape around this box before adding the candy with Collage Medium.
NOTE: The tiny red berries used in this project are from Hobby Lobby (they come in a bag of 1 million - you will only need to buy one bag per lifetime!).
Box 12 -
The tree image is from one of the Christmas Backdrops papers and the candy stripe is a piece from the Ephemera Pack.
 And there you have it!

This is one of those projects I like to create because each little scene stands alone, yet when put together, they make a wonderful whole. If I hadn't have had the short time frame for mailing, I could have made a tiny box a day. No mater, I'm happy with what I created and I hope you will give it a go.


Now carry on,
paula
This is just wonderful! TFS!
ReplyDeleteI am so happy to see this project. I have made the Halloween and Christmas one from last year. I think it was...I always need a jumping off point, and this is it. I think this one is just perfect and a project most people can tackle. Like you said, each box is a project and not overwhelming and then "bam" together they are one big project...gotta go, have to get started...
ReplyDeleteoh my goodness! I love this... So many festive and delightful details! You are so artistic and creative and i always enjoy seeing what you come up with Thanks for sharing Tamara
ReplyDelete