Hi again.
I'm here today with a project using Fragments + a few new products from the CHA release. My goal was to show how you can incorporate personal information into a project. Now I know I have talked about Fragments before so I won't go into the how-to details I just hope you'll bear with me while I talk about some of the nuances of this piece. (oh and there is a link below for the, "
I need a Fragment refresh").
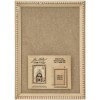
I stated with the new Framed Panel.
If you are a follower of this blog, you know I use flat panels all the time for artwork. But they never quite looked finished because there is no frame....and much to my dismay, there are no elves in my garage making me frames (
or even cleaning my garage for that matter).
Problem solved.
The Framed Panel comes with a frame so when you're done with your artwork you can simple add the frame over the top. EASY as that.
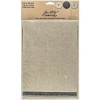
I started by adding linen from the Textile Surfaces pack onto the panel. It does take more than one piece of linen to cover the background, although you can barely see the seam. The Textile Surfaces are self-adhesive so there is no worry that glue might seep through the fabric.
I used a photo from the Photobooth strips but you could use a copy of a family photo if you want to make this more personal.
I glued Alpha Dice together and wrapped them in old book paper and string to create a simple element for the center. The Alpha Dice have letters on all sides so there are 100's of combinations you can make from one package of twelve.
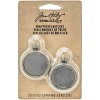
The Mini Pocket Watch was a show favorite (
you get two per package). The watch comes with a back but in this case I decided I liked how it looked without the back so the light colored linen fabric could show through. The 4 leaf clover is from the Adornments pack - Souvenir...I just clipped off the hanging loop at the top and colored it with Alcohol Ink.
To add some personal information to any piece (
birth of a baby, wedding date, graduation, birthday), decide what information goes with the picture you have chosen. Using Word or Pages, type the information into a text box that is the same size as the chosen fragment. The information must be printed with a laser printer either at home or a local copy store. If you need information on how to adhere paper to the Fragments - you can see that
here.
I was interested in adding a date to the piece. There is one particular Fragment that is an exact match to one of the 3 x 4" paper found at the back of the Dapper Paper Stash.
I cut out the correct numbers, taped them together so they were evenly spaced (
I had to cut a bit of the black paper surrounding the 1 to make it fit). Once it was glued onto the Fragment - it was like it was meant to be!
As you can see, I added some old favorites like the
Pen Nib, the
Mirrored Star,
Small Talk Stickers, and
Vial Labels. Notice what has showed up yet again? The
Mini Plaquette (
that's three projects in a row if you're counting)...I better stock up on those!
Hope you have enjoyed today's share and that you will think about what kind of Framed Panel you will make. The concept is easy to personalize and will let the receiver know how much you care about them.
Again, if you need a refresher on how to add paper or Alcohol Ink to the Fragments - you can check that out
here.
now carry on,
paula


Oh my goodness Paula this is so totally awesome, I love it!!! Super inspiring thanks for sharing! xx
ReplyDeleteI love how you did this! These would make great Christmas or birthday gifts, personalized to each individual?
ReplyDeleteI love how you did this! These would make great Christmas or birthday gifts, personalized to each individual?
ReplyDeleteNice piece Paula thanks for posting
ReplyDeleteBeautiful piece Paula! I love this idea......could do one for each family member. Always a pleasure popping over here. Love your work. Karen.x
ReplyDeleteThis is very beautiful, I love the idea of making it personal. Thanks for sharing
ReplyDelete
ReplyDeletewhen art meets heart
Your use of the new product is so inventive! This piece is a bit like a scrapbook page and your tips about personalization are just terrific. Genius to wrap the dice and a great way to use the Dapper numbers. You are so right about having a frame to fit panels and it looks like this is just the perfect size. What a wonderful gift this could be.
ReplyDeletePERFECTION! It's the only word that I can say! I'm in awe! Barbara
ReplyDeleteWonderful fragments and fabulous composition of all pieces together. Love it xxx
ReplyDeleteI love this! Using family photos would make this such a personal piece of art for home decor.
ReplyDeletewhat a beauty!! I have a stash of fragments (I knew I was saving them for something!!) now I need to go and add to my order for a few more things to make myself one of these! thanks always for the inspiration!
ReplyDeleteSo beautifully put together - all those wonderful embellishments! Jennie x
ReplyDeleteGreat project! I love the new mini pocket watch. I can't wait to see the new CHA products in person. Thanks for sharing Paula!
ReplyDeleteI love love love this! Need to stock up on these frames and you are going to cost me a small fortune in mushroom alcohol ink! I love the way you use it to age everything!
ReplyDeleteOutstanding!!!
ReplyDeleteOne of my favorite projects of yours! I love all of the details, the frame, and the story your project tells. Just amazing.
ReplyDeleteOooooo! So much to love here Paula. First of all, I adore the theme of this project with the fragments. I'm still working through boxes of my dad's navy memorabilia and I would love to do something like this. But also, I love the new products. The mini pocket watch ... oh my!!! And the Alpha Dice ... and the frames and ... I could just go on and on! So cool. Awesome project!
ReplyDeleteWonderful Paula, love the dice wrapped and tied, what a great idea! And all those lovely fragments, they are so versatile. Thanks so much for sharing your beautiful framed panel
ReplyDeleteLove this!!! Great inspiration!
ReplyDeleteAmazing! You are a constant source of inspiration....
ReplyDeleteI hope to come soon in Italy the new products of Tim!
Brilliant. I absolutely adore the whole clean yet vintage look to this. It allows time and space to look at all those details individually. And yes, that frame is awesome!!! Jenny x
ReplyDeleteBeautiful use of the fragments to highlight and focus our attention on specifics - rather than things getting lost in a collaged mix. Fantastic.
ReplyDeleteAlison x
Thank you Paula!! Just gave me the perfect idea for a 95th bday gift for my grandmother who was a nurse back in the early 40's. I've got a great vintage picture of her in her uniform with cap and cape! I can totally see this coming together in a fun collage. Thanks for the inspiration.
ReplyDelete