Here is where I started.
A blank journal that has been sitting on my desk for some months. Something about cracking it open and just starting. Once I get going, I know it will be fine. The beginning is the hard part.
Dyan's Creative Journal from Ranger is big (
might be a little intimidating for some) but the paper is wonderful and smooth. Over the course of an afternoon last week, I coated at least 6 double pages with Dina's Media White Gesso. I put on a nice thin coat with the plastic palette knife. Kinda soothing really. Good music playing, window open to let in a breeze...just me and the journal. Dina's gesso dries fast, but even so, I could continue to work on other things (
that's how it is around here) while I waited for it to dry. Once a double page was dry, I could just move on to the next, and then repeat again and again. I think it's a lot easier to have the pages ready to go when an idea comes to mind.
Okay, I promise to stop talking about the darn gesso now and move on.
I decided on a color scheme from something I saw on Pinterest. To be honest I can't even remember what it was now, I just know these were the colors. I went to my craft room, grabbed the colors I thought matched what I had seen and put them on my craft table.
They have been sitting there for almost 3 weeks.
Till today.
I started with the evergreen bough. Right from the bottle, right onto the page.
Then stated spreading it around with a wet wipe. It really moves nicely around on that Media gesso.(sorry, I wasn't going to mention gesso again!)
I got it where I wanted it.
Lots of white and texture showing.
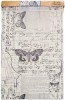
This is more realistic of the real color I see when I look at the pages. The Tissue Wrap and old paper was added with Matte Multi Medium...no brushes used in the entire project, just my fingers and hands.
Love the paper with the handwriting. I'm always drawn to things that come from the past...evidence that someone lived before me I guess.
No wrong way to do this, just fast movement, creating from your gut instead of from your head. Hard to do sometimes, especially in blog world where things only last a matter of seconds on someones screen and you want them to like it.
No matter.
Just for me today.
Note: because the photos are taken horizontally you will need
to click on the pictures to see detail of the progression.
Tissue Wrap, old paper.
Distress Paint Wild Honey, Evergreen Bough, Worn Lipstick, wet wipes.
At this point I left it to dry.
I loved it at this point. Could have closed the book and been done. But I decided I should push forward.
I had the thought to use one the the Found Relatives as a tape transfer. I think I will eventually work through all 24 cards from the Found Relatives deck in this journal. That sounds like a good goal for me.
So, I picked the Found Relative, a group of brothers and sisters. I added matte finish contact paper over the top of the photo.
Burnish with a bone folder.
Since Found Relatives are thick cards that can stand on their own, I decided to remove the back of the card before proceeding. Super easy to peel away.
Then into the sink.
After about 15 minutes I removed it from the water and patted it dry.
To my amazement the middle layer of thick white paper released itself without much effort on my part, leaving the photo covered in plastic...easiest tape transfer EVER.
I cut away the background.
I added my new relatives to the page.
I also added a bit of scalloped paper underneath so they don't look like they are floating on the page.
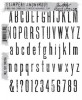
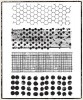
Distress Damask Stamp, Archival ink - Watering Can
Chevron Layering stencil, Wendy Vecchi Embossing Paste, plastic palette knife
Dot fade Layering Stencil, Numbered Layering Stencil, Mini Ink Blending Tool, Worn Lipstick Distress Paint
The embossing paste was put on and left to dry.
Then the paint was added right over the top.
Walnut Stain Distress Marker, Matte Multi-Medium, Remnant Rubs - botanical
Here is a good comparison.
This shows the same pictures with the addition of the Spritzer tool/Walnut Stain Distress Marker.
Because the photo of the children is protected with the plastic contact paper, any over spray is easily wiped away with your finger tip.
I added the handwritten word create at the bottom. Not something I would normally do, but since the book is all about experimentation, I was willing to test it out.
Well, that's it for page one.
I love the freedom to try new ideas on the pages of this book. Funny, now I can't stop thinking about what to do next. I do know I'm going to try Wendy's Crackle Embossing paste to see what it will do on flexible paper. And I need to practice my writing. Testing and experimenting, that's what it's all about, right?
now carry on,
paula