Hi Everyone -
I'm typing this post while listening to pouring rain. Living in California, that is something I haven't said in years. In fact, the local news station has had a reporter out at our local airport waiting for the rain. They keep saying he's on "Rain Watch"! And in reality, he's alone in the airport looking at Facebook on his phone. Anyway, between daylight savings and the winter storm, I really had to push to get through today's project before I lost all light for photography. No matter, the rain is so needed here, I sure don't mind.
The project today is by request from Johnna over at
Scrappy Camper Sisters. She asked if I could show how to make snowball's, which were part of the
Winter Wish kit I taught last Saturday at Whim So Doodle (
Johnna was in my class). Although, I couldn't
just make a snowball - that just seemed silly. So I have a fun little project that can be made in just an hour or two. Follow along and I'll show you what I made.
I am using the largest box that comes in the 6 x 8" configurations box. If you do not have any extra configuration boxes you could use a small gift box or paper mache box you can find at any craft store. I also used polka dot paper from the Merriment Paper Stash.
I am going to cover the bottom of this box, not the inside, so my measurements are for the outside of the box.
NOTE:
When covering any box, measure both sides and the bottom of the box, add the three numbers together. My box is square so my measurement is 6 3/8 x 6 3/8". Now score the paper based on the depth of the box. The configuration boxes are 1 3/4" deep, so score the paper 1 3/4" from the outside edge. After scoring, cut out the corners.
Use Multi Medium to adhere the paper. I like the small bottle of Multi Medium with the built in brush. I never have to wash a paint brush! I admit, I do buy the bigger bottle of MM but I use it to refill the one with the brush.
Once dry, use the Sanding Grip to sand the corners down.
I sealed the paper with more Multi Medium. Once I brush it on, I like to smooth it out with my hands so that it is super thin and will dry quicker.
Once dry, I sanded the box a bit and inked it with a Mini Blending Tool and Gathered Twigs.
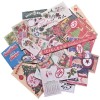
I'm going to use some of the trim from the Industrious Stickers to finish
Have you ever tried Alcohol Ink on Industrious
Stickers? Well, it works like a charm. I did a heavy layer of Poppyfield and let it
dry. Then a final layer of Mushroom to add the vintage look.
Once dry, I used them on the top edge of the box.
Set the box aside to work on the snowballs -
Gather a few things, plastic pearls (these are made by Darice), Distress Glitter - Clear Rock Candy, Multi Medium and a small spoon.
Put Multi Medium in the palm of your hand. Roll the plastic pearls in the MM.
Drop them in the Distress Glitter jar and roll them around by shaking the jar.
Use the small spoon to dig out the snowballs. Set them on your Craft Sheet to dry.
Yep that easy.
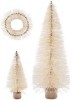
Next up is the Woodland Tree. I was inspired to create a vintage looking tree after seeing a one Tim created a few years ago. I coated the Woodland tree with MM.
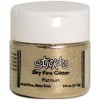
Then sprinkled on Stickles Fine Glitter in Platinum - the perfect mix of gold and silver. It is my favorite Christmas glitter! Now set the tree aside to dry.
The tree needs some ornaments don't you think? We need vintage looking bulbs to go with the vintage looking tree. I chose 4 colors of Alcohol Ink - Mermaid, Poppyfield, Meadow and Honeycomb. You might be saying,
what's she's thinking - those colors are really bright! No worries, old mercury glass beads started out bright, they have just been mellowed by age.
I counted out 16 plastic pearls in two sizes. Put 4 pearls into a small bag and drip in one of the Alcohol Ink colors (
yes, you must a different bag for each color). You just need a
couple drops, really. Roll them around until they are coated and pour them out onto your Craft Sheet or a piece of chipboard or paper plate....whatever is available other than your hand. That, it will stain. Don't worry if there are any white spots showing - that's actually good, and will be taken care of in the next step.
I'm going to tell you right now, these come out so nice that you
might as well do more now, because you are going to want them in the end.
And now, magic Mushroom Alcohol Ink. Seriously, that should be it's name.
Pounce it directly on the pearls with the Blending Tool w/ felt pad.
And just like that, they look like vintage mercury glass beads. Such an easy technique that has an amazing transformational quality. Mesmerizing really.
Use your hot glue gun to add the beads
into the tree. And when I say "into" tree tree I mean it. It always looks better when the bulbs are sitting inside the branches, instead of on them.
Every Christmas tree needs a star on the top, so I colored two
identical Mirrored Stars with Alcohol ink, then glued them back to
back.
A
spot of hot glue and the tree has a perfect top. Gluing two stars
together created more surface for the hot glue to adhere to the tree (
so the star is nice an stable),
compared to trying to glue only one star on top, it never works and you
end up gluing the star to the front of the tree, instead of the top.
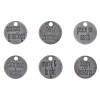
So the tree is done and now we need a little sign. I decided on a Tidings Token, so I spread white paint across the top to fill in the letters, then wiped away the excess. I added a Long Fastener and then used a hot glue gun to add the token to a Memo Pin. The pin will be pushed into the box in front of the tree.
Now were ready for Snow.
Pour a small amount of Distress Glitter into a disposable plastic cup. Add Glossy Accents to the Distress Glitter.
Stir with a craft stick until it has the consistency of brown sugar.
Use the craft stick to add the snow under the tree, that has been glued to the top of the box.
Use Glossy Accents to add the snowballs.
The snow might not look like it will stay in place, but just leave it for 30 minutes and it will become rock solid.
You can decorate the bottom of the box many ways. I wanted to use some vintage crepe paper I purchased from Julie Collins over at
Vintage Handmade. I have purchased beautiful things from Julie for many years. From her sugared pine cones to labels, to the
gathered crepe paper I'm using today. What I like about buying from Vintage Handmade is that everything is beautifully and expertly packaged. If fact, sometimes I have a hard time taking things out of the package.
It looks perfect on the box.
I used trimmings to cover the gathering stitches of the crepe paper, and a bit of Christmas ephemera in the center (
you can see it in the next photo).
Love how it turned out. If you made this using a gift box of some sort - you could fill the bottom with candy and give it as a gift (
especially if it's dark chocolate).
I hope you will try the Alcohol Ink techniques from today's tutorial. Just to see for yourself how easy it is to change the faux pearls into something so vintage looking.
Love the way the snow looks under the tree and on the Merry Christmas sign!
Well that's it for today. Have a great weekend everyone. I have to get some shopping done, a tree bought, and a few CHA projects made...cheers! I might even drive by the airport to see if the reporter is still there...covering
"storm damage" of course. Only in a small town I tell you.
carry on,
paula


 A
spot of hot glue and the tree has a perfect top. Gluing two stars
together created more surface for the hot glue to adhere to the tree (so the star is nice an stable),
compared to trying to glue only one star on top, it never works and you
end up gluing the star to the front of the tree, instead of the top.
A
spot of hot glue and the tree has a perfect top. Gluing two stars
together created more surface for the hot glue to adhere to the tree (so the star is nice an stable),
compared to trying to glue only one star on top, it never works and you
end up gluing the star to the front of the tree, instead of the top. So the tree is done and now we need a little sign. I decided on a Tidings Token, so I spread white paint across the top to fill in the letters, then wiped away the excess. I added a Long Fastener and then used a hot glue gun to add the token to a Memo Pin. The pin will be pushed into the box in front of the tree.


Amazing technique Paula. Oh geez, I hope I have enough time to try this! I have tons of naked Woodland Trees and I'm trying to make a few of them into ornaments!
ReplyDeleteWow, the info on making the snowballs and ornaments is super! Lovely tree!
ReplyDeleteamazing...those snowballs are so cute xxx
ReplyDeleteThank you for telling me how to cover a box! Seems simple now that you showed me. LOL. I really like everything you did in this project. I think I have everything to do it, except one hour is not in my "DNA." I am loving the rain but feel sorry for those up north.
ReplyDeleteThanks for the step by step. Hope I can find some time to play Christmas.
ReplyDeleteFantasmic project! I need to try this. Hope the rain doesn't cause much damage around you. Be safe!
ReplyDeleteLovely project , love the tree and baubles. Thanks for the step by step. Tracy x
ReplyDeleteSo cute!
ReplyDeleteWow Paula, wonderful project! I love the mercury glass ornaments technique, thank you for sharing!
ReplyDeleteOh boy I'm in love with those beautiful baubles! Thank you for sharing your secret to making them. And your snowy scene box is absolutely super. Got to try that. Jenny x
ReplyDeleteWhy I love everything you do ? This project is clever,wonderful and so creative! As always! thanks for sharing with us! Barbarayaya
ReplyDeletethe whole project is cool, but i really really love the vintage flair of those ornaments after you pounced magic mushroom on them
ReplyDeleteThis is just gorgeous love the pearls turned snowballs and ornaments.
ReplyDeleteoh my goodness!!! so so beautiful!!! I'm definelty giving this a try!!!
ReplyDeleteI adore this little scene! Thanks for sharing the fun technique on the snowballs, snow and mercury bulbs. A must try technique. Have fun at the airport looking for the reporter.
ReplyDeleteI ran out and got some pearls the minute I saw your post! You have so many wonderful design ideas Paula. TFS!
ReplyDeleteThanks so much, love the snowballs
ReplyDeletexoxo
ps thanks to Johnna too xoxo more
OMG! Those little snow balls and mercury glass ornaments are just amazing!!! What a beautiful piece!
ReplyDeleteI love those faux mercury balls and the adorable snowballs.... Now that is some inspiration! Sounds like you have a full list for this weekend - good luck!!! And happy rain!
ReplyDeleteSo much fun. I love making bottle brush tree anythings! They always look great no matter what. I love the industrious stickers colored with the alcohol ink.
ReplyDeleteJess
Beautiful, the little coloured and iced pearls look wonderful on the project too. Thanks for the inspiration.
ReplyDeleteoh I love those pearls!!!! they are perfect
ReplyDeleteBe still my heart. I see a shopping trip in my near future to purchase what I don't have so that I can recreate this!
ReplyDeleteLove your beautiful creation.
ReplyDeleteOh, Paula, this is such a beautiful project. You always give such excellent instructions.
ReplyDeleteOh I wish this was a week earlier when I was going crazy looking for little ornaments for some bottle brush trees 😕 I might have to pull the plain old beads off lol! Pinning so I don't forget. Beautiful as usual.
ReplyDeleteWhat a great project - thanks so much Paula! Merry Christmas to you and yours!!
ReplyDeleteGORGEOUS!! Thanks for sharing
ReplyDeletePerfection!!!!!!!!!!!!!!!!!!!!!
ReplyDeleteTruly beautiful! Plus a well written and engaging post. I usually don't read 90% of any post all the way to the end but this one was a winner!
ReplyDeleteLovely Paula, Nikki x
ReplyDeleteSimply amazing. Ilana. xx
ReplyDeleteI LOVE what you did with the tree and the faux vintage ornaments. And that snow...and the snowballs. OMG I have to give it a try.
ReplyDeleteI love THIS!! What a great project!
ReplyDeleteWow! That is a beautiful tree....Thank you so much for the tutuorial. Love it!! Love ya' Patricia B
ReplyDeleteWow! This is fabulous, Paula! I can't wait to try those techniques.
ReplyDeleteBEEEEEEEEUUTIFUL! Love it! Karen.x
ReplyDeleteWOW!! That is amazing! I love the faux mercury glass. I saw a technique the other day that did not even come close. Thanks for the tutorial.
ReplyDeleteLove your projects! Thank you so much for sharing.
ReplyDeleteOMG thats is the coolest little decoration! So easy when you know how, and thats why I keep coming back, you always inspire me. thanks so much!! Merry Christmas :)
ReplyDeleteSuch a fun project! Thank you for all the how-to's. Enjoy the rain :)
ReplyDeleteWeekday a fun tree! So clever!
ReplyDeleteOh my creative word! You rock! LOVE the ornaments and the technique! Gorgeous project!
ReplyDeleteLOVE everything about this Paula!! A truly vintage delight!! Just all smiles over how awesome this is :) I need to stock up on those Woodland trees (for next year!) ;)
ReplyDeleteXOXO-Shari
What a fun and lovely project. Thanks for sharing.
ReplyDeleteLove, love, love this project!!! I'm definitely making one for myself. I hope I have a Woodland tree on hand.
ReplyDeleteWhat a fabulous tutorial and I love your result, it's just perfect in every way. Thanks for stopping by my blog. I am so behind catching up with blogs.
ReplyDeleteJulie x