I'm using Specialty Stamping Paper today, which is a matte coated white cardstock. I found that this surface is one of the best for the technique I'm going to share because it is has slick surface and gives you a bit more open time.
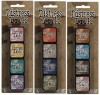
I wanted to try a spin on Monoprinting using the Distress Ink Mini's. I lined up all the things I will need. Water mister, Mini Distress Ink pads (set number #4 that has Spun Sugar, Shaded Lilac, Scattered Straw and Evergreen bough), Specialty Stamping Paper cut to 4 x 6", and a Layering Stencil - dot fade. I also had a folded paper towel that is off camera.
So normally in monoprinting you pounce the ink directly onto the stencil surface. But today I wanted to try something different by adding the ink to the paper.
I opened each ink pad and quickly stamped directly onto the Specialty Stamping Paper till I had 5 rows (about the size of my card). You can see that my lines are not perfect, I just tried to stamp the squares close to each other without going into the next square and even when I did, it's not going to matter in the end.
I sprayed the Layering Stencil with a generous amount of water from the mister.
Then flipped the wet stencil over onto the squares of ink.
Cover with a paper towel and press to soak up any excess just like you would in standard monoprinting.
When you lift the Layering stencil away from the paper you should still have the pattern of the squares but you have the pattern of the stencil too. Dry with a Heat it tool and blot off any excess ink.
The Specialty Stamping Paper has a matte finish which gives the ink a faded appearance after drying. A totally unique look.
I love how the Distress Ink has run along the stencil pattern, over other colors that were once only side by side.
I also changed up the colors of the Mini Distress Ink Pads and tried several stencil patterns repeating the technique. This time I used Picked Raspberry, Peacock Feathers, Spiced Marmalade, Seedless Preserves.
Schoolhouse...
and Bubble.
All right now back to the card tutorial...
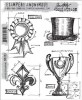
Once dry, I used the Armor Shield die to cut a fun shape for the front of the card.
I stamped the shield with an image from the SA High Society Blueprint Stamp set, then added a drop shadow with a Pumice Stone Distress Marker.
I added pink cardstock to the back of the Armor Shield and stitched right along the score line that appears in the paper when the die is cut. Just follow the line! I trimmed away the excess pink cardstock with my Tonic scissors.
The Mirrored Stars have at least 5 sizes of stars in every package. I colored one of the small sizes with Mushroom Alcohol Ink and added it to the center circle with Glossy Accents.
I added a bit of Glossy Accents to the laurel leaf that appears on the front of the trophy cup.
Then
lightly sprinkled Distress Glitter - pumice stone into the Glossy Accents and set aside to dry.
While the glue was drying, I added a piece of Ranger Metal Foil Tape to a piece of cardstock (simple peel and stick stuff). I ran the cardstock through the Vagabond machine using the Courtyard Texture Fade.
I squared up the cardstock to fit my card front then painted the foil sheet with Distress Paint - Black Soot.
I wiped away the excess with a paper towel, rubbing it into the creases.
I used a corner rounder on the metal piece and then added it to my card front.
Then the layered piece I completed earlier.
I wanted a sentiment, so I used the Tattered Curvy Banner Die to cut a piece of Manila cardstock into a banner shape. I added Glossy Accents to the ends and some pumice stone Distress Glitter. Normally when you used Distress Glitter, you shake it on and leave it alone to dry. I purposefully rubbed the Distress Glitter/glue around to create a more worn look, almost like the glitter was once there but had been worn away over time. Once dry, I inked the glittered ends with Vintage Photo Distress Ink to make the Pumice Stone Distress Glitter have just a hint of a golden color.
The word "noteworthy" came from the Remnant Rubs - Life Quotes
I added the Tattered Curvy Banner to the card with thin strip of foam tape behind the center of the banner. Then used the Spritzer and a Walnut Stain Distress Marker to lightly add a bit of splatter over the card.
Love the way the layers turned out.
I am happy with the result. I wish the camera showed the detail of the monoprinting technique because it really looks cool in person. If you try this technique, I would love to see how it turns out!
I wasn't going to make another card, but then the technique part was already done! I made a simple card using the large Sized Ovals to cut the center oval shape from the technique paper. I added an Ornate Plate I colored with Iced Spruce Distress Paint (
you know it goes with everything - "Iced Spruce is the new black" ...and you can quote me on that) and a Distress Glitter Heart. Some Jute string and a chitchat word in the
center finish it off.
I used Antique Linen Distress Glitter to cover the heart then inked the edges with Vintage Photo,
once the glitter was dry. I have gotten a few emails from people about the Distress Glitter and what kind of glue I used. You really can use any kind of liquid glue but I prefer a thin, even coat of Glossy Accents.
So that's two graduation cards down, two more to go!
We are off on a short trip to the Getty Museum this weekend to see a photography exhibit. You can follow along on Instagram (luckyday) and/or Facebook where I will be posting pictures of things I see along the way. Cheers for a great weekend!
now carry on,
paula


love them both...
ReplyDeletelove your style!
have a great trip!
Perfection! I love the monoprint look on both of these, and I have to agree about the Iced Spruce!!! It is replacing my go to Pumice Stone for the time being! Awesome tut!!!
ReplyDeletePaula, thanks for sharing - this technique is new to me so I'm going to give it a go. Jean.x
ReplyDeleteYou are so gosh-darn clever. Was at Whim So Doodle today. Hope your ears were burning in a good way! Jill and I were talking good things about you! I picked up another pack of the mini's so will be giving this new technique of yours a try tomorrow! Gonna be 90+ here all weekend, so this gal will be staying INside!
ReplyDeleteThis comment has been removed by the author.
ReplyDeletewow! the tutorial is really inspiring ^.^ and the cards turned out amazing!
ReplyDeleteWonderful cards, both of them and the top one would make a great Fathers Day or other guy card!
ReplyDeleteSuch a great looking technique. The way you've shaded the trophy really makes it look 3D and I love the banner and metallic background. Thanks for sharing. Jenny x
ReplyDeleteThe Graduation Cards are gorgeous. Love the spin you put on monoprinting. The Distress Inks just keep getting more fabulous! Thank you, Paula.
ReplyDeleteIced spruce is the new black .... hahahahahahaha.... okay made me add it to my shopping list! Wish you were coming with Tim to Columbus next weekend!!!
ReplyDeleteYou are so creative! love both your card , but my fav is the second!!! thanks for sharing this technique! BArbarayaya
ReplyDeleteThis looks great!
ReplyDeletegreetings Silvia
Fabulous. You are making me want the Trophies!
ReplyDeleteAwesomely Awesome, Paula!! LOVE both cards--the graduates are definitely Lucky Ones to receive these Fantastic creations!! The technique is almost like 'reverse' mono-printing! Love it!! Thanks for the inspiration!! Happy Memorial Day! XOXO-Shari
ReplyDeleteThat is so amazing Paula ( the technique); awesome cards you made !!
ReplyDeleteAmazing - that's why you are clever and I am not so I have someone to take inspiration from
ReplyDeleteFantastic
Love those stenciled backgrounds. Thanks for sharing the technique.
ReplyDeletenice!! thank you for the technique. =)
ReplyDeleteLove this technique!
ReplyDeleteThis is just fabulous! I love the results you got!
ReplyDeletePaula I love your creative mind…you always amaze me with your work…awesome! Hugs from Slovenia
ReplyDelete