Friday, March 24, 2023

Tonic Rotary Media Trimmer

Happy Friday everyone!

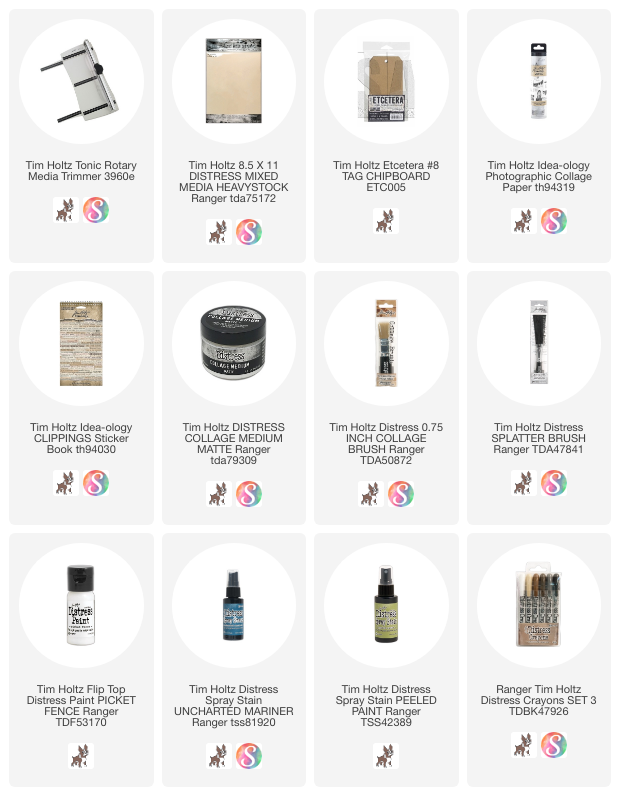
The Tonic Rotary Media Trimmer has been in my hands for a few weeks now.  I freely admit that me and slide trimmers have never been friends.  I'd buy one, thinking I could get it to cut straight and no...I couldn't, so I'd store it away till I gave it away to someone who wanted to give it a go.  I'd see people use them at events or crops, but I just couldn't get one to work for me. So for the 18 years I have been in the industry, I have use a rotary cutter and self-healing mat board (like quilters use).  Yes, I do use Tim's Guillotine Paper Trimmer, but mostly for card bases and quick chopping.  Nothing was ever precise enough, sharp enough, or strong enough for my liking.  Until now.
The Tonic Rotary Trimmer has been able to cut all the surface I regularly use with ease.  Even .50 chipboard, which to me, is incredible for a slide trimmer.  The cartridge that caries the blade is smooth and cuts easily.  I took my time to cut as many things as I normally would use a trimmer for: watercolor, velum, acetate, mixed media cardstock.  All super easy cutting, even two sheets at a time.
So enough about the testing...lets get started on the small project and I'll let you in on why I chose it for the this post.
The Tim Holtz Rotary Media Trimmer is highly engineered and durable, capable of cutting through heavy-duty chipboard (up to 0.05 inch thick), heavyweight cardstock (up to 130lb or 350GSM), synthetic surfaces (Yupo, acetate), and lightweight vellum with ease. 

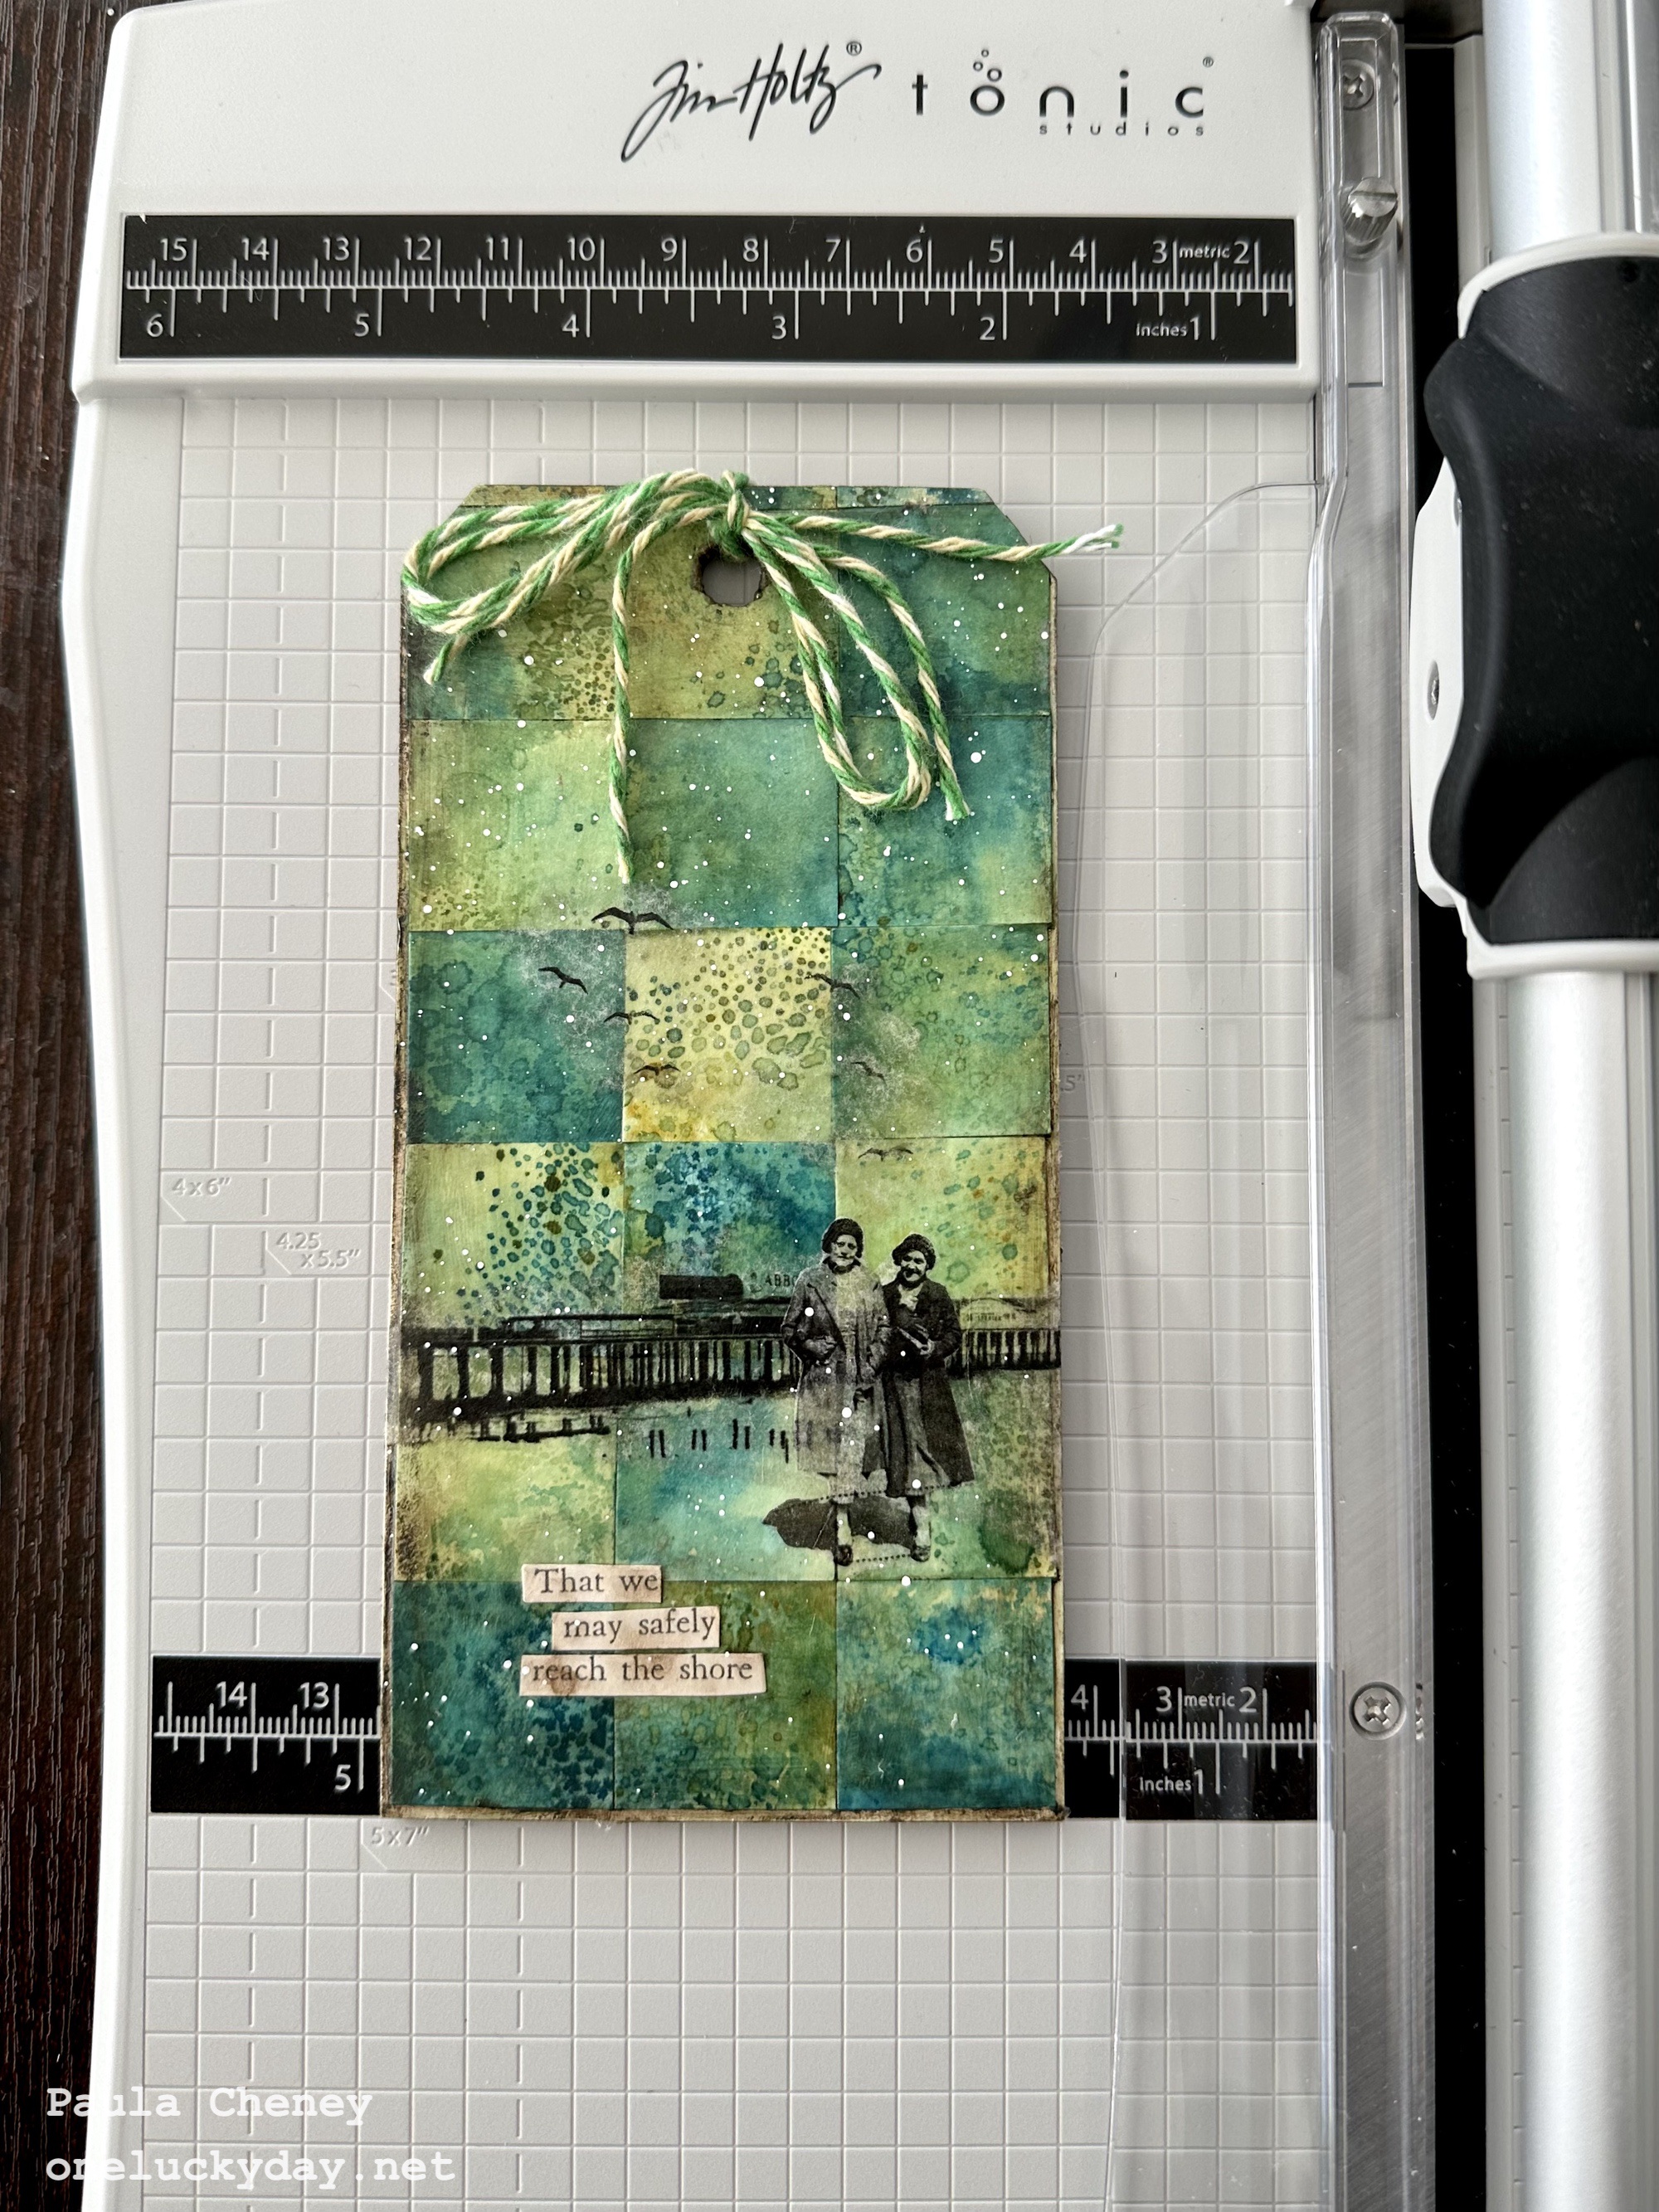
My goal with the trimmer today was to see how small I could go.  I know many have been very successful at cutting VERY skinny, long strips (like Kath cutting her own Easter grass).  I wanted to try 1" squares because with other cutters, the smaller the paper, the harder it is to hold on to...and if you can't hold on to it, you can't cut it straight.  With this trimmer, the plastic guide allows you to hold even a small piece of paper and keeps your fingertips safe! 
I started with a couple Distress Ink cards (Watercolor cardstock) from my stash (I made these cards back when I was working on Uncharted Mariner projects for the new color release).  I cut a few 1 x 6" strips,  then cut them into 1 x 2" pieces.  But I wanted to see if I could get a clean 1x1" square from this small piece.
The answer is yes!  I was easily able to cut all the 1 x 2", into 1 x 1".  The plastic guard held the heavy paper in place while cutting. The rotary cartridge easily slid right through the watercolor paper, even at this small size. 
* you will need 21 squares to make this project.
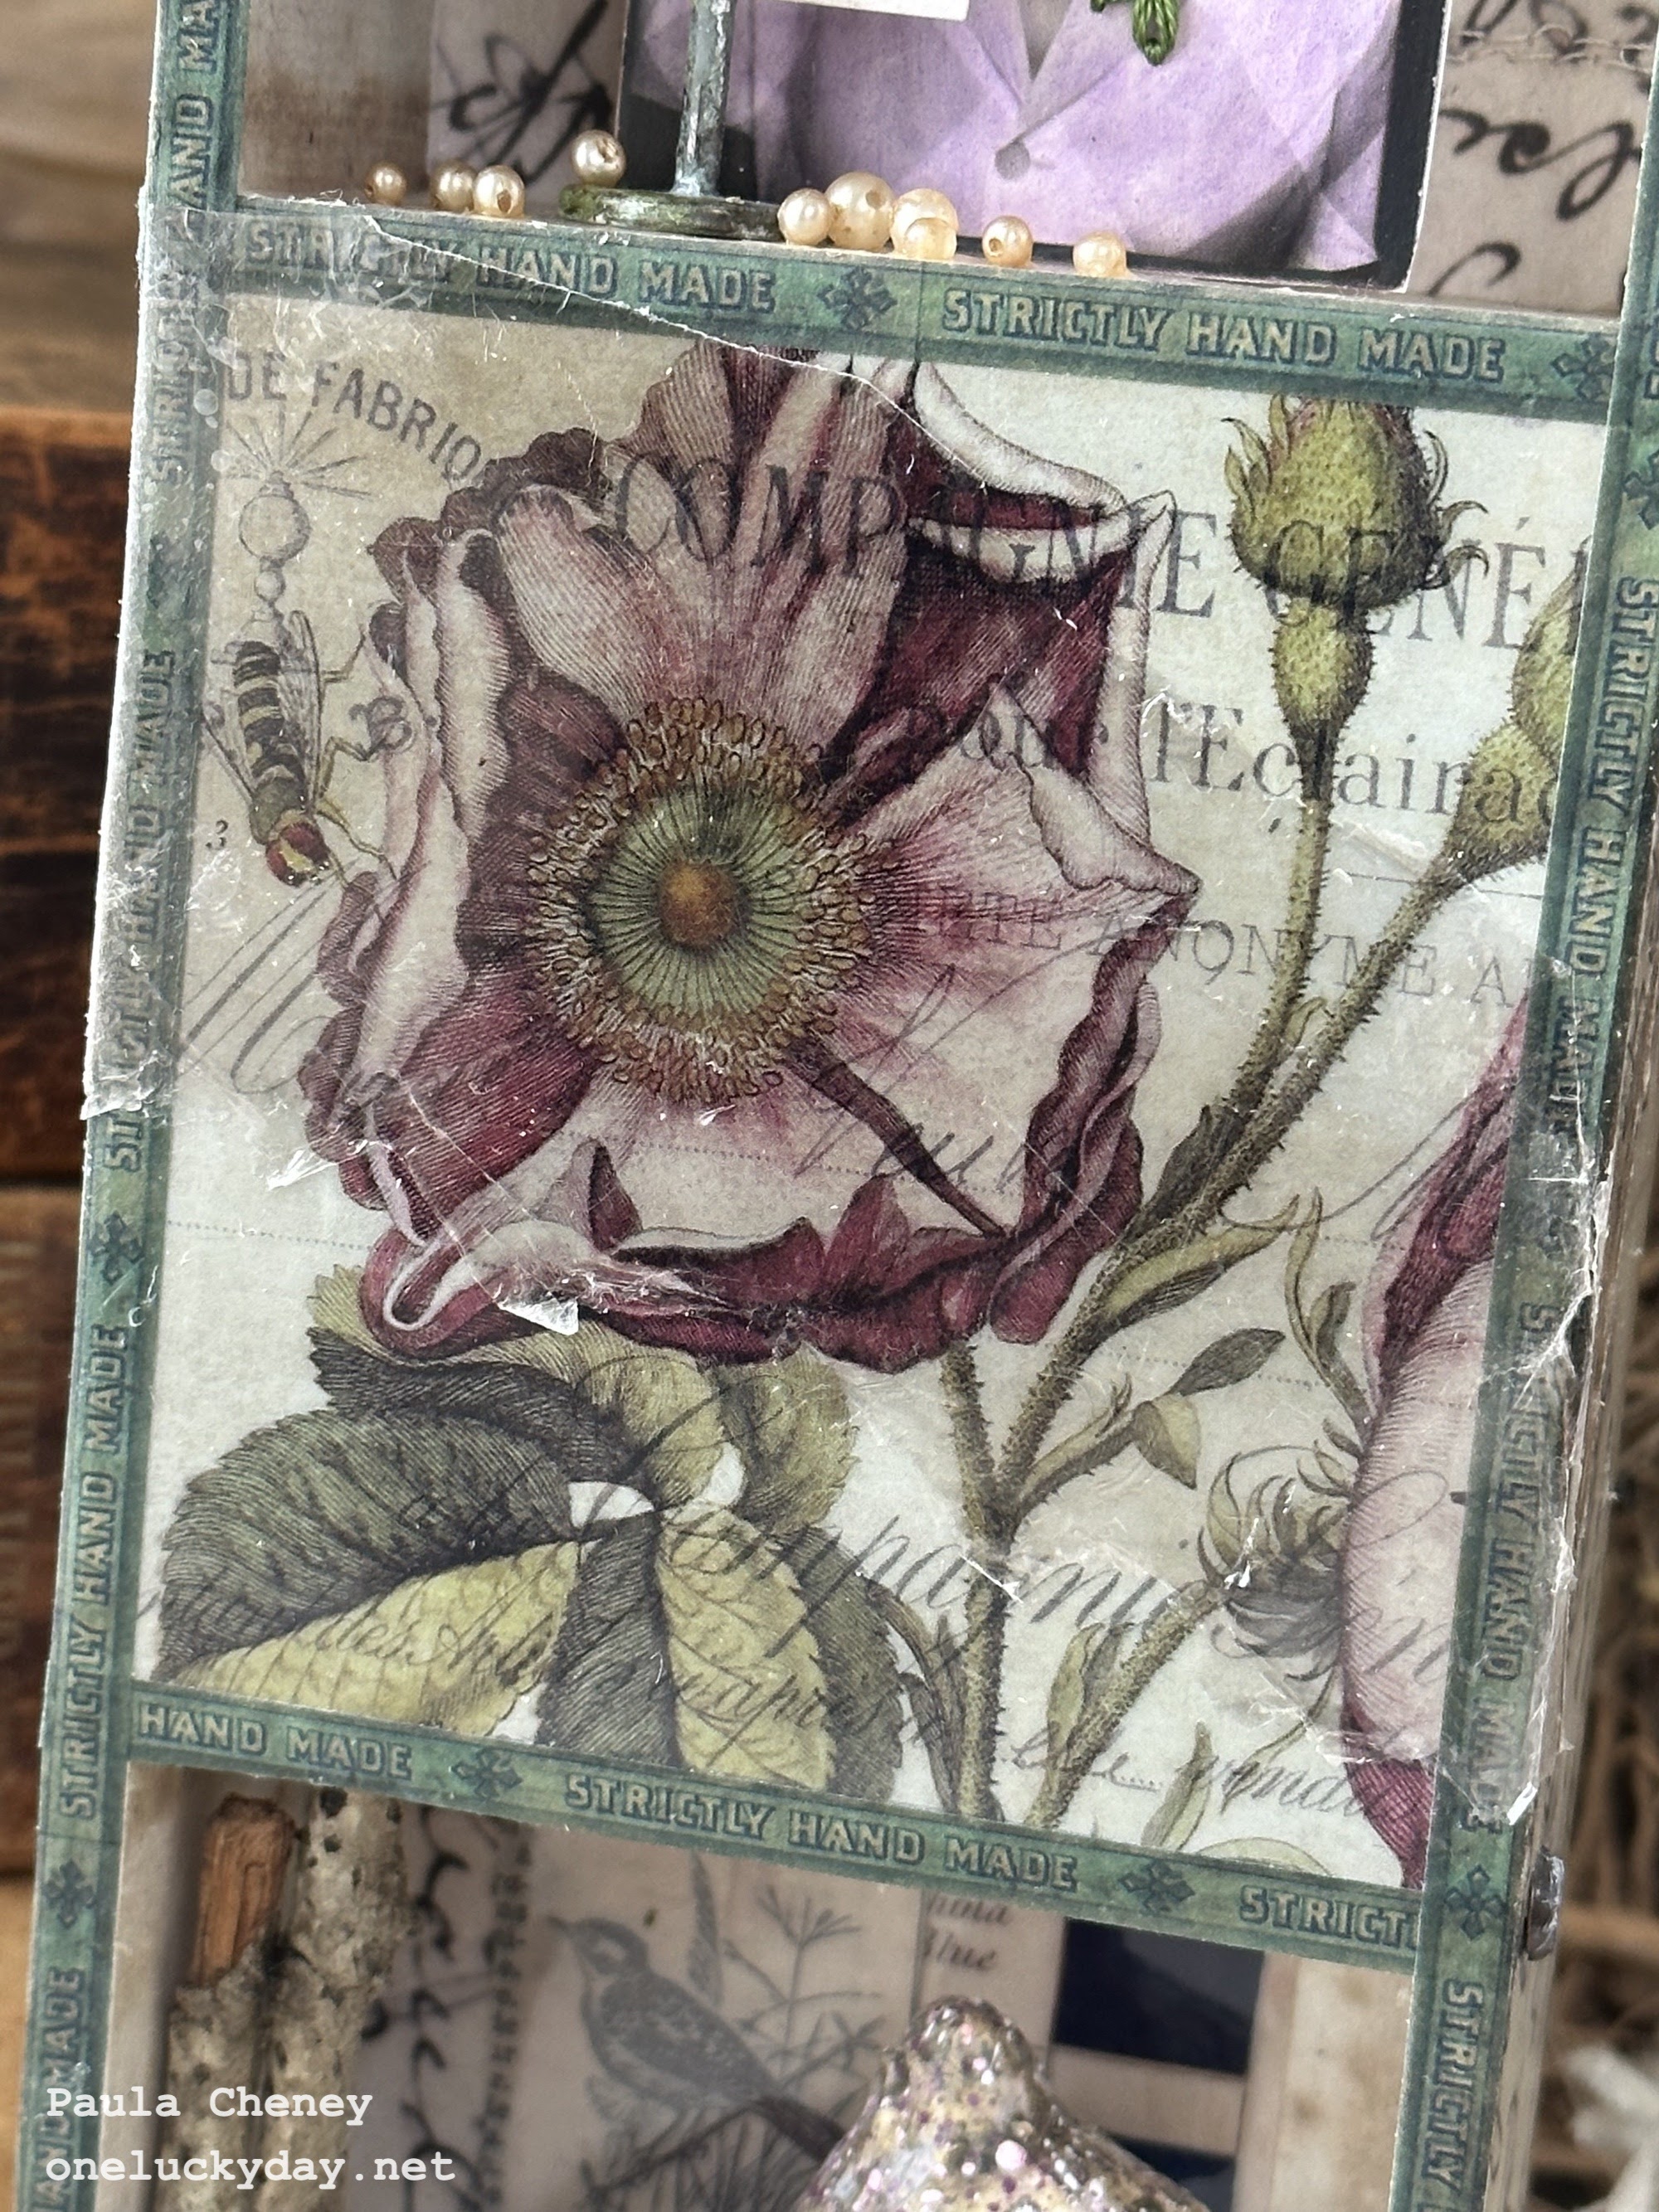
I cut a piece of cardstock the same size as a #8 Etcetera Tag and adhered the 1 " squares with Collage Medium.  I also added a coat of Collage medium over the top.
Once the Collage Medium was dry, I scribbled Walnut Stain Distress Crayon over the seams and edges. Use a damp finger or paintbrush to disperse the crayon.
Next, I adhered the patchwork to the #8 Etcetera Tag and cut the hole at the top for some string.
I didn't want to cover the background so I decided to use the new Collage paper, Photographic.  Whatever pieces you add to the tag, just remember you need Collage Medium underneath, then another layer on the top.
You can layer as many images as you wish... even over the top of a pervious one.  
I thought this sentiment from the Clippings Sticker book worked perfectly with the scene.
A bit of splattered white paint for good measure.
And some string at the top.

Loving the fact that I could easily cut the 1" squares - something I have never been successful with, with other trimmers. I also love the fact that it cuts like butter.  So easy to slide the carriage through thick paper.

Did you missed the YouTube Live about the Tonic Media Trimmer but you want to see exactly what you can cut with it? You can find the You Tube link HERE.
Now carry on,
paula

Thursday, March 23, 2023

Lucky Star

Hello Friends!

Happy to be here today sharing my Vignette Divided Drawer. I don't normally go for "purple" but the Transparency with the flower was the catalyst for this project and it just lead me that direction.  Lets get started!
I first adhered paper to both the inside and outside of the Divided Drawer.  I used paper from Backdrops 4 (the neutral pack) because I needed a neutral base for the "purple" story. It takes a bit of time to add all the paper pieces, but once it's done the rest was easy to fill in.  I also think the choice of the green Trim Tape was good to offset the purple.  I've never used the green tape in the Trim pack before, but once it was on, I knew it was the perfect choice.
*I previously drilled a hole for the Tiny Lights, that will be added to the center section.

I added Large Fasteners to the sides of the box that I had dented with the new Texture Hammer.  I cut the brad "legs" off each Large Fastener before denting and adding white paint - then I just used Collage medium to glue each metal Fastener to the box, mimicking rivets.  I added 3 Large Fasteners to each side of the Divided Drawer.

I added a Quote Chip Labels to a metal Label Frame. The oval size worked perfectly on the top of the Divided Drawer.  I adhered it with Collage Medium and let it sit for 30 minutes before laying the box down.  While this was drying, I worked on coloring the Photomatic and doing the stitching with embroidery floss. 
Distress Crayons were used to color the Photomatic: Peeled Paint, Uncharted Mariner for the background and Villainous Potion for her dress.
EMBROIDERY
I used a sharp needle and embroidery floss to stitch three french knots and two small leaves, as a corsage on her lapel. The photos are easy to stitch through and the texture is a fun addition.  Just remember, a sharp needle is a must.
TIP: to get the photo to appear to be freestanding, I added a small wood block to the back.

FIGURE STAND
I glued the star to the stand.  Once secure, I wiped white paint over the metal and let that dry.  A few pounces of Mushroom Alcohol Ink gave the metal a good Patina, making it look much older than it is.  The words LUCKY STAR came from the Clippings Sticker book.  The stand was secured to the box with Collage Medium.
*Figure Stands - this is the one item that is still on pre-order.  Hopefully they will be in shortly!

PEARLS
The pearls are vintage (from an old necklace).  I painted Collage Medium onto the surface of the box and just poured the pearls into the box to see which ones stayed put.  Once I let them dry, I banged the box on table to see if any would come loose - about 4 rolled to the back.  I used tweezers to grab the loose ones and glued each of them back in place with a little more Collage Medium.  
*remember, Collage Medium dries clear and shrinks around the item being glued.
TRANSPARENCY
I cut the flower transparency to fit the center compartment (where I had already added the Tiny Lights). I used 1/4" Scor-tape to adhere the Transparency to the wood box. The transparencies are thick and hold up really well over the open space.
After the Trim Tape is added to the box, the transparency will be enclosed on all sides. I added a piece of mica over the transparency (collage medium just on the edges) to add texture, but that part is optional.
For the bottom section, I wanted to keep the nature theme going.  I started with the background, adding ephemera pieces from the Transparent Things 2 pack.  I used Scor-Tape to add them to the back of the box before adding the Barrel and Toadstools.
TOADSTOOLS
You might notice I covered the cap of each Toadstool with vintage paper from an old book.  I coated the Toadstool cap with Collage Medium, then wrapped strips of book paper over the top till covered, adding more Collage Medium over the top.  Dry with a heat tool before adding the paint splatters (Villainous Potion and Picket Fence).  I also glued moss up inside the Toadstool so it hangs down one side.
BARREL
The Barrel is just glued into the box with Collage Medium (a nice big dollop!).  That much Collage Medium takes longer to dry, but once it is dry, it's like cement and will not move.
I added the moss and then some Bouquet flowers that were sprayed with Shaded Lilac Distress Spray.
One of the new metal leaves (Foliage Adornments) was added at the bottom.  I wiped Rustic Wilderness Distress Paint over the leaves before adding to the barrel with Collage Medium. 
I hope you liked the project today.  I love the spring colors and the nature theme.  It's hard to photograph with the Tiny Lights on (in the center section) but I like the way it looks in person. 

Now carry on,
paula

Thursday, March 16, 2023

Where the Light Shines Bright

 Hello friends,

Hope you week is going well!  We have been having lots of rain here in California, but no flooding in my area, so that is a plus!  We have a break in the weather toady with just a bit of blue sky so I might even venture out, even if it's just to the grocery store.

I'm really here to share a simple project...one of my favorites actually. I think its all the stitching that I love so much.

I began by cutting many pieces of Backdrops 4 paper (that is the new neutral pack that is just that...all neutral papers). The papers work seamlessly together, so this was an easy task. I cut the strips anywhere from a 1/2" to 3/4" which I thought best for this size project. I also used both the front and back of each paper. 
I then cut a base paper the size I needed for a small Vignette Tray and used a tape runner to add all the strips to it.  Once it was complete, I went to the sewing machine to do all the stitching, leaving the threads long, just in case I wanted to use them in the final piece.
You can see I added a couple small pieces of cheesecloth for more texture. If I was smart, I would have waited to add them later on, because I'm going to end up moving one of them before I'm done.  For now it's fine and I really like the added texture.
When I began this piece, my thought was to have all the pieced paper at the bottom and the house Snapshot at the top.  But after looking at the stitched piece laying on the tray for a few days, I decided it needed to be split up (that's the way some plans go, right?).  So out comes the rotary cutter, to cut about 1 1/2" off what I determined to be the top.
I had perviously painted the small Vignette Tray Black, so all that was left to do was add the stitched paper to the tray.  I decided to use wide Scor-Tape to add the paper, since the stitching raised it off the surface just a bit.

I chose an Snapshots Volume 2 photo of a house as my focal point.  I used a sharp cutting knife to cut away the background, leaving just the house, trees (with no leaves) and the ground. This was not hard to do, but you do need a self-healing mat board to work on.
Once I had my Snapshot ready, I used foam tape to add the photo over one of the backgrounds from the Layers Organic pack.  The clouds are the perfect scale for the scene!  Also having the Snapshot raised over the background gives it a great effect, like a diorama.
The last step was to cut a circle (always harder than it seems) out of metallic kraft cardstock that I had sanded just a bit.  
I slipped the "sun" behind the tree and house.  A little Collage Medium on the back keeps it in place.
I used the wide Scor-Tape to add the Snapshot to the tray, covering the black hole, lol!
The rest of the photos below were taken once the project was completed, but there are details that I did not take in-progress photos of, like the Large Fasteners and Label Frames seen below.
I had previously added the cheesecloth, but the Label Frame placement landed right on top of one...so I just peeled it off the tray and added the Label Frame with the Quote Chip. I love that the Label Frames fit all the sizes and shapes of the new Quote Chips Labels!
I added the bits of cheesecloth to the tray in places where I wanted to add the new Large Fasteners. Of course I had to use the new Texture Hammer on the Large Fasteners to dent them (I love the hammering part)!  I wiped a little white paint on them just so you could see the indentations.

NOTE: Large Fasteners are brads, which means they have "legs" that normally go through holes in chipboard or paper.  Because I wanted to use them on the Vignette Tray (which is wood), I cut the "legs" off and set the tops in Collage Medium.  Once dry, I pounded them with the Texture Hammer.  Okay, In all honesty, I did not wait till the glue was dry, so I ended up with a few across the room, but you can make that call for yourself!

The word "HOME" came from the Clippings Sticker Book.

I hope you like this project as much as I did making it! It was the first thing I made once I got Backdrops 4 - I had it in my mind even before the package arrived.  The execution just took a bit of finessing!
now carry on,
paula


Sunday, March 5, 2023

Collage Strip Vignette Panel

Hello friends,

Grateful to be here today, with a tutorial using product from the new idea-ology release. This was a very easy piece to make - I call it beginner level idea-ology! Everything is very straightforward...and the Collage Strips do all the talking!

Lets start with the background.  I cut a 9 x 9" piece of scrap paper to use as a base for the Collage Strips.  It will take 6 columns of Collage Strips to cover the 9 x 9" paper.  I decided to go (from left to right) pink, orange, yellow, green, blue, then purple, but you can come up with any color order you wish.  It will take more than one strip of each color to go from the top to bottom of the column, so choose two strips of each color family, then begin laying them out.  I made sure the photos on the Collage Strips never touched.  If a photo was too near another, I simply cut the strip to make the change in order.
Once I had the order the way I wanted it, I used a tape runner to add the strips to the base, butting them up against each other.  The tape is just to hold the strips in place when you take the paper to the sewing machine so one swipe per strip is enough.  If you are not sewing, you could use Collage Medium to add all the strips to the base.
Now to the sewing machine. 
Stitch on either side of each Collage Strip and then all the way around the edges of the 9 x 9" square.  I chose to cut the strings but you could leave them if you wish.
Use Collage Medium to adhere the sewn paper to the wood Vignette Panel.  Use a brayer to smooth out the surface.  You might even turn the panel over and put something heavy in the center till the paper is secure.
For the collage in the center, I added a circle from the Transparent Layers pack as the bottom layer.  
To adhere the transparency to the panel, I used 1" Scor-Tape (my go-to for transparent things). You can see here that you can barely see the tape through the transparency.
I painted all the metal pieces the same way.  Picket Fence Distress Paint, then pouncing over the top with Mushroom Alcohol Ink.  I try to paint all the metal pieces at the same time, let them dry together, then add the Mushroom over all, once dry.
When the paint on the Word Plaque and Large Fasteners was dry, I used the Texture Hammer to add dents into the Large Fasteners (this was very satisfying, lol).
The Texture Hammer works perfectly to smash/dent the centers of the new Large Fasteners.
I added the Word Plaque along with other new pieces of idea-ology to the collage. Many of the pieces were adhered with foam squares to create dimension over the transparency.
Layers Organic: all leaves, flower and black label
Ornate Adornments: metal flourish
Metal Frame: new frame that comes in 2 sizes
Photomatic: new photo SKU (larger than Photobooth)
This is an easy one, right? but super fun with the rainbow background!

I think the Collage Strips are one of the most versatile of all the new products.  You can use them as a strip, you can cut them, use them for labels, fold them into matchbooks (totally going to do that), use as a single color story or in a rainbow of colors!  So many uses!

Now carry on,
paula