Monday, August 21, 2023

The Dead of Night

 Hello Friends,

I have a step-out tutorial over on the Ranger Projects Page today.  I used lots of Ranger products (listed below) to create this Halloween panel.  It is an easy project to learn how you use each of these stains and pastes.  Halloween idea-ology is also a feature because...well, it is just so good this year!  The bat wings added to the boy are my favorite.  I love how it looks like he's either guarding the gate or pushing them open to allow you in!

Mica Stains
Texture Paste Black
Crypt Grit Paste
Crackle Paint

Now carry on,
paula


Sunday, August 20, 2023

From A Long Time Passed Away

 Hello Friends,

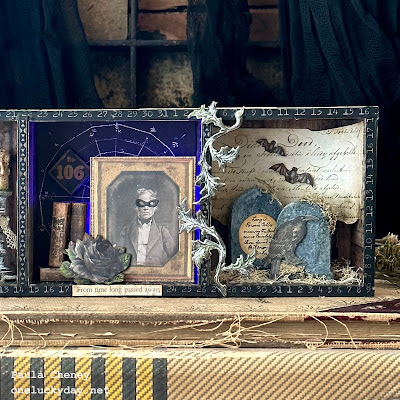
My second make that I'm sharing from Saturday's Live with Tim is a Vignette Divided Drawer.  It's a fun structure that can be used so many ways.  I dare you to count how many of these boxes were used in Saturday's live!  The funny (and very cool) thing is they were all used in such different ways that it's sometimes hard to spot them!

I don't have a step out tutorial for this project, so I took a couple of close up shots to see some of the details.  It really is just about creating a miniature scene in each box.

The Divided Drawer has been covered in Halloween Backdrop paper, with Design Tape added to the lip edge.  I drilled a hole in the back of the center compartment to add purple Tiny Lights as a focal point.

All the paper (like the pharmacy label, the eye, the web, the 106, etc) are from the Halloween ephemera pack).  The Bubbles have been colored with Lettuce Alcohol Ink and the poison label added to the new cauldron.  Drippy Candles were painted with Pearl Mica Distress Crayons so they shimmer.
The center compartment has a photo from the sticker book that I added a heavy chipboard backing to so that it would stand up.  The book were all created from the book covers that are part of the ephemera pack.
The last compartment is a faux graveyard scene using the two new tombstones. 
You might notice the metal leaves that are adhered to the front of the tray.  They are my FAVORITE!!! I love the way the curve to appear so realistic! I'm not going to mention how many I have already bought!
I hope you like this simple Halloween piece. I love the purple Tiny Lights and how they add to the overall eerie effect. It is a simple Halloween project that is full of potential to be as easy or and detailed as you want. I hope you will give it a go!

Now carry on...
paula

Saturday, August 19, 2023

Curious Things Vignette Tray

Hello friends,

idea-ology Halloween is ALWAYS exciting! And today is the first day of samples to share with you.  The LIVE was epic so I HIGHLY encourage you to go to Tim's blog to watch the replay if you missed it!  The makes are ABSOLUTELY Amazing!
Today I am sharing a favorite project that I made for the LIVE.  Absolutely inspired by a visit this summer (my 3rd time actually) to the Warner Bros Harry Potter Studios outside London.  Always a treat for us to go there and be inspired by the magic of Harry Potter!
The first thing I did was to take the large Vignette Tray and start layering ephemera into back.  I needed to see how the pieces work together to cover the tray back, before stitching.  After a few tries, I came up with this configuration.
I then cut a piece of paper the same size as the back of the tray to tape the ephemera to. You can also see I added some additional strips to the arrangement as I went along.
Once I was done with the arrangement of the ephemera, I turned the paper over to cutaway the excess that was hanging off the edges.
Next step is to move to the sewing machine to stitch the pieces into place (that is why I could use a tape runner on the back instead of Collage Medium).  Stitch along the seams with any color thread.  I chose a neutral, but black could be cool too. I left the threads long so many appear in the find piece.
This next step is optional depending on the ephemera you used.  I QUICKLY painted over the entire piece and brushed on Gathered Twigs Distress Ink with the glue was wet so that it would embed into the glue as it dries.  This gave it an over all aged look, some light places and some dark.
The last step to the background was to add some small pieces, so back to the sewing machine to add a few piece that I hand dipped into the ink puddle and dried before adding.
Next, paint the inside of the tray black and add Design Tape Trims to the edge.  I did add Backdrops paper to the outside of the tray but I forgot to take a photo of it!
Adhere the stitched background to the tray, leaving the strings loose from the glue.  Add a bunch of string to the eyelet on the tag.


These are Curio Frames that I have painted black and then sanded to look old. I added the images from the sticker book to chipboard and then to the frames.  You might notice that I added the metal frame The Manor to the inside of the frame with the gentleman.  It fit perfectly and added another element to the layers.
I wanted to use the Entomology bugs so I colored them different ways, using paint, Alcohol Pearls & Alcohol Ink.
I used foam squares to adhere the frames so they stuck out from the back of the tray.  That gave me the opportunity to add the bugs crawling out from under the frames.  A small detail but one that I loved.  
For the bottom of the tray I used a few things to create an eerie scene:
Tiny Vials
Drippy Candles
Candle Stands
Figure Stands
This year the candle stands come in a pack called The Manor.  Thats how I got the metal frame!
You can see I colored most things with paint and/or Mushroom Alcohol Ink. I added string and more Mummy Cloth and a bit of wire too! I also used the Figure Stands to add the top hat on a stand, that I thought worked perfectly in the scene. There really is no right or wrong for the bottom of the tray, just use what you have.
I hope you love this as much as I do. I think the stitched ephemera background was the catalyst for the entire scene. Never discount your background!

Now carry on,
paula