Tuesday, February 7, 2023

Lost Shadow Art Panel

Hello friends,
Just popping in with a quick post about my small art panel made with Lost Shadow! I love his little project! The layered details are what make it special...layering of Distress color, layering of paper pieces, and the layering of metals...they all work together to create an interesting piece with both color and texture!
1.  I started with a piece of Watercolor cardstock - I like that it's thick paper that will hold up to ink, water, and texture paste.  I used the Burlap Stencil to add the texture with Opaque Grit-Paste.  
2.  Once the Grit-Paste was dry, I sprayed three Distress Ink color on my mat: Lost Shadow, Peeled Paint and Uncharted Mariner. I spritzed a bit of water directly onto the paper, then pressed it into the ink.  Because the Grit-Paste is raised, you sometimes have to push into the ink or add mores water to make the ink run so all the spaces get filled in.
3.  Once the ink is dry, I mounted the paper on a small Vignette Tray with Collage Medium.
4.  Once the paper is secure to the tray, I squeezed out a dime size portion of Silver Foundry Wax on my mat.  I used my finger tip to pick up the wax and wipe it randomly over the raised surface. Then heated it till it turned silver with my embossing gun.
NOTE: It is very hard to even spot here because the camera does not pick up silver very well, but rest assured it is there and gives another layer of great dimension. 
Adding the layers in the most fun because anything goes.  
The big shipping tag at the back is from my favorite Urban Layers Ephemera pack (unfortunately, recently retired).  I inked it and broke the edges down to create some age.  
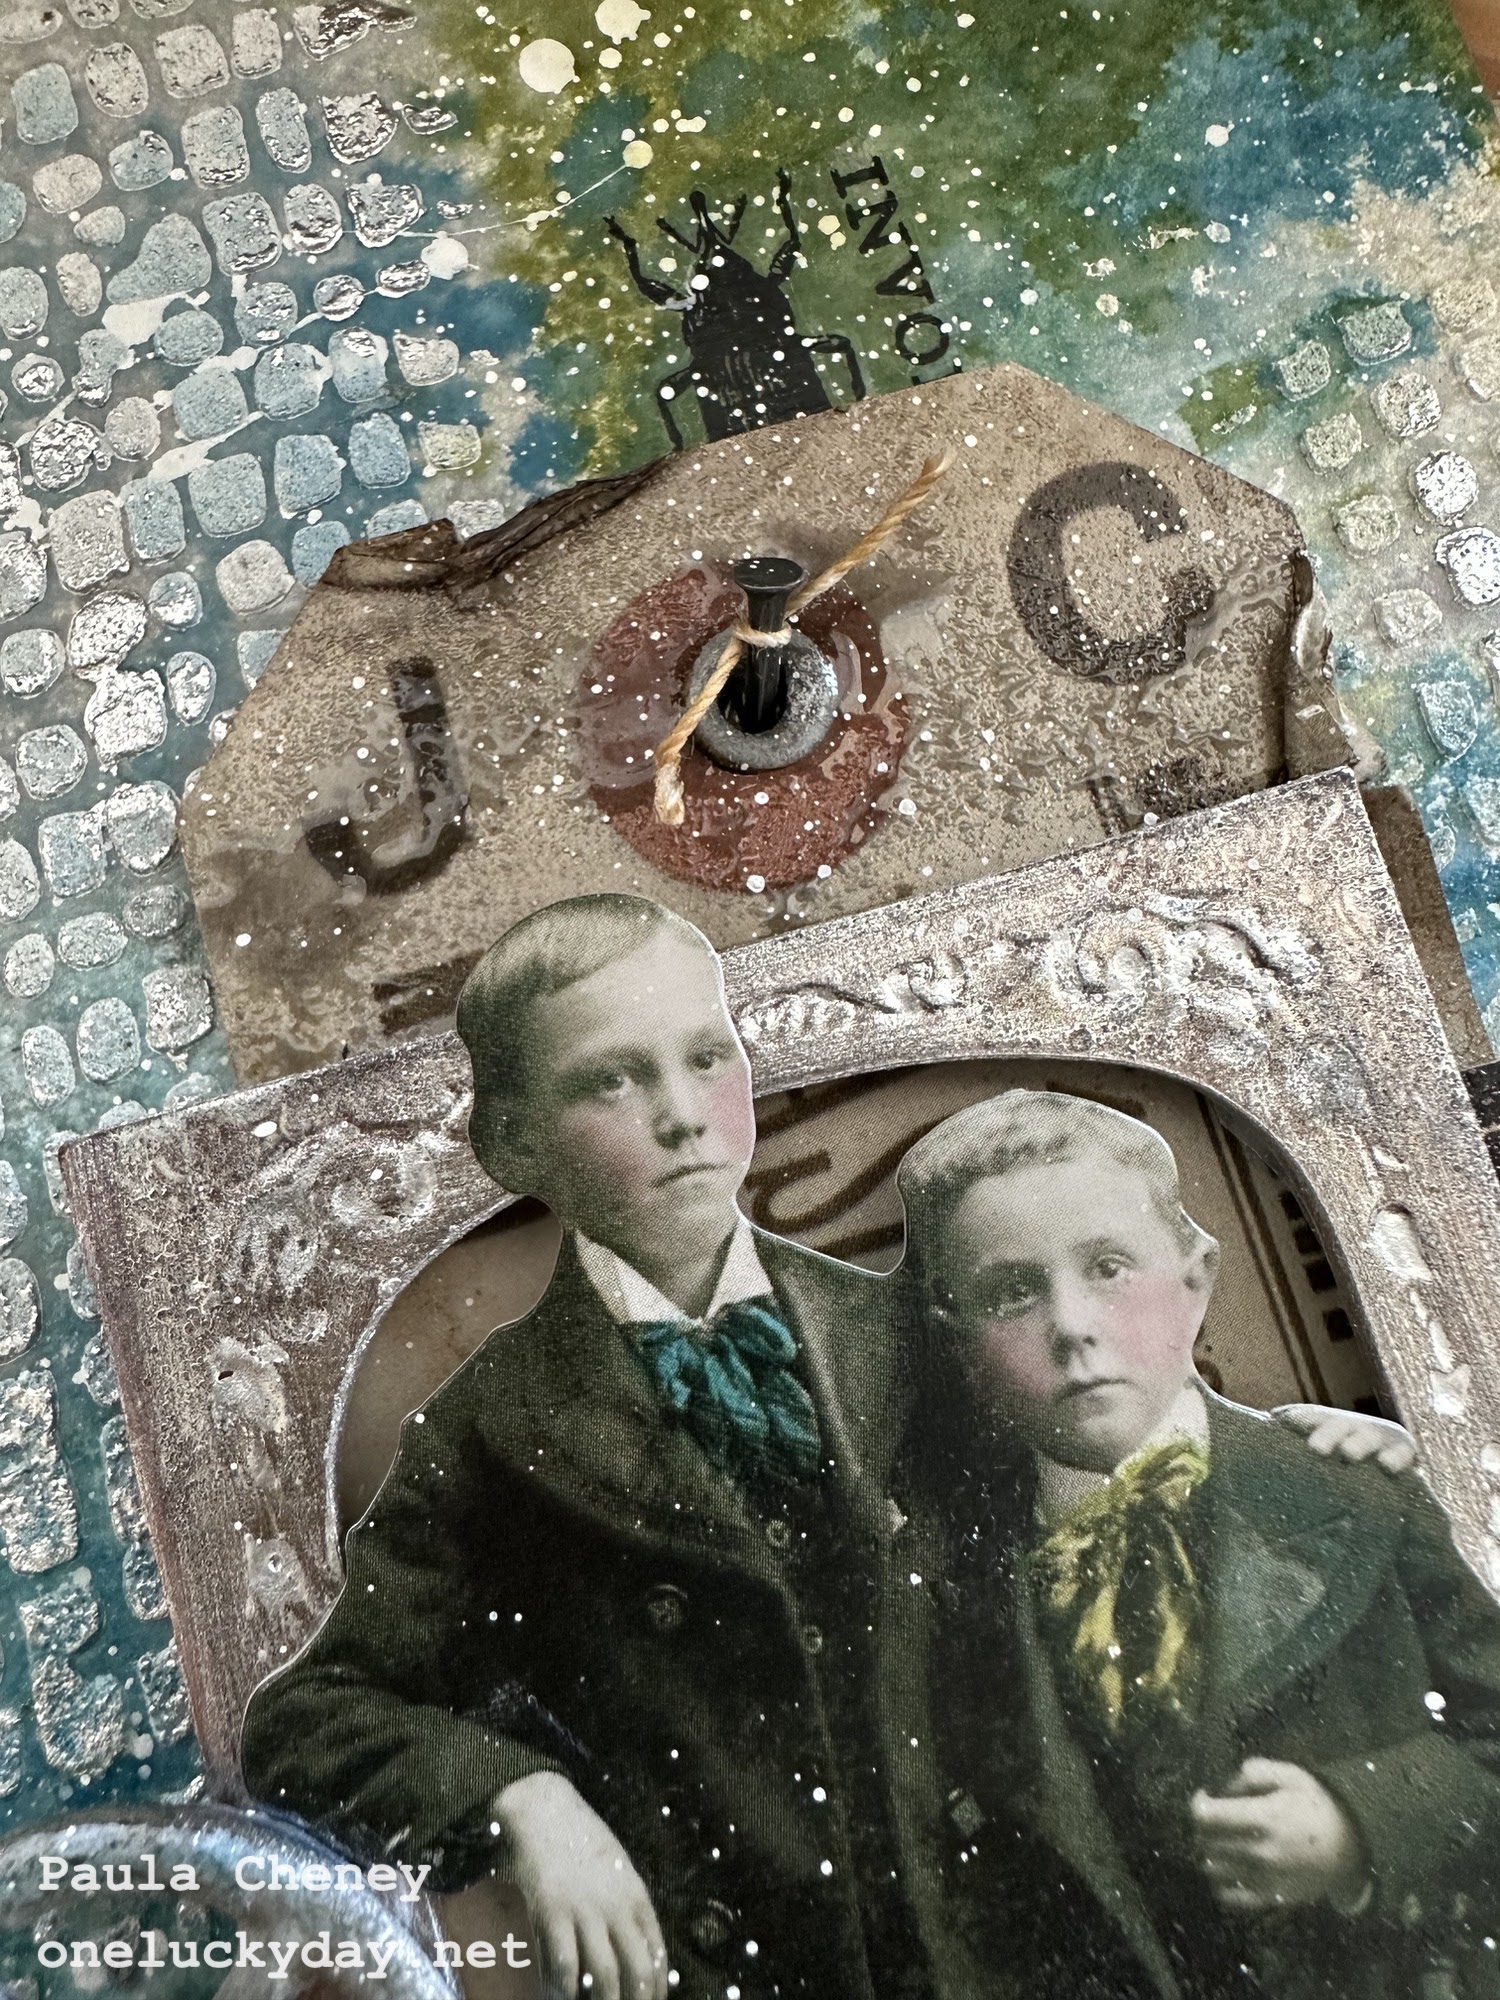
I also sprinkle Embossing Glaze randomly over the tag and it melted right on the tag WITHOUT using Embossing Ink...crazy, right? 
I added the tag to the tray with foam tape and an idea-ology Tack Nail that I purposely bent.
The Curio Frame which comes in gold, was also transformed with Silver Foundry Wax. I love the look!
Now for the fun part...adding all the layers of paper and metals.  
I will mention how I colored all the metals.
I first painted them Lost Shadow Distress Paint, then when the paint was still tacky, I sprinkled Lost Shadow Distress Embossing Glaze over the paint (randomly) and heated it till it turned into a shiny glaze.  One some pieces, I did this multiple times.  I also added Uncharted Mariner Distress Crayon (set 14) on the wheel shaped metal (from the Odds and Ends pack) to get the blue highlights.
The resin flowers are of course my favorite Heirloom Florals...this time transformed with Mushroom Alcohol Ink instead of Foundry Wax (like my last post).  You can see they have been layered over another gear, a bent nail and some string died with Gathered Twigs Distress Ink.
You can better see how the Embossing Glaze adds to the Lost Shadow Paint underneath on the gear.  This is just paint and glaze...no embossing ink was used.  A Hardware Head was used in the center to make it appear as if the gear is really screwed into the substrate.
I also added Remnant Rubs (Specimen) to a few spots on the surface, layering the bugs over numbers and text.
The last step was to add white paint splatters over the surface.  I used Distress Paint in Picket Fence and a Distress Splatter Brush.  The small white splatters really pop against the background and give yet another layer to the metal pieces.
This is an easy one so I hope you give it a go!  So many colors go with Lost Shadow, this could come out 50 different ways and with any theme imaginable!

Now cary on,
paula

Wednesday, February 1, 2023

Lost Shadow Card File

Hello friends,

Glad to be here today sharing another project using the new Distress color, Lost Shadow.  It quite possibly is the perfect foil for every other Distress color!  Meaning, it goes with every other color!
Foil: a person or thing that contrasts with and so emphasizes and enhances the qualities of another

I decided to make an idea-ology Card File so I could show different ways Lost Shadow can work with multiple colors, surfaces and textures. Lets get started on the cards, then we'll move to the Card File box.
Two stamp sets were used on the pockets. Lattice & Flourish + Tapestry.
I used embossing ink to add the stamped impression to the pocket, then added Lost Shadow Embossing Glaze.
Once the Glaze is melted with the embossing gun, it acts as a resist for the ink. I added Peeled Paint, Wild Honey and Villainous Potion to my craft sheet, sprayed the pocket with a mist of water, then smooshed it into the ink several time to get the combination I wanted.  Pat with a paper towel to remove the excess ink and let dry. This is such an easy technique that adds a lot of punch.


File Cards also come with 4 tabbed cards. I had some extra in my stash left from another project, so I decided to add another because I was having fun making them.
Stamps used on the tabbed cards
Nature's Wonder and Ledger Script

1. Lightly spritz the background of each card with Lost Shadow Distress Ink.  Blot-off excess.  Dry with heat tool.  
2. Choose a stamp from Nature's Wonder stamp set. Mount the leaf stamp on a grid block.
3. Ink the stamp with multiple colors of Distress ink (Wild Honey, Peeled Paint and Villainous Potion).  
4. Spritz inked stamp with water from the Distress Sprayer and stamp card to get the watercolor look.  
5. Repeat Process adding at least 3-4 leaves (or partial leaves) on each card.
6. Once all your cards have leaves, change up the stamp set to a script stamp.  Using the same watercolor technique, randomly stamp each card.
6. And finally, using Lost Shadow Spray Stain, slowly push down on the nozzle to get ink larger droplets randomly over the card.
Once the cards were done, I moved to the sewing machine to sew around the Clipping stickers I had added.  If you have a machine that can do free-motion, this might be easy but with standard machine it took a bit of practice to make the tight circles.  I like the way it turned out so you might be seeing this again.

The resin floral (Heirloom Florals) has been coated with a bit of Foundry Wax.  It's my favorite way to color them. 
NOTE: This link to a previous POST  includes tips on how to add Foundry Wax to Heirloom Roses 
For the #5 Mixed Media Tags (made by Ranger), I used Lost Shadow Distress Ink + Blending Brush over Mini Stencil set 47. It's easy to use the Blending Brush through the stencil to create a pattern.  I changed colors of ink to add the center details of the larger flowers.
After the stenciling was done, I either glued or stapled small pieces from Snippets Curator to the tags. I love using the Tiny Attacher!  The rayon seam binding was also sprayed with Lost Shadow.  Perfect color for these tags!
These cards are folded (they open like a book) and come in the File Card pack.  I had the idea to just use ink to hand color the card fronts.  So I squished Lost Shadow onto the craft sheet, spritzed it with water, then picked up the ink with a brush (about 3/8" wide) to make all the lines.  Obviously, everything was done freehand so you have to be okay with imperfect.  The last step was to spritz some Lost Shadow over the card front to get the little speckles.
I finished the cards by cutting colored cardstock using my Vagabond and the Sizzix "Wildflower Stems 3" Thinlit die.
Once the Wildflower shape was adhered to each card, I added a Number Strip (one of my very favorite idea-ology products) over the stem and stitched them down.  I like the texture the stitching brings to the flat front card.
Using Backdrops paper to collage plain cards is nothing new, but I can't seem to get away from it.  It is such a great way to use up left-over scraps, which I keep in a clear plastic envelope for a project just like this.
I used a a combination of Backdrops 1 and 3 but that does not really matter, any Backdrops paper will work together beautifully.
Once the paper was secure, I stitched along the seams where the paper meets, leaving the strings long.  I used a combination of Paper Dolls and Portraits, because why not?
Another one of those Heirloom Roses was added to the little boys lapel.
All coloring was done with Distress Crayons.
I wanted to make some random cards using the Mini Paper Dolls + Ephemera Memoir + vintage.  No rhyme or reason, just made what I wanted.  The big piece of vintage lace was sprayed with Lost Shadow.  
This frame is from the Memoir Ephemera pack.
I had the idea to make some quick and very random tags using a pack a Salvaged Tags as the base.
Each tag was done very quickly, using whatever was on my desk already or that I could reach quickly.  Mini Paper Dolls are perfect for this size tags!  
I added glue with my fingers as needed or just secured things with my Tiny Attacher.  All Distress Crayons were just scribbled on and rubbed thin with my fingertip or a cotton swab.  The vintage lace and ribbon was sprayed with Lost Shadow Spray Stain and most tags were spritz with the same color.
I love these kinds of tags, that are quick with not too much thinking!!  The little girl with the bear was added on top of the 4 ladies - she perfectly covers a lady on the right and looks like she was made to fit right into the scene!
I'm pretty sure I used the Tiny Attacher on every tag!  Super way to secure ephemera!
To cover the Card File itself, I needed to remove the metal pull.  It's very easy to do if you have a tiny screwdriver, similar to the size you would use for eyeglasses.  Set the tiny screws and pull in a safe place (like a plastic zip-lock bag) until you are done with the box.
I used the new Sizzix "Entangled" 3D folder to emboss 2 pieces of Mixed Media Cardstock.  I cut the embossed sheets into strips and adhered them to the Card File, cutting away the excess paper.  
NOTE: you MUST poke holes through the paper on the front BEFORE gluing so you know where to put the screws back.
Once secure, paint the entire outside with Lost Shadow Distress Paint and let it dry. 
I squeezed out about a dime size circle of Foundry Wax on my craft sheet.  Then used my finger to spread Foundry Wax over the raised areas (one side at a time). I heated the Foundry Wax with my embossing gun and it quickly changed to a shiny gold color.
Once the box was cool to the touch, I was able to add a bit of Walnut Stain Distress Crayon over the Foundry Wax to age.
I finished the box by adding Design Tape Trim to the top lip of the box and the cross bars. I also added the label pull back onto the front of the box with the same screwdriver.

I love making Card Files because the cards are small and easy to create.  In no time at all, you will have a full box of creativity!  Hope you will give it a go!
now carry on,
paula