Hello Friends,
I am sharing my last project from the Uncharted mariner release. This is a Divided Drawer that is filled with lots of idea-ology bits and bobs. You can really add anything you want into the compartments so look for small things, leftover from previous projects. I started with the box itself and then made the two domes. That set the course for the rest of the box. One thing to note is that that box can be use different ways because the shelves are removable. I used both in this project, but I did make sure that the largest compartment was at the bottom so the Display Dome Small would fit into the box. It does not fit into the other two compartments.
Follow along and I'll show you how I put it together.
Embossing Glaze
I decided to paint the outside of the Divided Drawer with Weather wood Distress Paint. I painted it on and wiped it off so you could see the wood grain under the paint. Once dry, I moved on to the stamp/embossing.
You will need some supplies:
Stampers Anonymous Eccentric + Stone (from the Slate & Stone set CMS299). Really, any stamp set could be used.
Embossing Ink
Uncharted Mariner Distress Embossing Glaze
Embossing gun
I stamped on the box with embossing ink and added Embossing Glaze. I embossed the stone first, then went back and added in the numbers from the Eccentric Stamp Set and embossed those small areas again. Embossing Glaze melts very fast so keep watch and as soon as it is melted, turn off the embossing gun.
Using Uncharted Mariner Distress Ink, LIGHTLY wipe the pad over the surface. It does not take much ink for next step. You can see here how lightly the ink has been added to the surface. Just skimming the surface.
Working very quickly, lightly brush the surface with Collage Medium. This wet medium will make the ink bloom to add a bit of blue to the surface.
NOTE: only work one side at a time so the collage medium does not dry on you.
BEFORE the Collage Medium dries, spritz sparingly over the wet surface with Oxide.
Spritz with a LIGHT mist of water and dry with a heat tool. The Oxide and the Distress Ink need to imbed in the Collage Medium for this technique to work. If the Collage Medium is dry when you spray the Oxide, it will never dry on the surface and will always come off on your hands.
Here is what it looks like when dry. You can see how subtle the Distress Ink background is.
You can see here that I used one of the new Design Tape Trims that is sized to work with all Vignette boxes and Trays. I love this one that has a repeated phrase going around the box.
The handle has been painted with Uncharted Mariner. I have found that if you wipe any metal with Isopropyl Alcohol (before you paint), the paint will not bead up on the surface. That is a good trick to hold in your memory because it makes it so much easier to paint metal pieces.
I did not put the handle/Hardware Heads on till I was done with the entire box so it could just sit cure over night.
TOP COMPARTMENT:
Curio Frame with ephemera from Field Notes ephemera pack. It is very had to tell but there is a piece of Mica under the butterfly.
The small metal Thimble is the perfect size next to the Corked Dome.
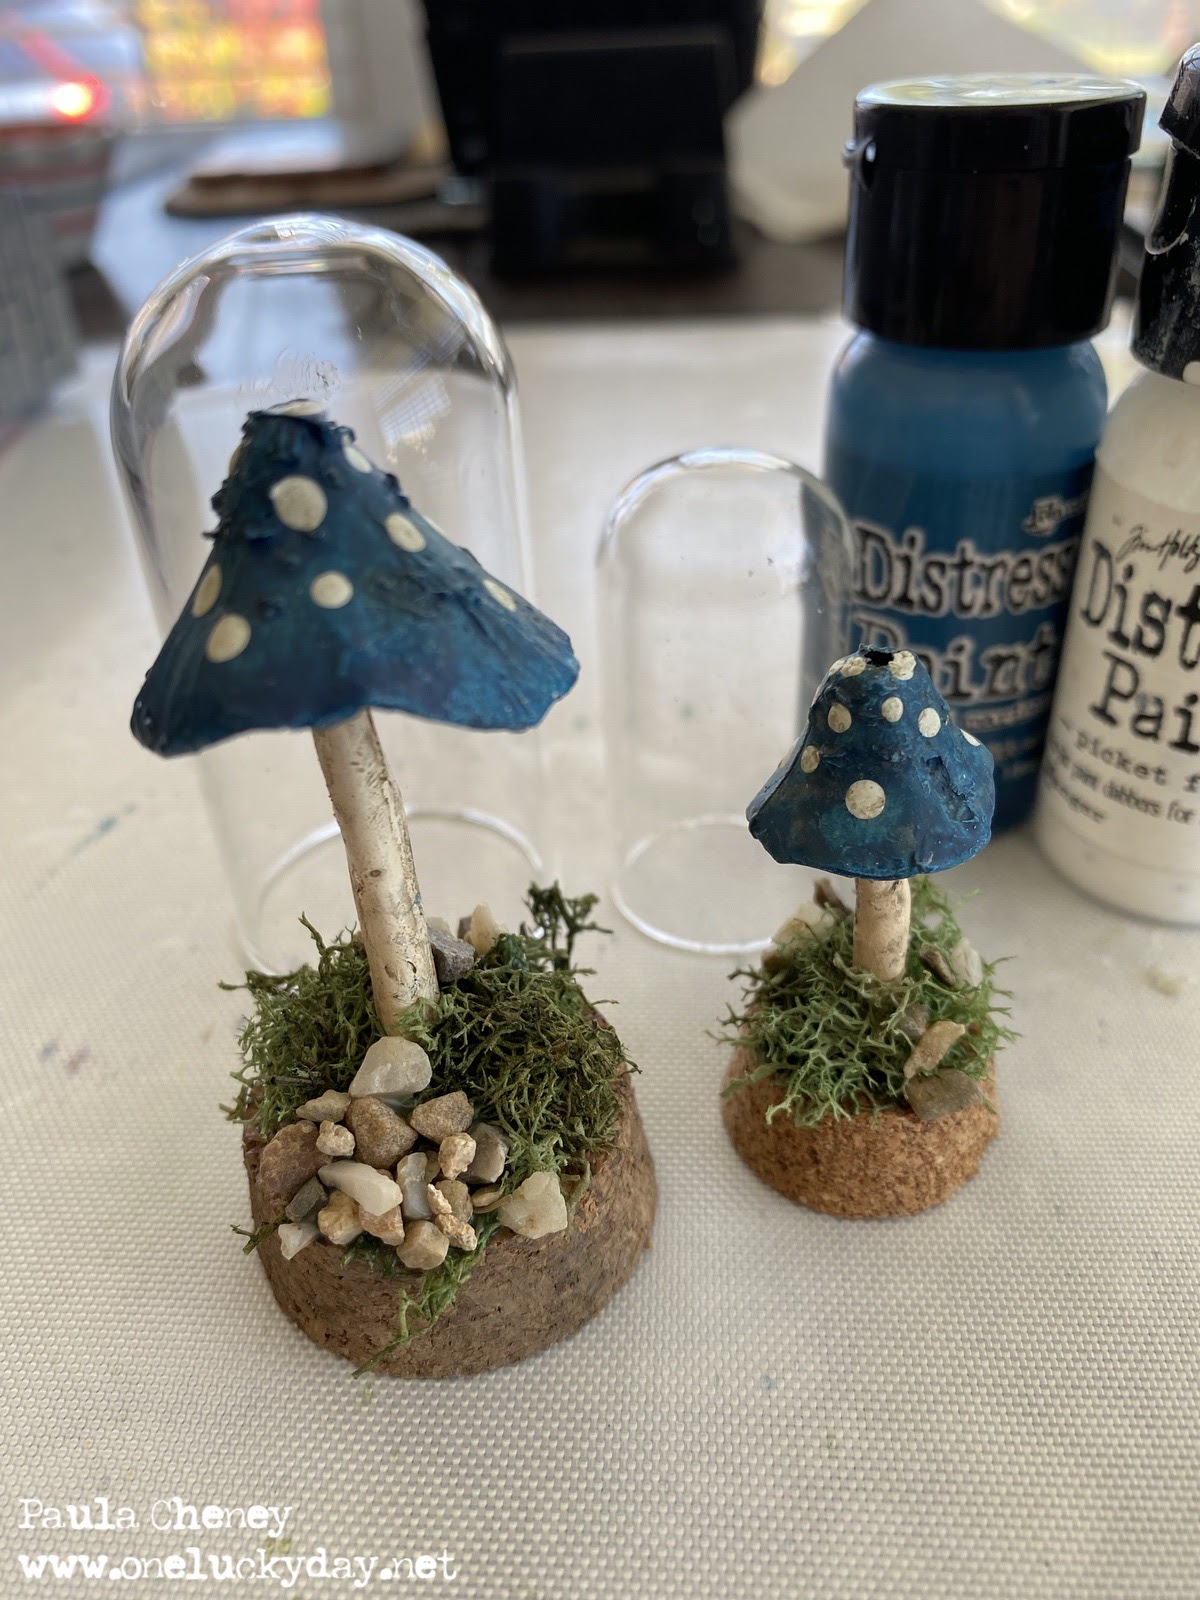
The Corked Dome with the Toadstool inside is 2 1/4" tall. There are two sizes of Corked Domes in the pack - I used the largest of the two (more about those later). I did need to cut off the medium Toadstool to make it fit in the dome. Yes, there is a smaller Toadstool in the pack, but the medium size looked better + gave me more area to paint.
BTW: Coked Domes are being retired and I am sad about that.
The Optical Lens is also a favorite. I added a Remnant Rub and a little bit of white paint to the lens.
TIP: when using Remnant Rubs, once it is adhered to the glass, rub Pumice Stone distress ink over the top and the halo around the word or image will disappear.
The Optical Lens is held on to the box with a small nail and some good wire.
CENTER COMPARTMENT
I painted an idea-ology Matchbox with Uncharted Mariner. The brown is watered down Gathered Twigs Distress Ink. I just pressed the label into the ink once the paint was dry, then added the label to the box. I added a number strip from the Snippets pack and tied it with a string.
I wanted to make the Matchbox look like the bird on the Mini Fair has made a nest inside, so I filled it with shredded cheesecloth, the Mini Flair button and Bouquet Flowers that I sprayed with Uncharted Mariner and Antique Linen Distress Spray Stain.
The Thought Token was added to the center with a foam square. Then I pushed a VERY small gold straight pin into the circle. I think the pin is called a "sequin pin". So, so small!
There are a couple other things in the center box that are significant. The Mini Paper Dolls are so fun to to use because they are so small. I have them sitting on a piece of ephemera - but how did I make them sit up? the answer is always a wood block. So look closely here, then scroll to the next photo to see how I did it.
I made two of this same project and the other has a man sitting, but the couple has been done just the same. I buy small wood blocks in bulk so I always have a variety of sizes in a container close by. The wood blocks give stability to many things in any Vignette project. There is a wood block holding up and supporting the Curio Frame with the butterfly and another hidden behind the Matchbox. They each give stability to the item they are supporting and are glued directly to the structure.
Love the mini size people!
You can't even tell they are glued to the black wood block.
This is what the Toadstools look like before going under the glass. I painted with Uncharted Mariner, then added white dots with the wood end of a paintbrush. I had to dig out a hole in the cork base so the Toadstool could be added with Collage Medium. Once stable, I added moss and tiny rocks (that I got at Michaels a few years back in the "fairy garden" section).
Large Toadstool is in the Display Dome Small (3" tall).
Medium Toadstool is in the largest of the Corked Domes (2 1/4" tall). This pack comes with two different sizes.
BOTTOM COMPARTMENT
You can see how the Display Dome Small looks in the bottom compartment. It fills almost the entire space top to bottom. I added tiny labels from a Snippets pack to the dome and the books. The stick is from my yard. The gold Stencil Chip really brightens up the background. The Stencil Chip has foam squares on the back to push it out from the back of the box.
The books were made with covers found in the ephemera pack - Memoir. I just filled them with cut and folded cardstock. They are messy to make with all that glue, but they are so cute when done! Again, the tiny labels on the front and spine of each book are from the Snippets pack (your gonna need tweezers).
I put a big dollop of Collage Medium at the base of the stick, so I hid that with a tiny bit of moss and string. Then just left it alone till is was stable.
I hope you have enjoyed this tutorial. I loved making the box (like I said I had to make it twice so I guess I better love it). Hope you get the idea of using little bits and bobs on hand to make it special and tell a story.
now carry on,
paula


 love greatly...
 Generous and true


 page 6 and 7
 To fly it to your heart