Sunday, November 20, 2022

Holiday Greetings

 Hello Friends,

Popping in with a quick explanation of putting my Holiday Greetings project together.  Many people thought this was a card, but it is really a wood Vignette Divided Box that I flipped over (7 x 10").  So this project is big enough to hang on our wall!  There are lots of choices to be made when building the background and the tree, based on what you have on hand.  So lets get started and I'll give you some options as we go along.

This is how I started. I turned the Vignette Divided Box over and just laid out as many pieces of the Christmas 2022 ephemera pack as possible.  I knew I wanted to use my favorite piece from the pack as the base (or trunk) of the tree.  Then I started laying them out in order of size from large to small.  I knew I would not use all of the strips, but this gave me the possible order to put them in.  At this point, I had not even thought to add the Scallop Etcetera Trim, so that is not pictured here.

I moved all the ephemera pieces to the side (still in size order) and began working on the background.  I created a stamped background using Lumberjack Plaid Distress Ink, but if you want to simplify the project, you could just use paper from the Christmas Backdrops paper pack.
STAMPED BACKGROUND
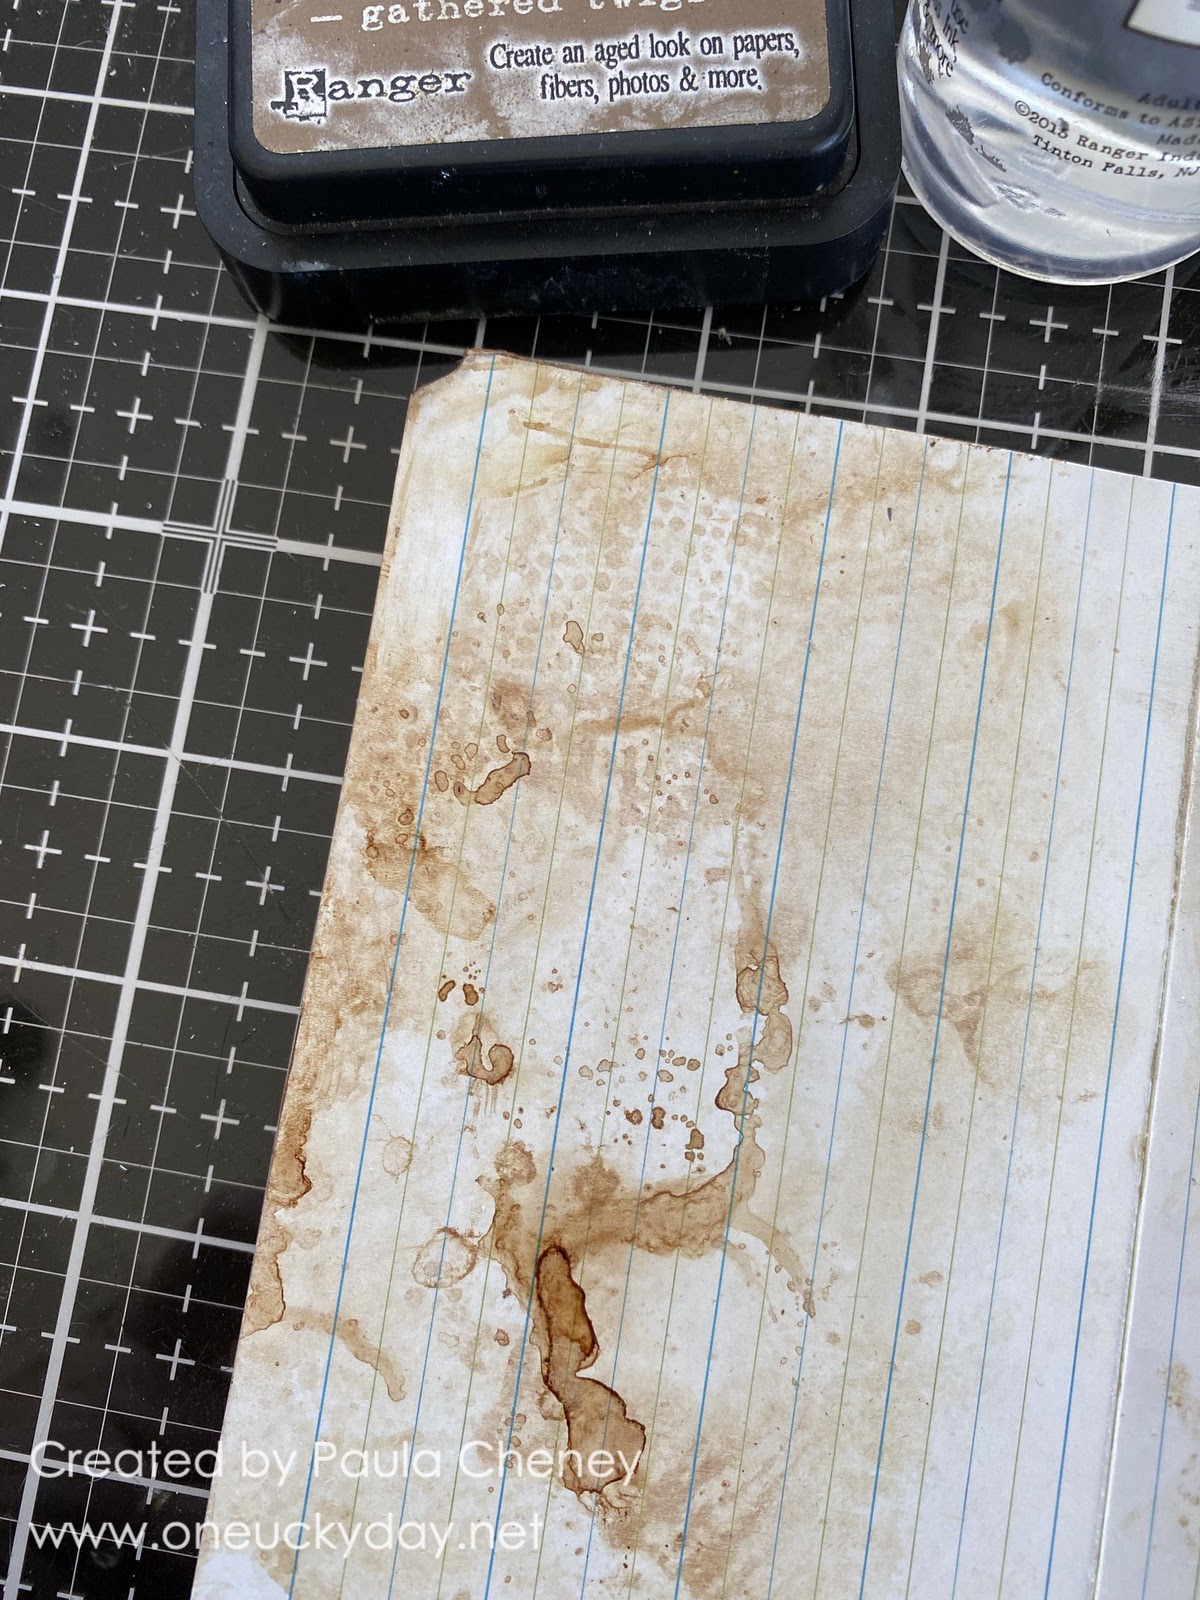
I cut a piece of Distress Mixed Media Heavystock paper to fit the back of the Vignette Divided Box. Then stamped with Lumberjack Plaid Distress Ink.  I used two stamp sets to create the background: Exquisite (floral and text) and Dots & Floral (polka dots)
The floral stamp images were added first, then the polka dots and finally the script.
I added multiple patterned papers to the edge of the Divided Box, followed by the stamped paper to the top (there is a better photo of the side of the box at the end).
I inked most of the ephemera with Gathered Twigs (still not knowing which ones I was going to use). Then set them aside while I prepared the scalloped trims.
The Etcetera Trims have two widths - I used both, then cut to length.

These are mine, but you can cut any length you need.  I just cut off the scallops I didn't need with my Tonic scissors.
I found that I got the best stamped image by adding a thin coat of Collage Medium over the dry paint.  Maybe it smooths out the painted surface? not sure, but it works.
Use Embossing ink on your stamp, press onto surface and add Lumberjack Plaid Embossing Glaze.  Tap off excess and emboss.
I will say, the other item I used with great success is the 'ole Embossing Magic Powder Bag.  I've used one of these for years and it works perfectly to get a clear image (the embossing particles only stick to the inked image).  Just pounce over the surface before stamping.  It's just that easy.
All three came out really good!
I had a few more things to add to the tree.
I added Clear Rock Candy to the large star before adding it over the red circle.  Both from the Baseboard pack.  The button is vintage and the snowflake is idea-ology.
The green label is from the ephemera pack and the 25 is from the Stampers Anonymous Department Store stamp set.
Now you can see how it came together.
As you can see, I didn't need as many ephemera strips as I thought I would to create the tree.  Adding the scallop trim change that.  The trims really helped to create dimension. I also used chipboard behind a few strips and 3D foam squares. 
The added holly is from the Ephemera Botanicals pack (a must have in my opinion).
The lace trim is vintage.
I added the silver Tinsel with hot glue (i gave it a trim on one side before gluing to the tree).
And you might notice that I added Snowfall Grit-paste to the top of the scallop trims.
Here you can see the dimension and the side of the project.
I had a fun time making this, since anything goes! You could make this tree 10 times and it could look different every time!

Now carry on,
paula
(and happy holidays!)

Thursday, November 10, 2022

Small but Bright

Hello friends,

Looking back to last month when I created this small File Folder book. I had seen how Susie Heinz and many others were using our Linen Tape to bind books and I decided to try it with the Linen Christmas tape (love the plaid).  I also used Christmas Collage Paper to make a regular inline product, like File Folders, look a bit more Christmasy. So lets get started...

Here is the fished book with the belly band - I made that by sewing two pieces of green striped Wallpaper together to create a band long enough to wrap around the little book.  I added red stitching, eyelets, and some red ribbon to finish it off.
Once you slide the belly band off the book, you can see that there are file folders stacked up. 
In the next few photos, I'll show you how I created the structure, followed by photos of the finished book.
Cut pieces of Linen Tape and use to connect two 6" File Folders.
Repeat... so you end up with two sets with two File Folders each.
I worked with the File Folders like this till the very end, then connected them with a piece of Layers ephemera (I'll show you that part later).

The File Folders were too clean for the vintage look I was going for, so I began pressing each page into Gathered Twigs Distress Ink/water mix and drying with a heat tool.  You might not think the ink would stick to a coated surface but it will (you just need to be patient in the drying process).

Next, rip pieces of Christmas Collage Paper and add randomly over the pages of the book with Collage Medium.  Remember, Collage Medium needs to be under the paper and a coat over the top to smooth it out. Once dry, it's very easy to remove the excess paper, with a sanding block.
I set the pages aside to dry while I worked on choosing Paper Dolls and Snapshots (they come in the same bag #TH94290) to use on my pages.  I colored all but one of the images with Distress Watercolor Pencils.  If you would like to learn more about working with Watercolor Pencils on Paper Dolls, you can read my blog post HERE.

Before I show the pages, I'll let you in on a little secret.  I used Clippings stickers (found in the Christmas Sticker book) to create a poem that you can read as you turn the pages.  It is one of my favorite things, to add poetry to something I make. Since I'm not very articulate, I know I can depend on the stickers to give me the words.  Here is the poem I put together for this book.

Glowing red and Christmas green
Visions of delight
Our Hearts are now algow
Grace and light
Stand fixed in steadfast gaze,
Hear the carols sweet
With glad hearts, to you we say
of peace, good will towards men.

Pages 1 and 2
Watercolor Pencils on Page 1
Aged Mahogany Distress Crayon on Page 2. This was used because there is not (currently) an Aged Mahogany Watercolor Pencil. 
Page 1
Here is where the poem starts.
This Snapshot from the Paper Doll Pack was colored with Watercolor Pencils giving it a nostalgic feel.
Page 2
Here is the Aged Mahogany Distress Crayon in use.  The Crayon gives such a rich color of red and I needed their suits to be this color!
Other pieces from the Ephemera Pack and Layers Botanical pack + Label Stickers on the tabs.
Pages 3 and 4
Page 3
The card was sewn, then attached to the page with 1/4" Scor-tape.
Items in pocket are from Christmas Ephemera pack.
Round seal from the Christmas Sticker Book.
Page 4
Polka dots on the girls dress made with a POSCA paint pen.
The round label circle behind her head is from the Classic Labels Sticker sheets.
LOVE how the Collage Paper typography looks on the background of this page!
Pages 5 and 6
Stars from the Christmas Layers pack.
Page 6
Pages 7 and 8
This is the center - 2 file folders on the left, 2 file folders on the right.
The card with the wreath on it is holding the two side together.  
Because this is a small book, it is surprisingly stable with just the Layers Ephemera piece in the center. If the book was any taller it would need two pieces.
Page 7
Added holly from the Layers Christmas Botanical pack with added green Droplets.
Page 8
Poinsettias from Layers Botanical pack.
Pages 9 and 10
Page 9
Page 10
The Linen Tape at the top is holding a card that flips up once you turn the page.
Pages 11 and 12
Now you can see the card from the Layers Christmas pack.
Page 11 
Open to reveal a surprise.
Page 12
Dresses colored with Watercolor Distress Crayons
Page 13 and 14
Page 13
Again, another Snapshot from the Paper Dolls Christmas pack.
Page 14
Back
And there you have it, one Christmas book complete.  I love the ease of using the File Folders since they are printed.  Only the added Collage Paper was needed to move them from everyday to Christmas.  I like that kind of flexibility!

Now carry on,
paula