Friday, January 16, 2015

CHA 2015

After a long hiatus from blogging during CHA prep, I'm back today to share our CHA story.  We started the CHA samples way back around Thanksgiving.  Lucky for me, Richele came to visit and ended up staying a week working on samples.  Just something about having a friend across the table to bring out the best in your work.
And yes, we really did have all that stuff out on the desk as one time! I can spot 4 different projects being worked on or thought about, right on that desk.
We don't usually take pictures while we are working since so much is new that cannot be shared before the show.  But I did have this one where we were trying to make a decision about whether or not to add a vintage handle onto a Configurations box?  You will have to wait for the post on samples to know what we decided!
And off we go to CHA - it was beautiful and sunny for the first few days, then we enjoyed some rain for a couple.  Either way, it was great to be in Southern California in Jan!

On the second day of set up - we have Tim's class for Ranger.  We all met up in the lobby of the hotel at 6:15 for our walk to the convention center.  Something weird about going to work in the dark!!
A huge group of us set up the classroom.  So many products to put out! 


During Tim's class on Friday morning, the announcement was made about the new Distress Colors that will be released this year.  Super excited about this (although you know about my space problems!)
If you haven't heard - Ranger is releasing 12 new colors of Distress this year.  One color per month throughout 2015.  The first color, Cracked Pistachio is ready for shipping, but the other 11 colors are a mystery.  Each month the color will be revealed and then you can choose to add it to your collection or not.  All products (pictured) will be released in the new color each month. 
For those of us that are huge fans of the Distress Ink Minis, they will released in sets of 4 colors (Jan - April, May - Aug and Sept - Dec) so by the end of the year you can have all the minis too.  2015 proves to be super exciting for the Ranger Distress line!!
 Also something new I don't want to forget to mention...the Minis will now be sold in open stock!
And now on to the booth itself.  Lots of stuff to work with...even more than before since we added a lot of postal props to go with the Correspondence theme.
 Thanks to Mario for a little help getting the cart into place before the lights are hung.
Would you believe this the getting towards the end?  Richele is sorting piles of faux greenery to add to the wall vignettes.  You can see the big crates are still on the show floor waiting to be picked up for storage.
Deb came to help us set up and teach the make and take (which is a lot of work!)  We are so glad she joined us for the show!  I think her make and take ladies would miss her if she didn't come!
You might notice the wall behind Deb with the drawer, boxes and paintbrushes...when you look at the final pictures of the booth, pay close attention as that wall has a major change up once we decide to hang a big hand painted sign (another treasure from Junk Bonanza).  Always in flux right down to the wire!
This year we changed it up and had papers from the new Paper Stash - Correspondence blown up and wallpapered to the sides of the booth.  One of the best decisions we made because it looked amazing! So many people on Facebook thought it was real wallpaper they could purchase.  Not a bad idea, but a dream, since it was made just for the booth. 
And the finished result!
I love the back wall with the old letter wallpaper.  It is of course also one of the papers from Correspondence. 
And seriously are the two black striped suitcases (with an original tag) not to die for?  I'd like to find another set of those in a shop!
 Our center cart with all the stacked suitcases and hanging cage lights.
 The Correspondence side of the booth with our pallet shelf that Art, Tim's neighbor, made for us.
 
Correspondence samples by Jan, Mona and Karen (all be back another day with more about the booth samples and who made them).

May Flaum stopped by the booth to photograph it before the show one day.  So happy she does this since they are the best photos of the booth taken.  Thank you May for letting me share them here.
Please click on any of the photos to see them larger!
 via May Flaum
  via May Flaum
  via May Flaum
  via May Flaum
  via May Flaum
  via May Flaum
  via May Flaum

I thought I would share some up close photos of the vignettes that I took.  I like these spots where the booth props come together to make a magical little spot.
 the wood box is full of old prescriptions

one of my favorites - the letterpress woodblocks stuck to a wood tray Tim and I found a Junk Bonanza


If you haven't read Tim's show recap yet - he has links to video tours of the booth that show a lot of the new product.  You can check that out here.

As I said previously, I will be back soon with closeups of booth samples.  You won't want to miss that!
now carry on,
paula

Thursday, December 18, 2014

The Festive Gent comes for a visit

I feel like I should start with an apology for my lack of blogging this Christmas season.  With CHA being moved closer and closer each year to the beginning of January, those of us who create product samples for the show are spending the month of December working away like Santa's elves.  Unfortunately samples can't be shown till Jan when the show starts!  Today I decided I needed to use a few of the precious few hours in the day to create something before the season is over.  I think this might be my favorite project since the Halloween Clock back in September!  Follow along and I will show you what I made!

I started with one of my favorite 6.5 x 9" Michaels wood boards as the foundation for my piece.  I used the 8 x 8" seasonal pack and Multi Medium to cover the board.   I sanded and inked the edges, then set it aside while I created the other pieces for the board.
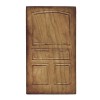
I gathered a few items to get started - Grungeboard, Kraft-Core, and the Passage Door die.
I used a very light coat of Collage Glue Stick to add the red Kraft-Core Core'dinations cardstock to the Grungeboard.
 Then ran the Grungeboard and die through the Vagabond.  Back at my work table, I cut out the center of the door along the scoreline with a Kraft Knife.
I lifted the cardstock, and used Distress Pant in Black Soot to color the raw Grungeboard.
 I used Matte Medium to adhere the cardstock, making it permanent.
Next up is sanding with the Sanding Grip and inking with Gathered Twigs.
I wanted to add a window to the open spot in the door.  I used a piece of Frosted and and the Texture Fade, Courtyard to create a faux pressed glass look.  It worked like a charm.
I used a little Mushroom Alcohol Ink over the Frosted "glass" and added it to the door.
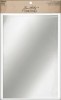
 I added a piece of Mirrored behind to give it a little shine. 
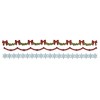
I cut the Holly portion of the "Holly, Beaded and Snowflake Garland" die to create a swag for the door.
I wanted silver bows though, so I adhered a Foil Tape Sheet to a thin piece of cardstock and ran it through the Vagabond.  Colored with a little Mushroom Alcohol Ink, they are now perfectly vintage.
 I used the foil bows over the green Holly to create a single swag for the door.
I added the swag to the door frame and a Hitch Fastener for a door handle (I changed the color to gold with Alcohol ink).
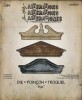
I also cut the Pediment die from Grungeboard.  I painted it with Distress Paint - Black soot, sanded and distressed the finish, then inked it with Gathered Twigs.
Next up is the sentiment.  I cut letters using the 'Wanted' Decorative Strip die.  My sentiment is long so I cut three sets of letters to get all the vowels.  I sanded the edges with the sanding grip revealing the Kraft-Core underneath.  Love me some Kraft-Core cardstock just for this purpose.
To get the letters straight on the panel I use a piece of Tissue Tape along the top and then lined up the letters along the edge.  Super easy trick.  I used Multi Medium to add the letters - It dries quick and clear, leaving no shine behind!
All lined up!
 I added the door with Wonder Tape and the word HOME.
I used the On The Fence die to cut a fence which I painted with Picket Fence Distress Paint.  Once dry, I inked it with Gathered Twigs to make it look more vintage.
 A little Multi Medium to adhere it to the scene.
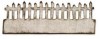
 Next up is the Festive Gent - my favorite from the Sizzix Christmas release.
1. I cut the Festive Gent from Grungeboard and painted it black soot.
2. I cut away the shape of the bow (that is part of the wreath die) so I could add the small red bow from the Holly die.
3.  Paint the wreath portion with Peeled Paint Distress Paint, let dry.  Once dry, add Glossy Accents (in a thin layer) and add the Peeled Paint Distress Glitter.
4. Add the Glossy Accented red bow to the wreath.
 A bit of foam tape behind the body, then he can be added to the board.
 One last touch - a house number for the door...of course it will be house 25!  I used the same decorative strip, Wanted to cut Foil numbers.
I also cut another set in black for a shadow and Alcohol Inked the foil in Gold to make it stand out on the Frosted door "glass".
 Just like this.
 And now onto the door.  LOVE it.
 Even though it looks so much better in person, I hope you get the gist of the project.  This may have a lot of die cuts but they were fun to add each one to the panel.  And don't get me started on the Frosted Window!  The Courtyard Texture Folder was the perfect scale for the Passage Door.
Cheers for a great weekend!
now carry on,
paula