Hi everyone!
I am sharing one of the cards I made using some of the new Halloween Sizzix dies. Follow along and I will show you how I created it!
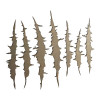
The first die is called CLAW MARKS.
I admit, at first I thought why would I need this die? But then once you use it, it becomes quite clear what fun you could have with the Thinlit. Each claw mark is an individual shaped die so you can add as many slashes as you wish. There are 4 large and 3 small claw marks included in the set, which gives you plenty to choose from.
This photo might help you see what I mean. I cut my Dapper paper to the size I needed for the card front. I then chose three of the claw marks (
two large and one small) and placed them on the paper, cutting side down. As you can see, I used a bit of washi tape to keep the claw marks in place when I ran them through the Vagabond machine.
Next I needed something to appear through the slashes...I chose a Found Relative card that I tinted with Distress Markers. Just color the image and wipe away the excess ink with a soft cloth or bit of a paper towel.
So
after I colored the Found Relative I decided to cut away the background (
that's how it goes sometimes!). I thought a piece of Mirrored would be just a bit spookier and for this purpose it seemed appropriate!
I squeezed drops of Mushroom Alcohol Ink onto the surface of the Mirrored (
remember to peel back the protective plastic coating on the Mirrored before doing this step). I followed that up by dripping Alcohol Ink Blending solution over the top to dilute the solid drops of ink. You end up with a very cool background.
I went back to the "claw mark" paper and inked the edges with Walnut Distress Ink. I also flicked water over the paper to create the dried water marks you can see here. Once dry, I stitched around the paper a few times. I used some tape to keep the layered found relative/mirrored in position before adding the entire thing to the card foundation. PLEASE NOTE:
the stitching is ONLY on the slashed paper - not through the Mirrored product.
The next die I used was Vintage Spirits. These are just so fun to use!
I adhered a piece of red cardstock to heavystock paper then ran it through the Vagabond.
I smeared on Vintage Collage Medium to tone down the bright red and give it aged matte finish.
Once dry (
which is not very long) I added it to the card front with Scrapbook Adhesive Foam Squares. As you can see, I added the card front to a piece of Textured Surfaces (Burlap) and a dark brown card base. The stitching looks like I sewed through the entire card but in reality it's just the top layer.
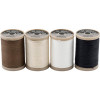
Craft Thread, Craft Thread I just can't get enough of you!
I used the colored Craft Thread to wrap around the card front and tie a long, one loop bow. I added the tiny keys from the Adornment pack just because they were really cute! Can you say that about a card using claw marks?
Seriously, my favorite card. The Mirrored effect is wonderful when you tilt the card back and forth!
Thanks for joining me today! I'll be back with another card next week.
now carry on,
paula


Such an intriguing card. Love the techniques you used.
ReplyDeleteLove, love, LOVE this card, Paula! The detail is amazing and the mirrored effect behind the claw marks is just awesome ~ a really stunning card! <3
ReplyDeleteHalloween is not my jam, but I love this card! I may need to get the claw dies and see what else can be done with them!
ReplyDeleteWOW !!! Paula you ROCKED this ! What a jaw dropping affect... this card is full of amazingness!! LOVE IT, love it LOVE IT.
ReplyDeleteLove this Paula, love the mirrored backdrop and that Die is such fun. Lovely piece. Tracy x
ReplyDeleteAwesome card Paula!
ReplyDeleteI love everything about this card! I fell in love with it during Tim's live FB preview. I never would have guessed that you used the mirror paper. Thanks for sharing the process!
ReplyDeleteLove all the detail of this card. The mirrored behind the Found Relative is BRILLIANT! Great tutorial Paula!
ReplyDeleteOh those scratches...talk about scary...and love the gent behind them! BOOtiful card!
ReplyDeleteAmazing, love it. Want !!
ReplyDeleteWow so great! I don't do/need Halloween cards but I'm might just buy the stuff anyway, they're so fun!!
ReplyDeletePaula, I just love, love this card!!! I cannot wait to get the claw die!!! Fabulous!
ReplyDeletePaula, I really don't do Halloween but this card is fabulous!!! Love all the techniques you shared!!!
ReplyDeleteTim's new release is just 'wicked' as my grandkids would say... and so is your card Paula, I just love those claw marks and the gorgeous red wicked!
ReplyDeletethis is amazing...my favourite of all your cards and yes I'm in the addicted to craft thread too...hugs kath xxx
ReplyDeleteBeautiful, so clever.
ReplyDeleteOh, how many ways do I love this card? Your idea to use the mirrored is just so clever! And I could really use this die, having a pair of cats in the home. Very 'wicked' card! Thank you for the inspiration!
ReplyDeleteThis is so cool. Love all the Halloween dies. Off the subject, do you know when you will post the flip frame calendar.
ReplyDeleteThanks-I am inspired by your creative cards and projects.
Love this!!!
ReplyDeleteThis is awesome!!
ReplyDeleteI don’t have the mirror paper, so I taped the card to grey cardstock. I also didn’t think to try coloring on the card. It doesn’t look as cool as yours, but it came out pretty neat. I just found your blog so I was going by picture only for my inspiration. I think if I make another I’d try something different. I don’t know if I’ll splurge on the mirror paper anytime soon.
ReplyDelete