Showing posts with label Halloween project. Show all posts

Monday, October 7, 2024

Halloween Card File - Day 1

Welcome Day One of the Halloween Card File!

I call it "prep" day because we will be preparing the Card File and the cards for embellishment later in the week. As with any Card File, there are so many options that sometimes making a choice becomes the problem. So for this project, I'm going to show you how I tackle something of this size. It's actually very methodical, so what looks like random, really isn't random at all.
Today we'll tackle the box itself and add layer of Distress Ink over all the card we will be using.
Card File Box:
Use a small screw driver to remove the metal pull on the front of the Card File (be sure to put the screws in a safe place as they are VERY small!). 
Paint the Card File and the metal pull with black paint - you can use Distress Paint or acrylic craft paint. Be sure to paint the inside of the Card File as well.  Set aside to dry while you work on your cards. When you come back to it, the box should be dry and ready to sand and put back together. 
Sand the edges of the Card File and the metal pull to distress the finish (I always use steel wool to sand metal, so if you have some it's the perfect time to break it out to use on the metal pull). 
Use the small screwdriver to reattach the metal pull. There is no need to add the "title" to the metal pull - that can be done when you find the right words in the Sticker Book at a later time.
OPTION: If you want to cover the box with paper from Halloween Backdrops rather than painting it, I would still paint the inside of the box with black paint and just cover the outside with paper. Punch the two holes with an awl, the screw the metal pull back on the box.

File Cards:
The Card File will have 21 finished "cards" when we are done. Nine of the "cards" are pockets so they require an extra card or tag to go into the pocket. In our case, you will need 6 extra cards and 3 tags (exact information will be spelled out below). I cut the extra cards from Mixed Media Heavystock since it is the same material that the File Cards are made from.

Here are the cards that will be used and what pack they came from:
File Cards (TH94223)
3 - folded cards
3 - tabbed cards
3 - plain cards
I did not use the pockets from this pack.


File Cards 2 (TH94369)
3 - zig- zag cards
3 - library pockets
3 - envelopes
3 - pockets with a hole in front
Additional card and tags (cards cut from Mixed Media Heavystock)
3 - #5 tags 2 3/8 x 4 1/4" (tags were shortened to 4 1/4")
3 - 2 3/4 x 4" with rounded corners
3 - 2 7/8 x 4 1/4"
COLORING PROCESS
All cards and tags have been colored with Gathered Twigs Distress Ink. We are going to be adding more ink later in the embellishment phase using Scorched Timber. The combination of Gathered Twigs and Scorched Timber is pleasing to me, but of course you can use your favorite Distress Ink colors.

I like using my Gathered Twigs ink pad rather that the spray ink, because it is hard for me to control the amount of ink on my mat. I have a tendency of over inking the cards and I really don't want that, so be cautious of how much ink you have on your mat.
I smooshed the ink pad onto the Tonic Surface Mat multiple times and sprayed with water. Then work in groups of tags, maybe 3 at a time (since you have to stop to add more ink and water before starting again). Everything is very loose and watery with lots of white space showing! Remember this is only the first layer of ink. 
You can choose to use a heat tool or not when inking your cards. I use a paper towel to pounce over any heavy ink spots in the inking process, then give them a quick dry (like 10 -15 seconds depending on the size of the card). 

Work your way through all the cards and tags until everything is colored as shown below. This is a process that will take some time, so don't rush. Open the window, listen to some music and just focus on the ink! Once you are done, double check that you have a little ink on every side. Then just leave the cards to dry overnight. They will be nice a crispy dry in the morning and we will be ready to start adding paper.

I posted the product list last week, but I thought I would post it again so you can gather items to use over the next week. Anything can be substituted for something you have on hand including the 2 stamp sets I will be using.

Vignette Card File
File Cards 
File Cards 2
Halloween Collage Strips Large
Halloween Collage Paper
Halloween Ephemera Pack
Halloween Layers and Paper Dolls
Halloween Backdrops
Halloween Sticker Book
Halloween Word Plaques and Tags
Halloween Transparencies
Postmarked
Keys Adornments
Mini Paper Clips
Cello Tape Stickers
Tiny Clips
Stampers Anonymous Tidbits
Stampers Anonymous Deconstructed
Distress Ink Gathered Twigs and Scorched Timber
Mixed Media Heavystock (extra cards)
black paint

See you tomorrow!
now carry on,
paula


Friday, July 14, 2017

Ornate Owl Card

Hi all,
Popping in to share a card I made for the Tim Holtz Sizzix Halloween release (which is awesome by the way).  If you were part of Tim's Facebook Live event this morning then you will have previewed the card as well as MANY other cards our team created for the release.  If you missed the live event you can see the rebroadcast on Tim's Facebook page  or YouTube channel later today.

Today's card was made using the new Ornate Owl and Skull Damask Texture Fade.  It's an easy card to make so let me show you how I did it...
Since the Ornate Owl die is so intricate, I ran the black cardstock through my Xyron machine to add a sticky back (that is the white paper you see in the photo).  This way, when you are ready, you can just peel away the paper backing and adhere it to the surface, which in my case will be Metal Foil.
 I used a fine glitter over the surface of the owl to create a visual texture.
I adhered a sheet of Metal Foil Tape to a piece of Distress Heavystock (the tape is self-adhesive).  Then I used a pen to trace the outside shape of the owl.
 Cut out the shape.
I used my Blending Tool with a felt pad to add Alcohol Ink (Oregano and Amethyst) over the Metal Foil Tape.  Remember, Alcohol Ink is best when layered so wait 10-15 seconds before adding the next layer to get more dept of color.
 Now pull the white protective sheet off the die-cut owl and adhere to the foil surface.
For the background, I ran green cardstock through the Vagabond using the Skull Damask Texture Fade.  It created a great surface for the background of the card.
I used the mini Black Soot Distress Ink to rub onto the raised surface.  These minis are the perfect for this technique because you can control the how much ink goes on.  After I was happy with the color, I spritzed the surface with water using the Distress Sprayer to let some of the ink run into the background and dried it with a heat tool.
 I flicked a bit of gold paint over the surface and set that aside to dry.
A linen surface was prepared using a piece of Distress Heavystock and linen Textile Surface (one of my absolute go to product for self-adhesive fabric).  Instead of keeping it a brown linen surface, I added Black Soot Distress Ink to the edges.
Both the linen surface and the green cardstock were added to a purple card.
I colored some Tim Holtz Craft Thread (thick thread for crafting and hand sewing projects) with Walnut Stain Distress Ink an water to use in the background.  So add the string with Collage Medium (the glue is hidden behind the owl).
Use foam squares (my favorites are made by Scrapbook Adhesives) to adhere the Owl to the card front.  Wrap the string around the ends of each branch.
I made a VERY small tag (the hole is the small hole of the Cropadile) using Distress Heavystock and a Clippings sticker.


 Mini Fasteners were added to each corner.

Well, I hope you liked the Ornate Owl card.  This die is just amazing with all the cutout detail!  The Halloween dies will be shipping at the end of July so I will add a link once they are available for pre-order on Simon Says Stamp.
I will be back on Tuesday with another Halloween card so stay tuned!
carry on,
paula


Monday, August 10, 2015

Curious Halloween

Hi everyone!  A group of us are creating projects this month using the new idea-ology Halloween release.  Four amazing projects have been posted so far and I'm hoping to add another good one to our growing list of Halloween inspiration! 

Today I'm working with the back side of a Burlap Panel.  It is the back so it doesn't look too great, but I promise it will get better!
NOTE: I did trim any burlap hanging over into the center.
What better way to transform something than paint! 
I added a piece of paper from Regions Beyond paper stash to the center using Multi Medium.  This year the holiday paper pad is 8 x 8" which I love because the paper is scaled down.  Perfect for smaller projects.
I cut four  3/4" strips of paper from the same paper stash.
I stitched down one side of each using block thread and then inked each piece with gathered twigs and black soot and a blending tool.
I folded each strip along the stitching line and roughed up the edges, tearing and bending the paper.
Then added Glossy Accents to the back side of each strip...
The strips were added one by one to the frame of the burlap panel.  The folded edge wraps right around the edge.
When I got to the corner, I just ripped the end of the strip (and inked it) to make it blend into the one on the bottom.
I dug through my Letterpress to spell CURIOUS.  You can use any word but one that is 7-8 letters long is the perfect size to fit in the center.  Rusty Hinge is the perfect color of Halloween orange!
Side Note: the word frightful is a great word for this project.  It fits perfectly if you leave out the T (which in my excitement I did).  
Serious.  
I painted it.   
Waited for it to dry.  
Took pictures.  
Then I realized I spelled it wrong.  #truestory

back to the task at hand...
If you have Letterpress, then you know that vowels are sometimes hard to come by.  I needed an O and I didn't have one, so I used a sharp X-Acto knife to pop off the tail of the Q to make and O.  This worked for me because in order to get a more cohesive look, I painted the "base block black" (say that three times).  This made it virtually impossible to see where I removed the tail of the Q.
NOTE: Letterpress blocks are created using different colors of black and brown stain - in my case I ended up needing to only paint 3 blocks black (R, S, and Q) from varying shades of brown to match the other black blocks.
When you open the Regions Beyond paper stash you will find lots of great Halloween papers to work with, including this one that has a menagerie of small images.  You can use the paper as is or cut the images apart (that's what I'm going to do). 
This is a great time to pull out the Tonic shears to cut up the squares.  Nice long blades to easily cut through the paper in one shot.
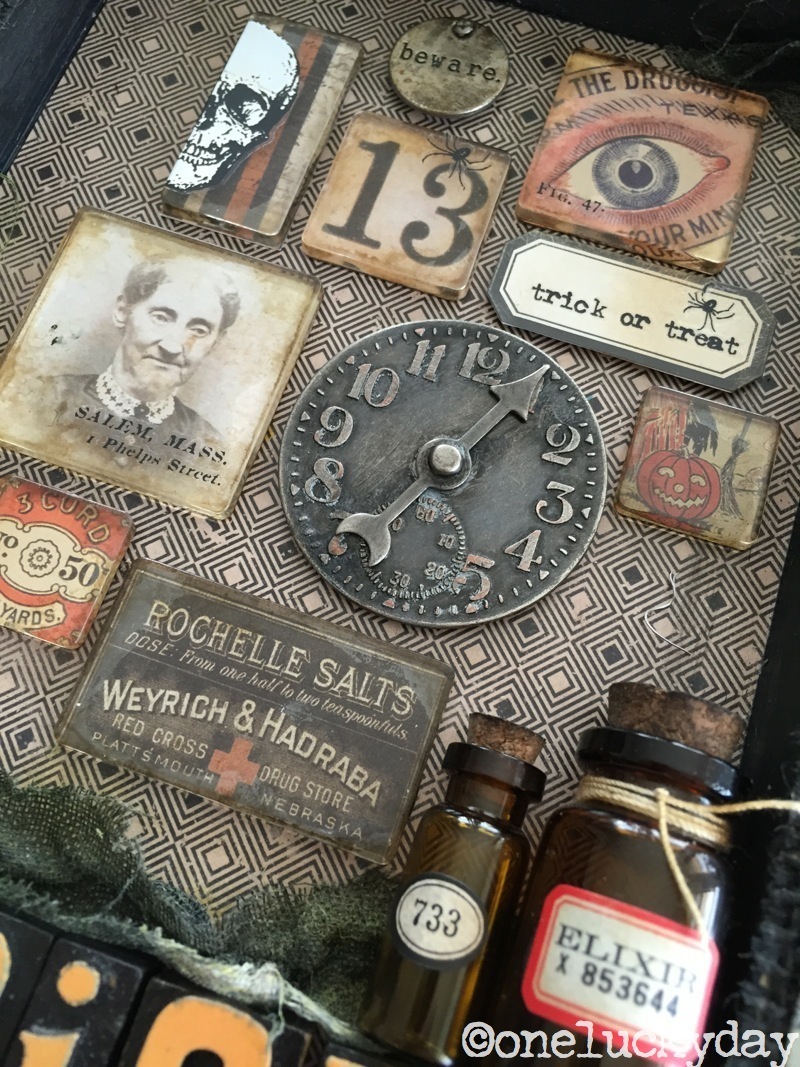
The reason for cutting the paper apart is that the images on this sheet are scaled to match up with the idea-ology Fragment pieces.
Since this is a Halloween piece, I'm going to add Mushroom Alcohol ink to the Fragment pieces.  I dripped a bit onto the felt pad (you don't need a lot).
Hold the tool in one hand and the Fragment in the other to add the Alcohol ink to the flat edges.  You almost push or "squeeze" the ink from the felt onto the Fragment.
You can finish by pouncing just a bit of more onto the face of the Fragment.  Remember there is going to be printed paper underneath so you want to still see through the plastic.  If you get too much Alcohol Ink on the face you can remove it with a q-tip and a bit of rubbing alcohol.  The processes is very forgiving.
You need a small amount of Glossy Accents to glue the paper.  I think the one mistake people make using Fragments is using too much Glossy Accents.  If you put too much on the Fragment, it will squish out from under the paper, which can easily get on your fingertips and leave glue fingerprints on the face.  You can avoid that mess by just using a small amount of GA (as shown).

Once you have your Fragments complete, you can go back and add Remnant Rubs using the Remnant Rub Tool.  The new Curiosities Remnant Rubs are awesome.  So many great images in a mix of black and white on each sheet!  Love that.
Here you can see one of the white Remnant Rubs.  The skull was big so I just cut it down the center and used it on the narrow Fragment piece.
I need a few more things before I put this together:

1. Wordband -  for the top of the project.  I used Picket Fence paint, Alcohol Ink in Mushroom and Lettuce to color the band.  I also used black soot Distress Stain to color Linen Ribbon for the ends.
Wonder Tape helped me secure it to the frame.
2. Apothecary Bottles - The new amber bottles come with these darling labels.  Just choose one!
3. Oddities Adornments - this is a great pack of trinkets with spiders (up next), a bat, skeleton, a darling pumpkin and 5 word tokens.
4.  Oddities Adornments + Timepiece -
Is this not a great spider?  I painted the Timepiece and spider (with added chain) in Black Soot and let them dry.
I added the Letterpress to the bottom of the frame as well as some dyed cheesecloth (black soot + crushed olive Distress Spray Stain).  I rubbed Multi Medium into the cheesecloth until it is malleable (it doesn't take much).  Then it's easy to manipulate into place with the end of a skewer or tweezers.
Now it time to start adding the pieces.  Apothecary Bottles first, then the Fragments, etc.
NOTE: I did use foam squares under the Timepiece and Vial Label.

I added a Screw Eye at the top to hang the spider on a chain.
NOTE: the frame is hard wood so you will need a pilot hole to get the Screw Eye started.
I also cut a few flowers using the Tiny Tattered Florals + Black Kraft Core cardstock.  I think I may be addicted to making these flowers!

And one last step to add a bit of detail...I found this tiny strip of vintage book paper on my desk (I have no idea where it came from) so I inked it and stuck it in behind the cheesecloth.  Love the challenge of using things I find on my desk!
 Love the hanging spider!

Well I hope this gets you into just thinking about Halloween.  The next couple months are pretty packed for me so I'm happy I could get this fun project done early!

If you missed any of the Halloween projects this past week there are links below to see what each of the designers created.  If you are not a follower of these girls, be sure to sign up because there is more to come!

 And three additional designers this week!  Can you guess who?

Remember, you can check Tim's blog for new projects every Monday, Wed and Friday throughout the month!

Thanks Everyone!
now carry on,
paula