Showing posts with label tutorial. Show all posts

Thursday, March 2, 2023

Lost Shadow Tag

Sorry it has been so long since I have posted! But I have been in the thick of it, creating new samples for idea-ology for LIVE on Saturday the 4th (9AM PST).  

In the meantime, please check out the tutorial of a project I created for Ranger using Lost Shadow and the new Distress Crayon set (#14). I think you will like the background technique, using crayons, instead of Distress Ink.

Click HERE for tutorial


Now carry on,
paula

Saturday, October 15, 2022

Welcome Home

Hello friends,

Today is exciting as it is the start of the Christmas making season! idea-ology Christmas Live was so inspiring - I love hearing Tim talk about all the makes and the inspiration behind them!  He just makes everything seem so amazing.

I'm sharing my Welcome Home Tray today.  Follow along and I'll show you how I created it!

I started with a large size Vignette Tray and lined up Collage Tiles on the back. They fit the 6 x 12" tray perfectly with tiles four across and eight down.

I also used the tiles on the sides of the tray.  You can pre-cut these to fit the sides and then glue them on.
For the front of the tray I use the red marble Backdrop on the sides and the bottom.  I filled in the center top with a different Backdrop paper.  All the Christmas Backdrop papers are good, so there are plenty to choose from to cover the tray.
The Christmas Tape comes with 4 skinny tapes (+ 2 wide) to use on the edges of any Vignette Tray. I am using the black one with Christmas words.  I think that one looks best against the red marble paper.

To make the bottom display shelf, I used a Vignette Box I covered in more Baseboard paper. 
Then I created a "sandwich" of: a card from the Layers Christmas Pack, a piece of acetate and a Baseboard Frame.  Once I had these three pieces together, I adhered it to the Vignette Box I had already put paper on.  This particular frame has the words 'Merry Christmas' at the bottom (its really a vertical frame) and I needed to cover that up (since the words are running on their side).  I decided to shave off the back of a small tree and adhere it to the frame with hot glue.  I also chopped a wood slice in half and added it to the tree to finish it off.
I added Collage Medium to the back of the Vignette Box and placed it into the Vignette Tray.  Then left it to dry overnight and came back to it the next day.
TIP 1: Something that I use whenever I make Vignettes is a rubber phone holder. I had it on my desk for my phone, but found I was using it to prop up my projects more than using it for the phone.  
For most Vignettes, they fit right in the space to work in a standing position (shown below). It also works if you are working with the Vignette laying down (testing things before gluing for example), it can be used to prop up the Vignette at two different levels depending on how much you want to lift it. I usually go for the higher position and if stuff keep sliding down, then I drop to the lower level.  The rubber helps to keep it from sliding away.  
I bought this one back in 2020 called Phoneprop  but I am sure there are many that could be used.
Okay, now back to the task at hand...
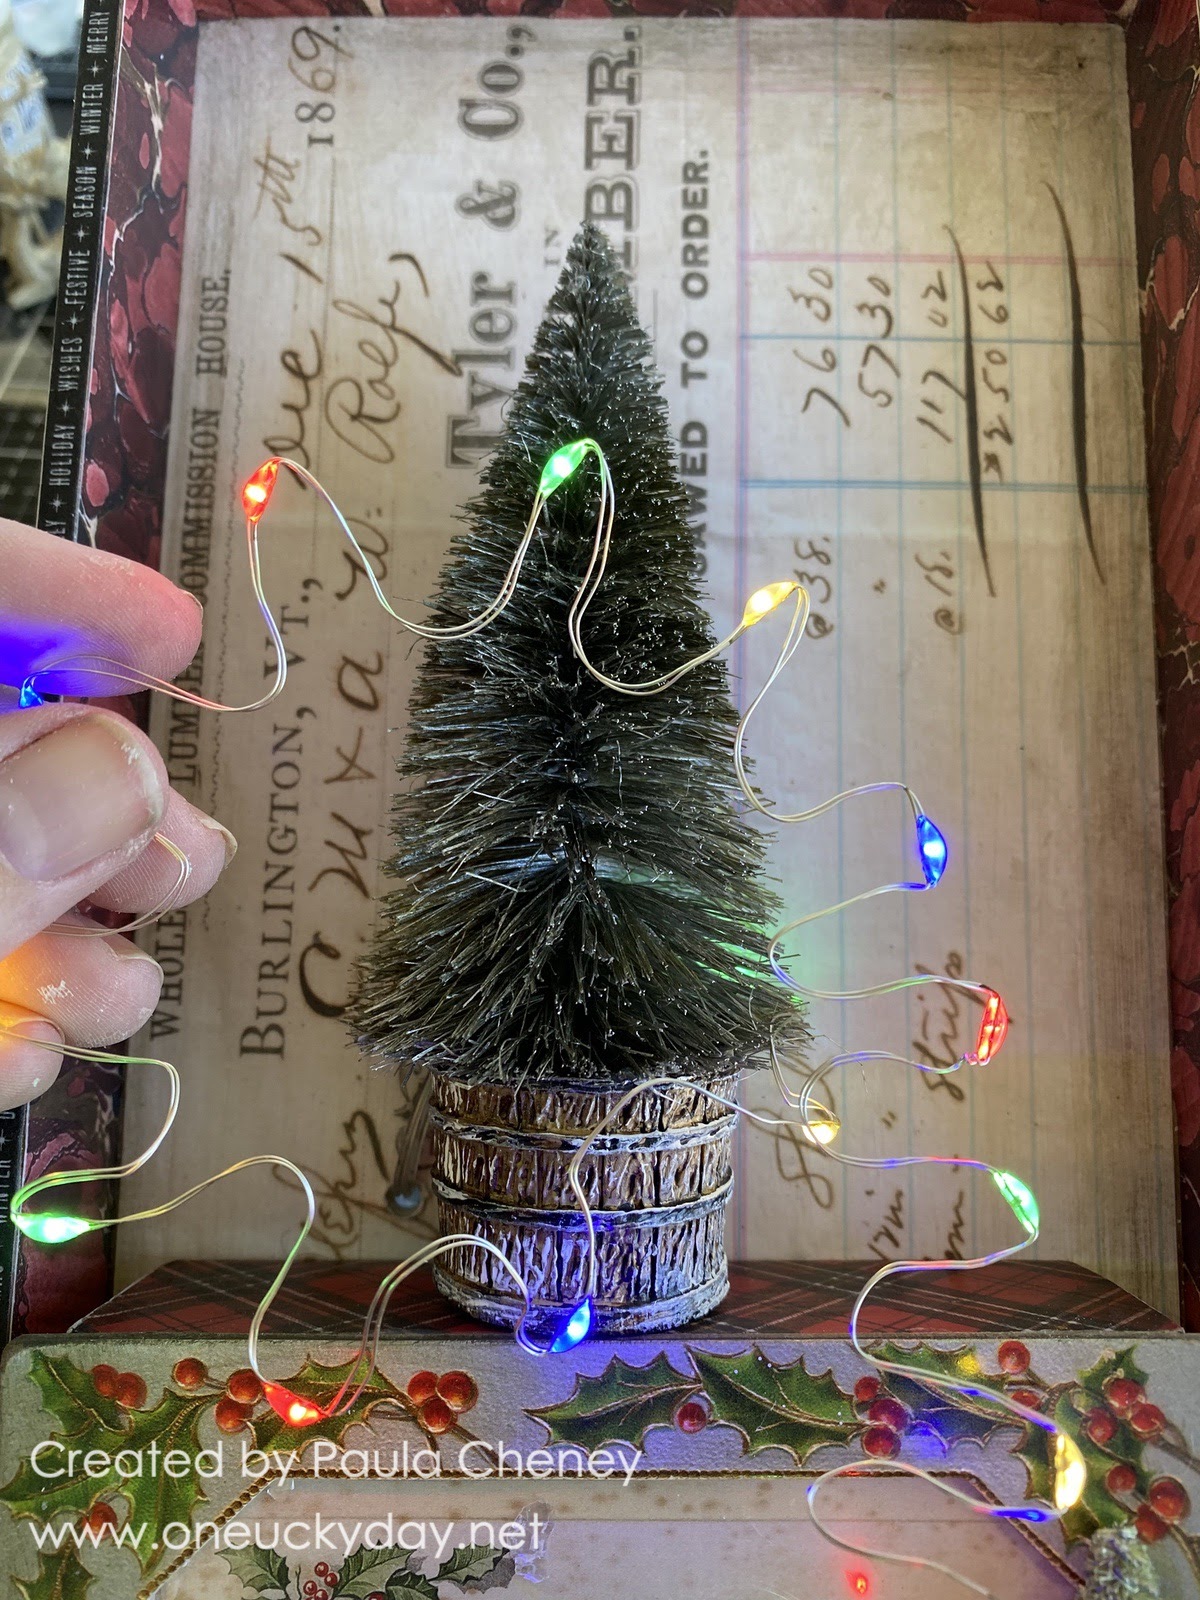
I hot glued a Woodland Tree in the idea-ology Barrel. I decided where I wanted to place the tree and then made a hole in the Tray with a hammer and awl.  It would be best to make the hole just up from where the Barrel and tree meet.
I ran the lights from the back of the tray to the front, then did my secret wire bend.  TIP 2: By bending the lights this way, it's easier to hide the wire in the tree.  So I bend, then start to wrap the tree.
I wanted to add a lantern which needs just one light so I made sure I wound the lights around the tree until I had one left for the lantern (it took me two tries to get it right). 
TIP 3: use putty (like you might use to put up posters with - this one comes from Hobby Lobby, they always have it by the check stand).  I like to use it to keep the Tiny Light in position till I can get it glued securely into place.
Use Hot Glue to glue the tree into place.
Then adhere the Lantern with Collage Medium.
While the lantern is drying, color various sized of Baubles with Alcohol Ink and push them into the tree, using hot glue to secure.  I like the largest Baubles at the bottom and work my way upward using progressively smaller Baubles.
Brush tree with Collage Medium and shower it with Mica Flakes.
Do not press the Mica into the glue, just let them fall where the may.  It makes it much more organic looking!
Lets talk about the roof.  
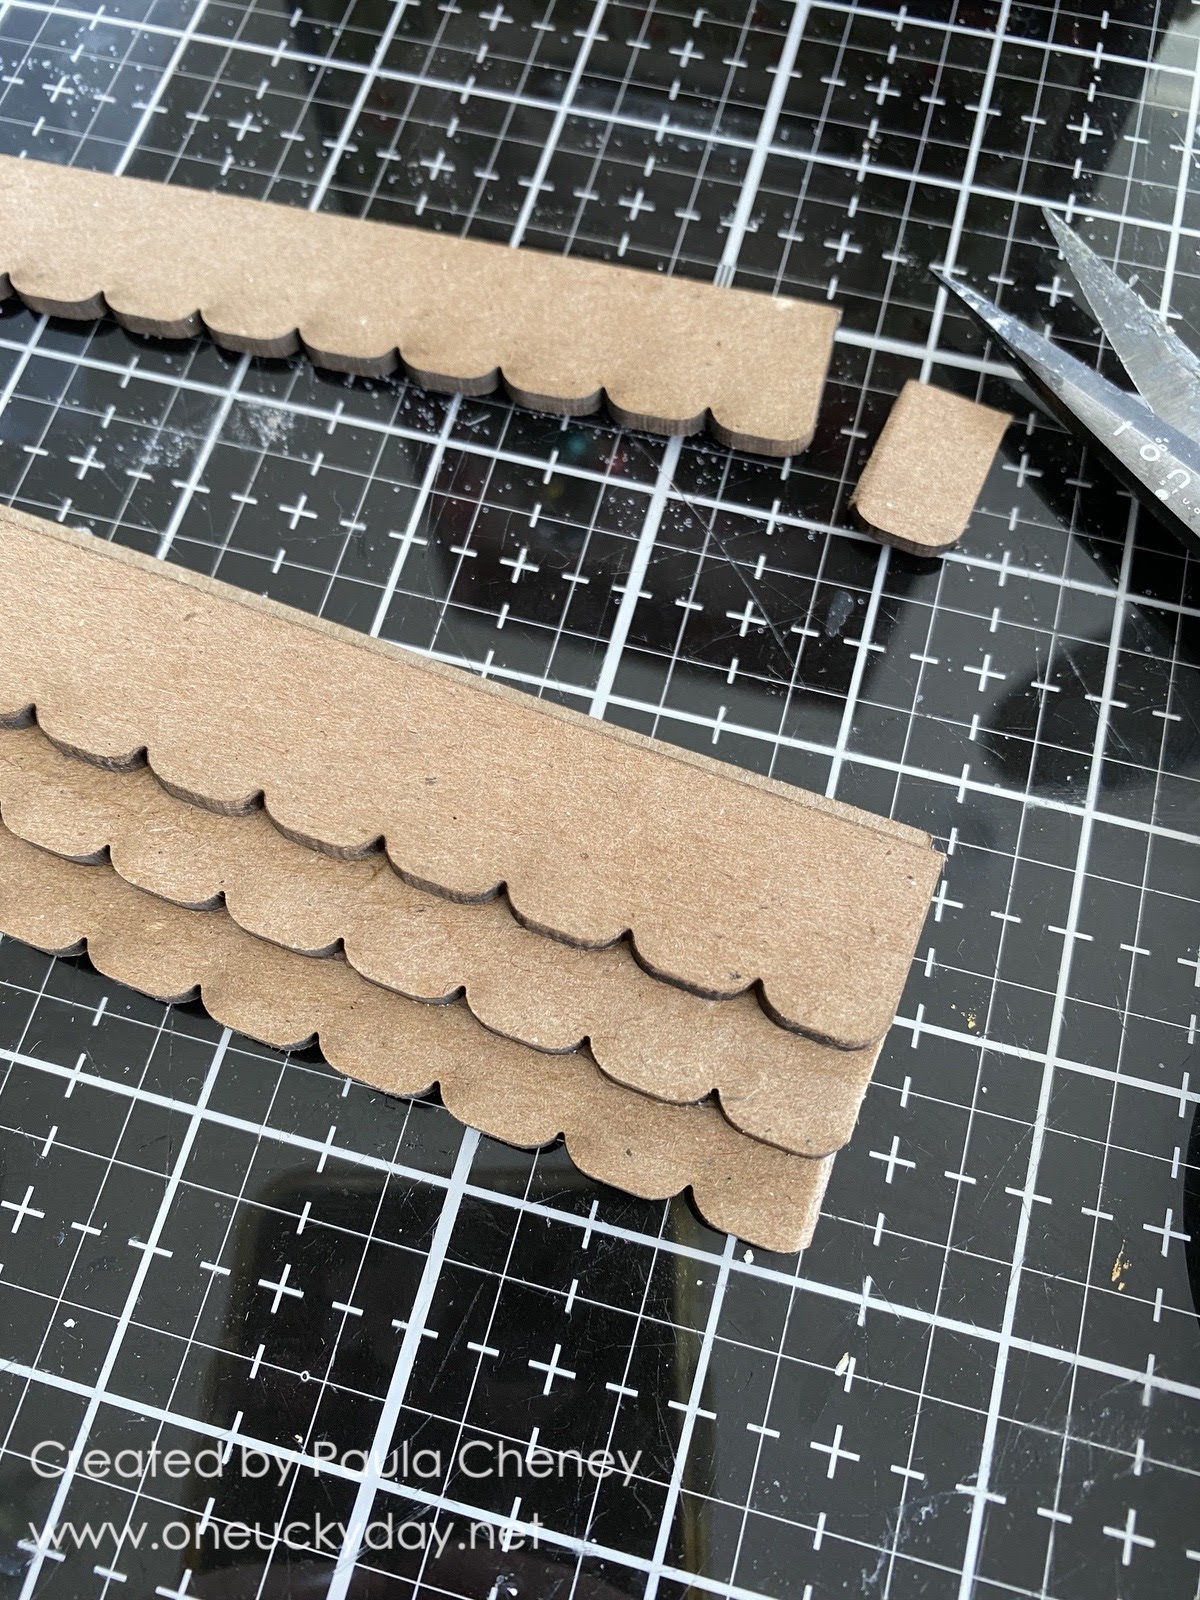
I created the roof using a piece of heavy chipboard + 3 of the wider 6" Etcetera Trims - Scallop. There are 5 pieces in the package so you only need 1 package to have all the pieces you will need.
Punch out the three wide 6" scalloped trims.  
Cut ONE scallop off the end of each strip so the entire piece fits into the large Vignette Tray.  The Tonic scissors cut easily through the Etcetera material.  Then stack them on top of the heavy chipboard piece.  You can see the chipboard sticking out just a bit at the top.
Use Collage Medium to glue the three trims pieces to the thick chipboard.  Only the bottom trim is glued directly to the chipboard.  The rest are just layered on and cantilever out from the bottom.  Once secure, I trimmed the excess chipboard away. You might think you need to add something under the top trim to hold it up, but you don't. The piece is so sturdy after the Collage Medium dries that there was no need.
I painted the trims with Ground Espresso Distress Paint and let that dry.
I also used a small amount a white paint and dry brushed it over the brown and let that dry.
Then I used my finger to wipe Grit-Paste Snowfall over the trims.
It's thicker in some places and thinner in others (I like the more organic look).  Set aside to dry before adhering the roof into the tray.
This photo shows how the roof fits into the Tray at an angle (totally up to you how much of an angle you want).  I added a decent amount of Collage Medium to the top edge of the chipboard trim and pushed the whole piece up and into the tray.  I let it sit for at least 30 minutes before I moved the tray to a standing position to continue.
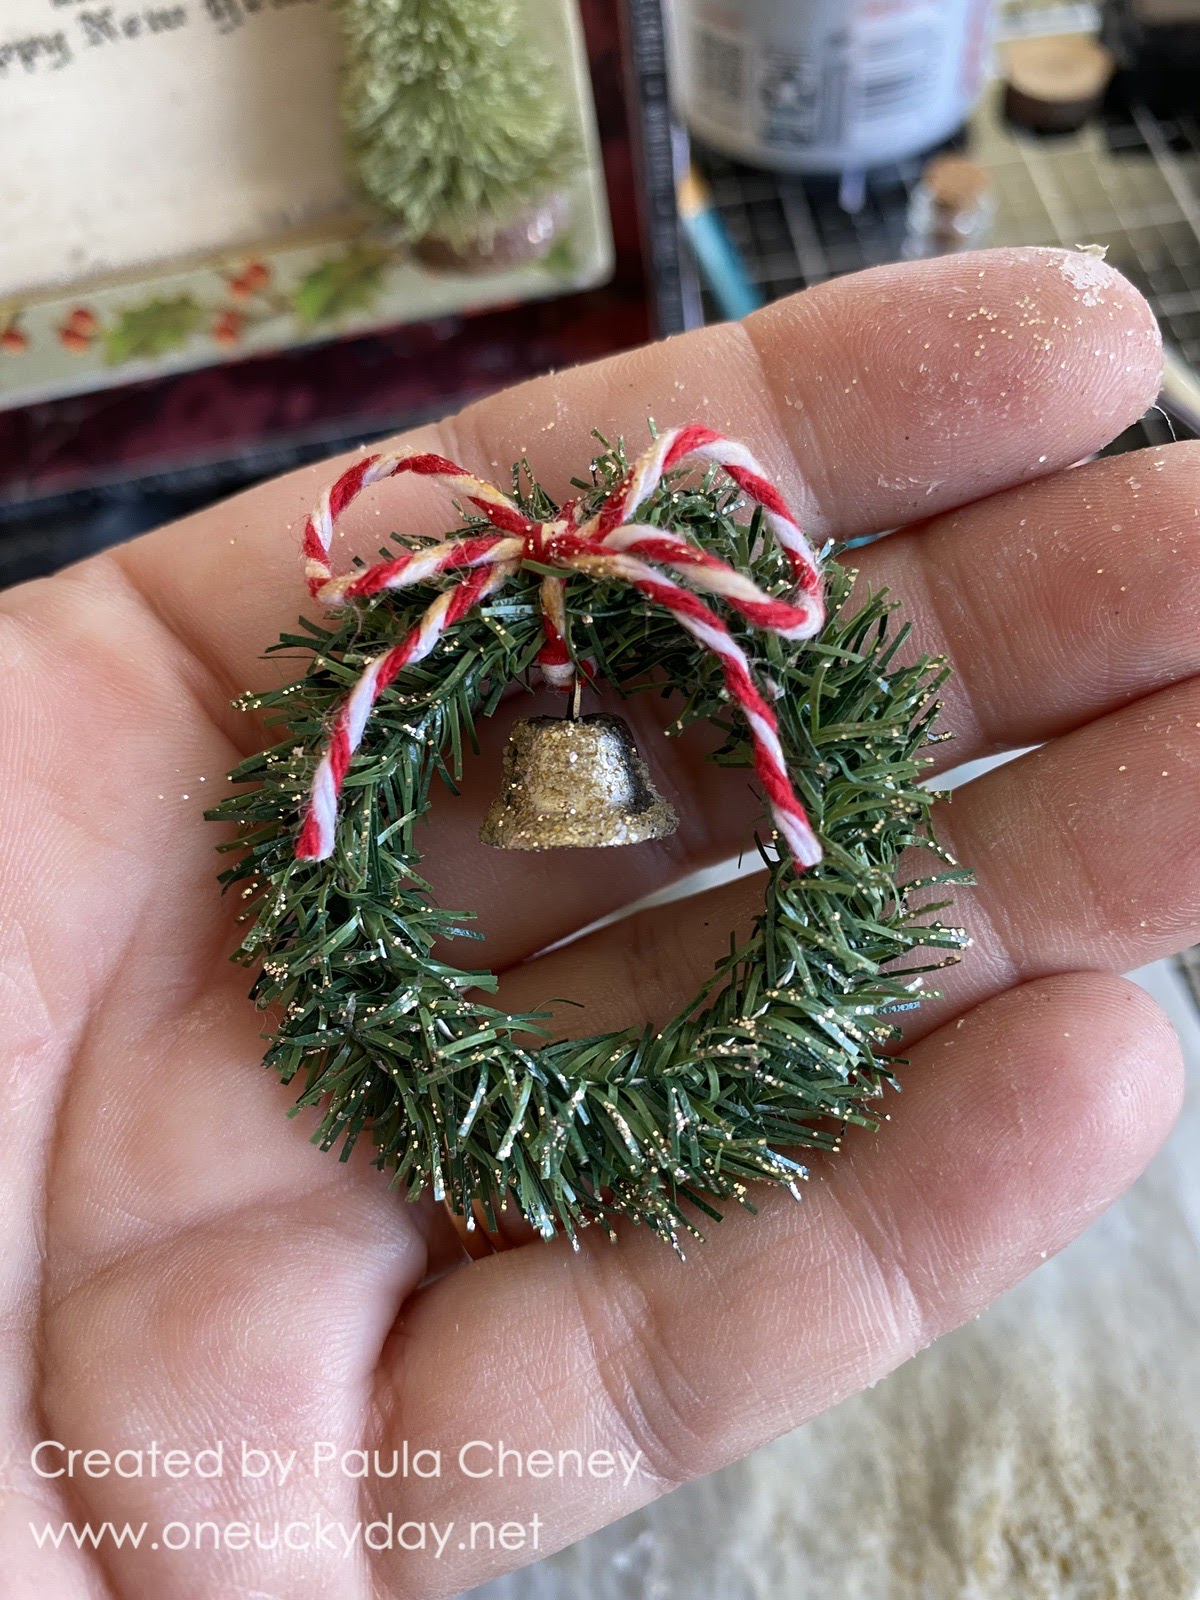
Create a wreath with wired Pine Twine (I love this stuff). I actually made two wreaths, one slightly smaller than the other, and hot glued them together at the top to get a bulkier wreath. I added the bell from the Tiny Bells pack, red and white twine and a bit of Stickles, rubbed on with my finger. Just darling!
Adhere the wreath to the red door.  Baubles are optional of course but I figured, what the heck! It's Christmas!
The house number was made with a Label Frame (I love these because they come with the "rivets" already in the side holes...no need to add something extra).
The numbers are from the Numeric pack and have been colored with Foundry Wax - Gilded.
I added a painted red handle to the top of the tray and once secure, Tinsel and a tag from the ephemera pack.
Added snowballs made from Baubles and Snowfall Grit-Paste.

Stickles on the tiny tree and a Word Plaque painted with white paint.


This was a fun project.  I loved figuring out how to build the roof out of trims.  It looks way harder than it is! And the Snowfall Grit-paste was perfect to add the snowy charm!

Now carry on,
paula

Tuesday, August 23, 2022

The Haunted Circus

 Hello Friends,

The idea-ology Halloween Saturday Live was so exciting! I loved seeing all the projects by the Makers.  So many great ideas and loads of inspiration!

Today I am sharing a tutorial for the Haunted Circus!  This was a fun one to make (and pretty darn easy), so follow along and I'll show you how I did it!

I used the largest of the Square Vignette Boxes for this project (5.5 x 5.5"). I covered the inside of the box with a print from the Worn Wallpaper Halloween pack.  The inside edges will never be seen so I just put the paper on the back of the box.  I did cover the outside of the box with a different print from the Worn Wallpaper pack (you will see that print at the end of this post).  

Tiny Lights - You are looking at the top of the box, but this was the best way to show it.  I used green from the pack (it comes with one green and one purple). 
  1. Drill a hole in the top left corner.
  2. Thread the lights from the back, into the box.
  3. Cut the ends off a large craft stick to fit the box (no need to paint the craft stick black like I did).
  4. Wrap the lights in a LONG diagonal pattern around the stick.  Wrap, going up the craft stick, then turn and wrap back down, crossing over the wires (sounds harder than it is). If you wrap this way, you are able to get all the lights on one side of the craft stick.   
  5. Add two 3D foam squares to the back of the stick and adhere to the top of the box.
Another view...
And with the lights lit up!
I used this long piece from the Worn Wallpaper pack to start the layering process.  In the end, this piece will not show, but will give strength to the other pieces.  In theory, you could just cut a strip of cardstock instead of using up this piece.  Up to you.
Color the curtains with Distress Crayon.  Peeled Paint was used for the curtains.
Use Design Tape or paper to cover the floor.  You will not see too much in the end.  This black crackle tape from the Design Tape pack is a favorite.  I have used it so much this season, I think I might need another pack to get me through!
I also added another tape at the bottom (from the same pack) that says, "Orders attended to day or night".
I used 1/4" Scor-Tape on three sides of the box to secure the two curtain pieces.  The curtains are from the Layers pack which is thicker ephemera.  Perfect for the front of the box.
The stage is now set, sorta speak, so now we can add some embellishments!
To build up the stage front, I used scalloped Etcetera Trims.  The trims come 4, 5, and 6" long.  I both widths of two 6" long trims and cut them with my tonic scissors to fit (about 5.5").  
You can see here that once they were cut to length, I glued the two pieces together and painted them black.  Doubling them up helped to stabilize the trim once glued to the vignette box because it is wider at the base.
I could have used them just like this, but I decided it need more interest.  I had the idea to use the hinges that are part of the 2022 Sticker Book Curiosities. I added a hinge to each side of the trim.  Notice that the hinge just covers the shorter layer of the scallop trim?  It also hangs over the trim at the bottom - don't cut that off!  That will help with stability once it is glued to the box.
Here is the top piece with both hinges added.
I added the, "For Skill and Amusement Only" sign from the Baseboard pack to the center, between the hinges.  Let it dry in place before adding the trim to the top of the box.
So here is what it looks like when you add the trim to the top.  The bottom of each hinge and the baseboard sign all cover the FRONT top edge of the box.  Make sure you not only add Collage Medium under the trim but also behind the bottom edge of the hinge and sign.  We'll let that dry in place while we work on the rest of the embellishments.
To make the game wheel you can use either of the game wheel ephemera pieces from the layers pack.  Both will work.  There is a black and white target circle in the Baseboards pack that I used as the base. I punched a hole in the game wheel, added a Game Spinner (old product) with a Long Fastener (brad).  Then added that piece to the target backer.  I know it covered the target but sometimes that happens - it was the perfect size and weight to use!
I cut a strip of the new Distress Woodgrain Halloween which is black woodgrain cardstock with a black core.  I used another craft stick, mounted the cardstock on top, and there you have a faux stand for the game wheel.
I love this Baseboard piece which reminded me an old circus poster.  I added the Halloween Shape with the skull and crossbones to the center.  I also wiped black paint over the Shape to fit it with the theme.
The candy apples were simple to make.  I put Bubbles in a small plastic bag and dripped a few drops of Red Pepper Alcohol Ink over the top.  Close the bag and squish it around till the Bubbles are coated.  Pour out onto a paper plate (disposable/has sides to control rolling away).
Use glue to add tiny stick cuttings and leaves to the top of some of the Bubbles. Pile them in the barrel while adding glue, leave to dry completely.
Once the apples are set.  Adhere Barrel to box with Collage Medium.
I dug out some spiderwebs I bought at Joann last year.  I started by wrapping the spiderwebs around the game wheel and pulling in every direction from there.
Color the sweaters of the Paper Dolls with Distress Crayons.
I added a skull and mask stickers from the Sticker Book, to the Paper Dolls.  Then glued them into the box.  You know me...there are wood blocks behind each of the boys so they are secured to the back wall but can stand out in front of the wheel.
Now back to the top.  I added Hardware Heads over the image that was on the hinge (scroll back up to see what it looked like before).
I wanted to embellish the curtains, so I decided to add black Tinsel to the edge.  This Tinsel is wired so you can bend it to keep its shape.  That is exactly what I did.  I cut a piece and shaped it to fit one or two of the curtain swags and then glued it on so the tinsel hung down just below the swags.

You can see it here along the swags...

I captured some image of the finished top and back.  Hopefully this will help to see how that top piece was added to the box.


Hope you give this one a go.  Such a fun, whimsical piece...not scary at all!  I had a great time making it and sharing it with you!
If you missed the Live last Saturday that shows all the idea-ology sample made for this release, you can view it HERE.  Product is the first hour, so if you only want to see samples, start about 1 hour in.

Now carry on,
paula