Showing posts with label eclectic elements. Show all posts

Friday, November 8, 2024

Holidays Past Advent Calendar

Hello friends,

It has been a slow week around here due to the fact I tested positive for Covid on Monday. It's my first time having it and it has given me a heck of a stuffed up head. It's hard to think when you're stuffed up like that! But things must press on! Monday and Tuesday were a wash (it was all napping and no working) but by Thursday I felt good enough to actually put some words together.
Today, I going to try and tackle the Advent Calendar that I made for the Live. The calendar itself is very straightforward. If you are a sewer, you can see right away how it was made, so I guess I'll just try my best to give you a rundown with a few snapshots (and they really are snapshots) of the making process.

Finished size is 20 x 25"
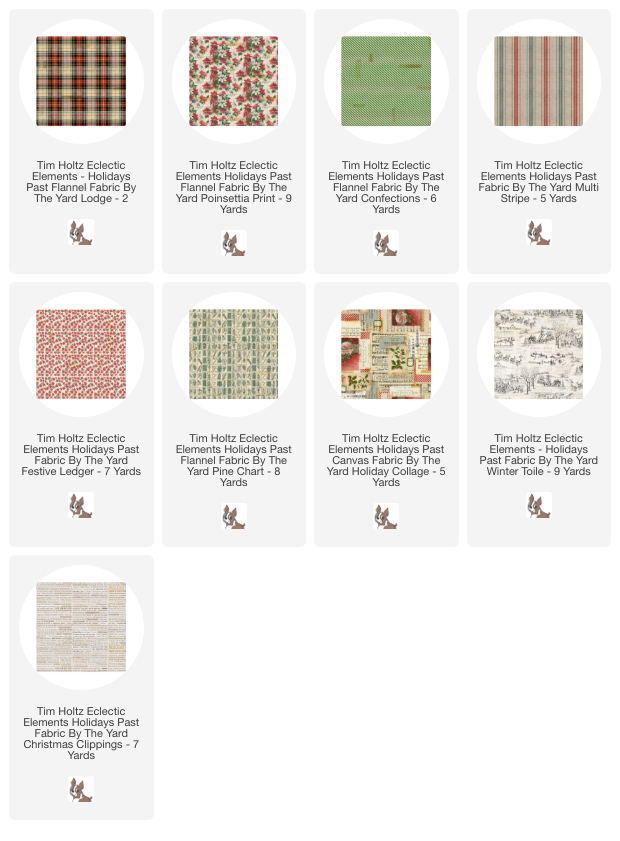
I used 9 Holidays Past cotton prints for the calendar. Admittedly, the more prints I added the harder it got to make it balanced.  My rule of three, meaning use at least three of each print, was easier with eight prints. Nine was challenging, but I got there in the end. Here is the fabric from the collection I used:

Poinsettia Print (large poinsettia print)
Confections (green stripe)
Winter Toile (white winter scenes)
Multi Stripe (green and red ticking)
Pine Chart (green pine illustrations)
Christmas Clippings (text)
Holiday Collage (collage print)
Lodge (plaid)
Festive Ledger (small poinsettia print) 
*Lodge was also used for the binding and Holiday Collage for the backing.

BACKGROUND:
  1. Cut one 5 1/2" wide strip of each of the nine fabrics (5 1/2 x 44"). 
  2. Cut three, 4 1/2" pieces from each strip (set aside the leftover strip for later). If you use less than 9 fabrics, you will need to cut a few more pieces
  3. Lay out the pieces in 5 rows of 5 (the photo below shows 8 different fabrics - which was easy to stick to 3 of each + 1 plaid (25 total squares). But then I decided to add the ticking stripe, so I ended up having to move the squares around again.
TIPS: Use a sharp rotary cutter for cutting. Be accurate with your measurements/cuts.

5 1/2" x 4 1/2" background squares

4.  Going back to the leftover strips that were set aside, cut at least three, 4 1/2 x 4 1/2" squares of each pattern.

5. Fold the squares in half and press on the fold line. 

6. Work out a pleasing group, moving the patterns till it suits you. This part took me a while because of adding the ticking stripe. You can see the addition in comparison to how it was in the last photo. I obviously ended up changing the position of the some of my base rectangles to get all the patterns to work. Honestly there is no wrong way to do this!

NOTE: I think it is wise to take a photo of the squares before you start to move them. That way you can put them back in the same spot once basted. I swear, even if I stack them in order, I still question myself when putting it back together. The photo will save you a lot of grief.

Adding the folded 2 1/4 x 4 1/2" pockets

I did not take a photo of the next step, but once I have the fabrics in place, I basted the pockets to the matching background. I also used a sewing gauge (ruler) to make sure my pockets were even, before basting in place. I admit, I tried it without basting and my pocket was out of whack, so don't skip this part. It's worth it in the end. 

So the next step is to start sewing the strips together (1/4" seams). This photo is showing the bottom two rows after stitching. Again, be very aware of where the pockets meet when sewing the strips. 
Once you finish stitching the 5 rows as shown, then you can stitch the 5 rows together. Again, this takes some matching but it wasn't as hard as I thought it might be.
NOTE: when you are done stitching the rows, remember to open the seams and iron flat before sewing the strips together.
SIDE NOTE: In our guest bedroom, I have a small desk that I can convert to a sewing table when needed. I also lower my ironing board to a sit lower than my desk and place it on the right side of my chair (I'm right handed). I have a swivel chair, so I can place my pieces on the ironing board, then pick up, sew, then go right back to the ironing board to iron flat, and repeat.  I don't even have to get up, I just swivel! This set up has been a wonderful change for me because previously I was sewing in the craft room and ironing in the guest room. So much walking back and forth between the two rooms. I don't know why I didn't think of this 4 years ago when I bought the little desk. I share this because maybe sewing might be more enjoyable if you look at what space you have and how you can improve it for use. I did spend about $100 at Office Depot for a super comfortable swivel chair and that alone has made my sewing journey better. If need the guest room for an actual guest (like my father-in-law who just visited in October), I just put the cover on my machine and store it in the closet. The iron and ironing board goes into its storage space and I'm good to go. Easy transition to a bedroom again.
So this is what it looks like all stitched together! It really is satisfying to see it sewn together!
Let me explain what I am doing here with the black plastic. I like to use a temporary spray adhesive to stick the fabric to the cotton batting (Warm and Natural) before I quilt or stitch it together. So I got a large black trash bag and cut it open to cover my kitchen table. Then I can lay the batting on the plastic, spray the temporary adhesive, then add the advent (or whatever I'm working on). After pressing the batting and fabric together with my hands, I remove my piece from the black plastic, then hang the plastic on the back of a couple kitchen chairs till its not tacky anymore. I can fold it up later to store in my craft room, then use again the next time I need to spray.
After the black plastic has been removed, use a quilting ruler and rotary cutter to square up the advent.
Next I will cut the back piece to fit the front. I used one of the collage fabrics but you can use what you like. In all honesty, the large poinsettia would be the best fabric to choose for the back, because it is the only one that is really random so you would never know if its crooked!
Once I had the front and back together, I stitched across the advent 4 times, right under each row of pockets (broken green line).
I think you can see one of the stitching lines here, right under the pocket.
A view from the back.
Before the binding was added, I made two folded triangles for the top two corners. I have a dowel that will fit across the back and slip inside each corner for hanging.
I will quickly talk about binding. 
First of all there are a million videos on YouTube about making binding and sewing it on. The corners are always the hardest to wrap your mind around if you don't use binding regularly. They are really easy, you just need to know the fold trick.
The Lodge fabric was cut 2 1/2" on the bias (going across the grain) to get the diagonal plaid. Whenever it has been a long time since I have sewn corners, I go to this video and watch her do at least one corner (at the 2.52 mark - she will repeat the corner three more time so you get it). Then I remember, yep, that's how you do it. I'd rather watch, then do it right the first time and not have to pick it out. It's an easy trick and I NEVER would have figured it out on my own. 
I still finish my binding by hand since I am always terrified to finish with the machine. Richele has tried to talk me into trying it, but I'm not that good of a sewer!
Okay, well thats it for today. I will be back shortly to talk about the tags and the decorations for the calendar. I know this is a big project, but it is one that you could keep and use year after year. 

Now carry on,
paula


Thursday, October 20, 2016

Eclectic Elements Craft Thread

Just a quick post today to talk about Eclectic Elements Craft Thread.  We introduced Craft Thread for use in hand stitching on sewing projects but I have found myself using it over and over in my everyday crafting projects.  In fact I am using it extensively in my Christmas class this year.
The Craft Thread is sold in three palettes made up of 4 colors each....you know the pack with the reds is my favorite. 

I created this stitched pillow for the spring Quilt Market.  It was here that I really got to experiment with the Craft Thread using different stitches along with vintage lace and grain sacks.  Annette Millard wrote a great blog post about the pillow and her experimentation with the Craft Thread.  You can read it here
If you are a sewer, you can also download free project instructions for Airmail Patchwork Tote Bag using Eclectic Elements metal zippers and Craft Thread.  This looks like a fun project!
Hope these projects give you some ideas for using the new Eclectic Elements Craft Thread.  Whether it's stitching or crafting...you are going to love it.
Now carry on,
paula

Monday, May 27, 2013

In Memory of our Heros

Good Morning Everyone! 
For most of us in the United States, Memorial Day means a day off of work and a barbecue.  In fact we might not even think of those who have gone before to secure our freedom.  You might remember I traveled to France in April.  While I was teaching at the Paris event, my husband Jay and Dave Schuh (yes, Debby's husband) took a train/tour out to the Normandy coast to visit the WWII landing beaches, museum in Caen and the American cemetery.  What a moving experience it was for them to visit these hallowed grounds, hear the stories of sacrifice and courage, and visit the cemeteries of those who did not return home.  So please remember to say a little pray of thanks today for those that have served our country in the past as well as those serving today.
image via Graphics Fairy

And the topic you have all been waiting for....fabric.  My, oh my I think a record was broken for the amounts of comments left on the blog to win the fabric.  So much excitement surrounding the new fabric!
Here are the 3 winners of the fabric:
Barbara Mason: My lampshades are all a quiver cause I have been looking at them and they know something is up!! Great post, giveaway and instructions....

DDWilson: Paula, your tutorials are wonderful! Samples, oh my....just what I was thinking about.....I bet that the fabric is a long time in getting to rural Montana!
Here's hoping, would love to play around with them

Susi in Italy
Susibi
How fantastic did that lampshade turned out .. and hurray for glue guns! These fabrics are fantastic so if a little bundle by chance made its way to Italy I would be more than pleased. 


Lucky girls, please be sure to contact me at paula@2gypsygirls.com with your name and shipping information so I can get the fabric samples out to you asap.

cheers for a great day!
paula

Friday, May 24, 2013

Eclectic Elements Lampshade

One of the projects I made for the Quilt Market booth was a fabric covered lampshade.  I knew I wanted to use the Eclectic Elements - Melange fabric since it has both ephemera and butterflies, some of my favorite things.
I purchased a small lamp and separate shade from Walmart.  The shade looked pretty straight forward as far as lampshades go.  I have made lampshades before and one thing to remember is that if you pick a round shade, your fabric will have to "roll" around the shade.  Great if your fabric is a floral, but if the fabric has any sort of straight line in the pattern, the "line" could end up heading the wrong way.  I guess that's my way of saying be mindful of not only the shape of shade but of the fabric print as well.
I started by peeling off the fabric tape around both the top and bottom edges.  I decided to leave the tan fabric in place since the creme lining had been wrapped from underneath and onto the outside.
Once the fabric strips were removed, I used a piece of canvas to create a pattern the shape of one side of the shade.  Don't worry, it doesn't have to be perfect.
Once I had my pattern cut out, I pinned it to two layers of fabric.  You will need a total of 4 pieces so cut out one more time.  As you can see, I cut the sides about a 1/2" wider than my pattern to allow for the seams.
Now over to the machine!  With right sides together, stitch all 4 pieces together.  It kinda looks like a little skirt.
Now back to the work table...pull the "skirt" down over the shade and line up your seams.
I used a small, low temp glue gun to adhere the raw edges of fabric to the shade.  Work in very small sections (about 2 - 3" at a time).  A fabric strip will eventually cover the raw edge so don't worry about turning it under.
Little by little I worked my way around the bottom of the shade then moved on to the top.
You will need bias strips to go around the shade to cover the raw edges.  If you are not familiar with bias tape, it is a strip of fabric cut cross-grain so that it has a bit of stretch (just what you need to go around corners or circles).   I used my clear quilting ruler, self healing mat board and rotary cutter to cut the bias strips.  Okay, I use this same set up to cut every piece of paper that crosses my desk.  I admit it, am paper trimmer impaired.
The cutting mat has a bias line right on the board.  I placed a square piece of Dictionary fabric on the board, then lined up the ruler with the yellow diagonal line and cut.  NOTE: The strips have already been cut away from the piece below.
If you want to know more about making your own bias tape there is a very in depth tutorial on Made.
...and if you are not a sewer you can always buy bias tape at any fabric store and skip this step.
Here are my cut strips.
I took the strips to the ironing board and ironed each raw edge toward the center to make about a 1/2" strip.  It doesn't have to be perfect, just do your best (remember, were making a lamp shade not splitting an atom).
The bottom strip is the back side, the top strip is the front.
Now just glue the strip to the shade using the hot glue gun.  I suppose you could use fabric tack, I just like the speed of the glue gun.
When you come to the end, just fold the strip back on itself and add a bit more glue.
That's it.
Super simple (don't let the bias tape part scare you!)
Seriously, how cute is that lamp with the Melange fabric on it?  I admit I was kinda sad when I had to pack it up only a few hours after I made it, to send to the show.
(that's my dad in the Navy uniform, circa 1944)


Now here is the good news!  
I am giving away fabric samples I brought home from Quilt Market!
I have 3 sets of 3 different fabrics so leave me a comment to win.
I will post the 3 winning names on Monday morning (May 27th).
UPDATE
As promised, the names of the fabric winners were posted (here) on Monday the 27th.

Here are the 3 winners of the fabric:
Barbara Mason: My lampshades are all a quiver cause I have been looking at them and they know something is up!! Great post, giveaway and instructions....

DDWilson: Paula, your tutorials are wonderful! Samples, oh my....just what I was thinking about.....I bet that the fabric is a long time in getting to rural Montana!
Here's hoping, would love to play around with them

Susi in Italy
Susibi
How fantastic did that lampshade turned out .. and hurray for glue guns! These fabrics are fantastic so if a little bundle by chance made its way to Italy I would be more than pleased. 


Lucky girls, please be sure to contact me at paula@2gypsygirls.com with your name and shipping information so I can get the fabric samples out to you asap.

Friday, May 17, 2013

Eclectic Elements Fabric Bags

Hi everyone!  Glad your here to see some of the things I made using Tim's new fabric, Eclectic Elements.
Today, it's all about bags.
This one is purse size.  I sewed pieces of the new fabric together like I was making a quilt top.  Once the pieces were together I folded the top and bottom under and sewed it to a heavy canvas base.  Do you remember when I made the sewing machine cover?   I made the purse exactly the same way...it's just right side up and smaller in size.  Next, I added the vintage buttons and the lace and trim I purchased at the flea market in France. 
The difference between the purse and the sewing machine cover is that I created a lining piece (exact same way as the bag) and slipped it inside the purse.  Of course the raw edges from the purse and lining needed to be covered so I made my own bias tape to encase them at the top.  Again, just like the sewing machine cover where I used a store-bought red bias tape to finish the bottom edge. 


The second bag is tote bag size.  Same basic principle, but this one has added panels on each side and a store-bought webbing for the handle.  A bag this size can carry a lot of stuff, so I thought the webbing handles would be more practical.

I worked on the pocket as a separate piece, doing all the stitching around the wool flowers that I cut out using the Tattered Floral die.  The steel rule die cuts the flower perfectly, even from wool!
  I finished stitching the flowers, then added the beads before I sewed the pocket to the bag front. 
Hope you are inspired this week by all the projects!  I love sewing so this has been really fun working with all the fabrics.  

For more inspiration visit Sande Krieger's blog tomorrow.  She made some really cute things I think you are going to love...I hope one of them doesn't fly away before you get there (hint, hint).

Tuesday, May 14th - Tammy Tutterow  

Wednesday, May 15th - Richele Christensen

Thursday, May 16th - Chelle Fowler

Friday, May 17th - me!
Saturday, May 18th - Sande Krieger 
Sunday, May 19th - Kerry Lynn Yeary


By the time you read this post I will be in Portland at Quilt Market with Tim and Mario...looking forward to a great weekend!
Cheers!
paula
oh, and ps...there are more projects coming next week...and a tutorial or two, just saying.

Monday, May 13, 2013

The one about the really big box...

I am sure many of you read Tim's announcement Friday about his new venture.  If you have followed his career, you know he is not one to rest on his laurels, so I wasn't surprised when he told me his venture would be taking him into uncharted territory.
Speed ahead to April when a giant box showed up on my doorstep (please excuse the garden hose in the background).  The poor FedEx boy looked at me in despair when I said I wanted the box hoisted up the two brick steps to the porch.  To be honest, it took the two of us, him pushing and me pulling to get the big box even close the front door.  
Since the box was so heavy, I had no choice but to get a box cutter and open it right there on the porch to reveal the what we had been anxiously waiting for.

Fabric.  Twenty Four rolls of beautiful fabric.
So one by one, I hauled each roll of fabric into the house and laid it on the kitchen table.  Wow, that's a lot of fabric!
You might wonder why I got the big box and not Tim.  That answer is easy.  Part of my job is to work with artists that will take the product and create fabulous things.  That means the next step was unwrapping each bolt, cutting pieces of fabric, packing it up and shipping it out.  All in all, nine packages went out to some very creative people.  The exciting part is that very soon, we will be able to finally share what we have been working on all month long.
 
Here are a few snippets of the pieces I worked on -

Three of the artists will be sharing their fabric adventures this week so be sure to visit their blogs on the days listed below.

Tuesday, May 14th - Tammy Tutterow
Wednesday, May 15th - Richele Christensen
Thursday, May 16th - Chelle Fowler
Friday, May 17th - me! (I'll be back to share the first of my projects)

UPDATE: many of you are wondering when the fabric will be available...it will be released this week at the Quilt Market show in Portland (to the trade only) and should start shipping to stores in July.

If you would like to see fabric samples up close you can visit the Coats website.
Time to start thinking, FABRIC!
cheers for a great week!
paula