
Nice to be here today sharing another Saltwater Taffy project. This is a really easy mixed Media project that any one can do. I used a 9 x 9" wood Panel which to me is just the perfect size for this project. I used a sewing machine but that is absolutely optional if you do not have one.
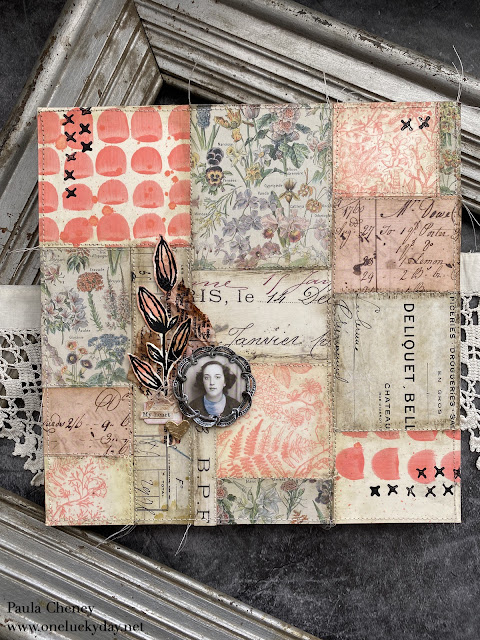
I started by creating a few stamped and painted pieces using Saltwater Taffy over Mixed Media Heavystock. I created one or two cards of each so I could use as is or cut them into pieces.
Painted cards - I used Distress Paint in Saltwater Taffy to freehand paint the splotches on the Heavystock paper. I used a paintbrush that had a rounded shape so I could get the unique pattern. I literally just painted the shapes on the card and dried it with a heat tool. I went back and added a few splatters after the fact. This card was larger so I cut it on half and used on the bottom left as well.
Stamped cards - I used an old stamp I had called Botanical Sketch (CMS216). This stamp is very large with an open center. I used my stamp platform to stamp the image in Distress Oxide, then cut it into smaller pieces. I love the delicate botanicals of this image and was happy with how it turned out here.
Normally, I would just adhere the papers to the wood Vignette Panel with Collage Medium, but I wanted to add stitching, as if the pieces were stitched together to create the patchwork. So I cut a piece of cardstock 9 x 9", the same size as the front of the Vignette Panel, and adhered the patchwork to the cardstock without overlapping. You don't have to use much glue/tape runner since they will all be secured by the stitching.
*All other paper pieces are from idea-ology Backdrops 1.


I wanted to add Crayon to give it an aged look but if you like the clean lines, just skip this step.
 For the focal point, I placed a Photobooth Photo into a metal frame (Deco Frames).
I also embossed two sets of stems from the Media Marks 1, stamp set. Once embossed, I hand cut the stems, then pressed them into Saltwater Taffy Distress Ink (with a little Gathered Twigs added).
The text paper in the background is just Collage Paper that I pressed into the leftover ink puddles and dried with a heat tool. Once dry you can rip the paper into any shape. Placement is up to you. This one could have gone on the right side as well. You could extend the collage elements, adding as many as you wish.


now carry on,
paula

To add the crayon, you need a slick surface which means adding Collage Medium. Distress Paint dries permanent, but Oxide Spray does not. It is still reactive to wet/water, even though it feels dry to the touch. With that said, just be cautious when you drag the brush over the botanical images. I have found that the longer they dry (say over night) they less they are likely to smudge. So this is a great project to do the stamping one day and the "putting together" the next.
Once I had the surface covered with a thin coat of Collage Medium and it was dry, I added the crayon to the seams for more depth. I always go back a pounce over the top with a wet wipe to remove the excess.
 Next step is optional. I love sewing on paper, so that is just what I did. I sewed most of the seams, either right on the edge or in the ditch between the papers.
 Once I was done at the sewing machine, I used 1" wide Scor-Tape to secure the paper to the wood Vignette Panel.
I used a different set of stamps, Media Marks 2 to make the X pattern on surface. I needed the X marks in black to tie the stem to the rest of the panel. This time I used black acrylic pant so it would look more distressed. If you were going to use ink - you would need Archival since the surface is sealed with Collage Medium and of course you could used more embossing powder.
I also embossed two sets of stems from the Media Marks 1, stamp set. Once embossed, I hand cut the stems, then pressed them into Saltwater Taffy Distress Ink (with a little Gathered Twigs added).
The text paper in the background is just Collage Paper that I pressed into the leftover ink puddles and dried with a heat tool. Once dry you can rip the paper into any shape.
This is the last of the current Saltwater Taffy projects but there will be more in the future. The color just resonates with my aesthetic! If you missed the other projects, you can find them here:
paula
This is GORGEOUS, Paula!! I love the softness of the entire project.
ReplyDelete