I posted a picture a few days ago on Instagram of some printing I was doing on idea-ology Tissue Wrap. I got so many questions on how I did it that I've put together a tutorial for those that requested step-outs of the process. For those that are familiar with printing, just scroll through the first portion of the tutorial to find what I did with the printed quote.
step 1: Pick a quote. Create a document on your computer and type the quote or phrase into a text box. I like to place the text box on the bottom portion of the page so the printer can grab the paper first.
step 2: Print out quote using a LASER printer. NOTE:
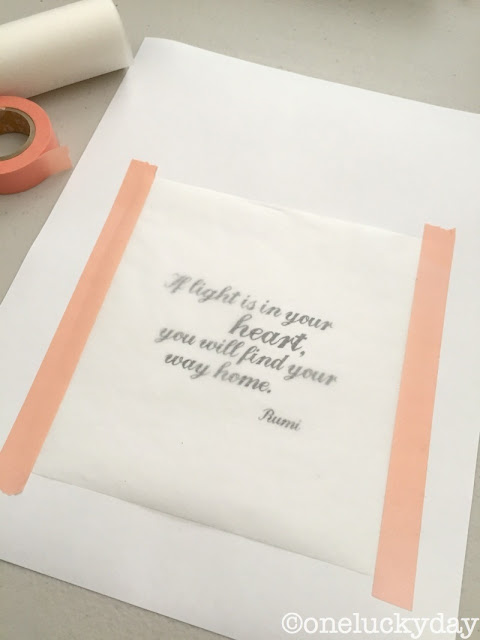
It is always helpful to draw an arrow at the bottom of the paper to determine the direction of printing since we will need to insert the paper into the printer tray again. Roll out a small piece of Tissue Wrap large enough to cover quote.
step 3: Use a low tack tape to secure the Tissue Wrap over the quote. NOTE:
the quote will eventually be cut out so the Tissue Wrap does not have to be perfectly straight.
step 4: Place document back into printer making note of the directional arrow you previously added. Print.
step 5: The printer will print the quote onto the Tissue Wrap in the exact same place as the first time (
but it still seems a little like magic).
And there you go! That's how easy it is to print on the Tissue Wrap!
So now lets talk about what to do with it!
I using a Framed Panel for this project. I have covered the back panel with a piece of paper from the French Industrial Paper Stash. I used Collage Medium to adhere the paper. This product is fast drying so add medium in the center first, then work your way out to the edges. Remember to work quickly! Once adhered, add a thin layer over the top of the paper and let dry.
Cut out quote from Tissue Wrap. I like to cut away as much as possible and use rounded corners rather than sharp.
NOTE:
This is the one part I might have changed looking back...I think I would have added the bottom portion of my collage and THEN added the quote so I could have gotten a better position.
How to add the Quote:
step 1: Using a small brush, add Collage Medium to the area where you want the quote to go.
step 2: Press the Tissue Wrap into the wet medium with fingertip.
step 3: Add a layer of Collage Medium over quote.
step 4: Again, use your fingertip to smooth out the medium over the quote. I use a small circle motion to smooth it out.
You can see that much of the Tissue Wrap disappears into the background.
Collage Work:
I am using my favorite paper from the Dapper Paper Stash to cut up the pieces I want for my collage.
Because my quote has the word HOME in it I decided to cut easy house shapes.
Again, I used the Collage Medium to adhere the shapes to the substrate. Remember to take into account that the frame will cover part of the panel once complete.
I created a puddle of Tumbled Glass Distress Paint on my Craft Sheet. Using a Mini Blending Tool and a Mini Stencil, I added Tumbled Glass circles to the background. Now I might have lost some of you since the paint is bright and does not look like it goes, but stay with me here...other layers will be added!
Back to the collage...cut small pieces from old books to add detail. You might notice that I changed 2 of the roofs by adding strips of text and cigar bands. Once I was done I added a layer of Collage Medium over the houses.
The next step is to add depth using Walnut Stain Distress Crayon. Just scribble the crayon on to the surface and around each house. Rub with your fingertip...if the crayon does not move easily, dab it a couple times with a damp (
not wet) wet wipe. Using the “damp wipe” leaves the crayon with a mottled look which I love (
and something you could never create with just your fingertip).
The beauty of the Distress Crayons is if you get too much on, just wipe it away and start over. Yet the surface will be dry to touch in record time, leaving a silky smooth surface (
something you have to touch to understand).
I also added a very small heart (
cut from chipboard using the Heartfelt die). The heart almost looks like it’s cut from wool but it’s not. I simply saturated it with Aged Mahogany Distress Stain.
I did come back and add more paper at the top edge because I felt my quote was too low. I repeated the same steps as before, ending with the crayon again.
The last step is to paint the frame with Black Soot Distress paint and
let it dry. I added it to the panel with Collage Medium and set a book
on top to make sure it adhered well before painting the edges black.
Notice that the Tumbled Glass circles weave their way in and out of the background? The Distress Crayon really helps to tie everything together.
There is only one thing I don’t like about my piece...the placement of the quote. Needs to be moved to the right and up a 1/2”. Darn it. Sure wish I had placed it after I adhered the houses. I think I would like to make another with the space to add more houses, details and embellishments. Fingers crossed I do a better job next time around!
now carry on,
paula
Products Used in this Project


LOve this Paula and really love the houses. That's my favourite sheet of Dapper paper too but so far I've not wanted to cut into it! I might now! Thanks for a great how to with the wax paper too. Jennie x
ReplyDeletePS HAppy travels!
tissue paper - where did wax paper come from ???
DeleteFantastic project and great tutorial!!! Love the finished piece, I really think that with the added paper at the top the placement of the quote looks fine now. I thought I could do without the Dapper papers, so don't have them, but..... I think you have just convinced me I actually do "need" them.....
ReplyDeleteThank you, as always, for a great tutorial, I love those houses and the crayon really does give them some depth... Now I need to see if the local Library has a laser printer, it is such a great way to add a sentiment! Anne x
ReplyDeleteAs always, this is stunning Paula and what a fabulous tutorial...I'm definitely going to have to try this out! As for the placement of the quote, I would never have thought anything if you hadn't said, it looks fine! x
ReplyDeleteAmazing! Love it. Thanks for showing how you
ReplyDeletemade it. Very inspiring!
Another stunning project, Miss P! Have fun junkin this weekend!
ReplyDeleteBeautiful as always!
ReplyDeleteLovely project, love how you added the text to the tissue wrap and the shading around the houses. Tracy x
ReplyDeleteThanks for your tutorial. and thank you for being such a great inspiration:-)
ReplyDeletexxx
Mir
Thanks for another great project and the tutorial and tips. Always helps to know those little things that can make things easier and better.
ReplyDeleteGreat tutorial to show how versatile Tim's plain tissue can be. I admire this piece and those rich pages from Dapper. I wouldn't have thought to place pieces along the top edge--they are perfect there and add a lot of interest to the piece. Just a smattering of faded, broken lines to the left of the text (ala postmark) might satisfy your desire for balance? Even a glaze of a light or dark color wash in that area might do the trick. Love the quote!
ReplyDeleteYour blog is always a source of inspiration, you know to explain everything in a simple way, your tutorials are fabulous! Amazing work as every time! I'm waiting for your workshops in Italy!!!!! Would be fantastic!|BArbara
ReplyDeleteYou'll always see your *own* stuff in a different way, but I'm totally down with the placement of the words, etc! Looks cool and quirky. My eye draws a line from lower left to upper right, and it looks great!
ReplyDeleteYou'll always see your *own* stuff in a different way, but I'm totally down with the placement of the words, etc! Looks cool and quirky. My eye draws a line from lower left to upper right, and it looks great!
ReplyDeleteExcellent tutorial full of teaching and inspiration!
ReplyDeleteI love this technique and the project. Thanks for sharing this. I was so late to this party, but glad I made it eventually! I better stock up on plain collage!
ReplyDeleteThank you so much this is such a great technique never thought to print onto the paper. Just wondering is it not possible to skip the first print and just print onto the taped down tissue paper?
ReplyDeleteYou can totally skip that step. I do it because I want to know exactly where it will print on the Collage Paper I have cut out.
Delete