Showing posts with label saltwater taffy. Show all posts

Monday, March 14, 2022

"My Heart" with Saltwater Taffy

Hello friends!

Nice to be here today sharing another Saltwater Taffy project.  This is a really easy mixed Media project that any one can do.  I used a 9 x 9" wood Panel which to me is just the perfect size for this project. I used a sewing machine but that is absolutely optional if you do not have one. 
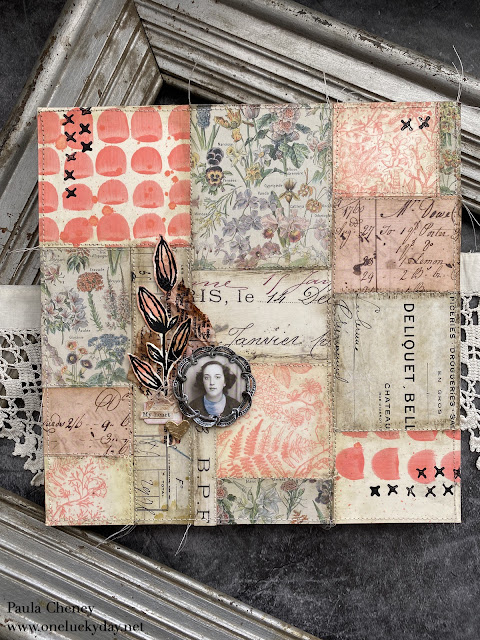
I started by creating a few stamped and painted pieces using Saltwater Taffy over Mixed Media Heavystock.  I created one or two cards of each so I could use as is or cut them into pieces.

Painted cards - I used Distress Paint in Saltwater Taffy to freehand paint the splotches on the Heavystock paper.  I used a paintbrush that had a rounded shape so I could get the unique pattern.  I literally just painted the shapes on the card and dried it with a heat tool.  I went back and added a few splatters after the fact.  This card was larger so I cut it on half and used on the bottom left as well.

Stamped cards - I used an old stamp I had called Botanical Sketch (CMS216).  This stamp is very large with an open center.  I used my stamp platform to stamp the image in Distress Oxide, then cut it into smaller pieces.  I love the delicate botanicals of this image and was happy with how it turned out here.
Normally, I would just adhere the papers to the wood Vignette Panel with Collage Medium, but I wanted to add stitching, as if the pieces were stitched together to create the patchwork.  So I cut a piece of cardstock 9 x 9", the same size as the front of the Vignette Panel, and adhered the patchwork to the cardstock without overlapping.  You don't have to use much glue/tape runner since they will all be secured by the stitching.
*All other paper pieces are from idea-ology Backdrops 1.


I wanted to add Crayon to give it an aged look but if you like the clean lines, just skip this step.
To add the crayon, you need a slick surface which means adding Collage Medium.  Distress Paint dries permanent, but Oxide Spray does not.  It is still reactive to wet/water, even though it feels dry to the touch.  With that said, just be cautious when you drag the brush over the botanical images.  I have found that the longer they dry (say over night) they less they are likely to smudge.  So this is a great project to do the stamping one day and the "putting together" the next.
Once I had the surface covered with a thin coat of Collage Medium and it was dry, I added the crayon to the seams for more depth.  I always go back a pounce over the top with a wet wipe to remove the excess.
Next step is optional.  I love sewing on paper, so that is just what I did. I sewed most of the seams, either right on the edge or in the ditch between the papers.
Once I was done at the sewing machine, I used 1" wide Scor-Tape to secure the paper to the wood Vignette Panel.
I used a different set of stamps, Media Marks 2 to make the X pattern on surface.  I needed the X marks in black to tie the stem to the rest of the panel. This time I used black acrylic pant so it would look more distressed.  If you were going to use ink - you would need Archival since the surface is sealed with Collage Medium and of course you could used more embossing powder.
For the focal point, I placed a Photobooth Photo into a metal frame (Deco Frames).
I also embossed two sets of stems from the Media Marks 1, stamp set. Once embossed, I hand cut the stems, then pressed them into Saltwater Taffy Distress Ink (with a little Gathered Twigs added).
The text paper in the background is just Collage Paper that I pressed into the leftover ink puddles and dried with a heat tool. Once dry you can rip the paper into any shape.
Placement is up to you.  This one could have gone on the right side as well.  You could extend the collage elements, adding as many as you wish.


This is the last of the current Saltwater Taffy projects but there will be more in the future.  The color just resonates with my aesthetic!  If you missed the other projects, you can find them here:

now carry on,
paula


Thursday, March 10, 2022

Focus on the Good

 Hello Friends,

I am over on the Ranger Projects Page today with a project featuring the new Distress color, Saltwater Taffy.  I hope you will pop by to see the steps to create this piece!  


Now carry on,
paula

Thursday, March 3, 2022

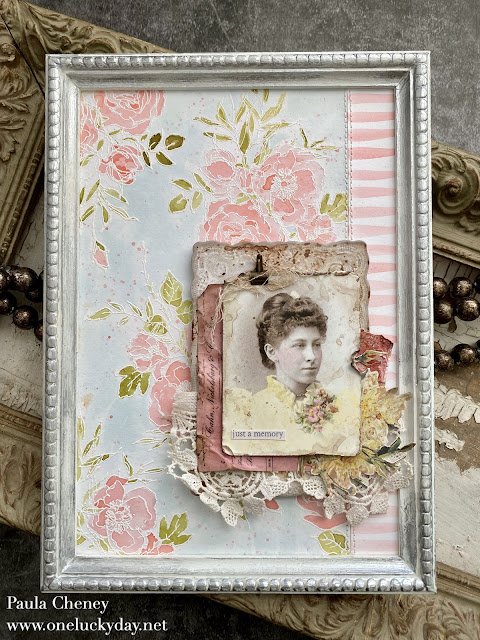
"Just a Memory" with Saltwater Taffy

Hello friends,

Here today sharing my second of the projects using Saltwater Taffy!  Over white Distress Watercolor paper, Saltwater Taffy takes on a "pink" tone...this really seams to be a chameleon color. (and I like that).  Pink-er on white, peachy on Mixed Media Heavystock.  
Lets get started!

Cut a piece of Distress Watercolor paper the size of your substrate.  Mine is a Framed Panel so its 9" long.  I am going to add a stripe strip on the right side so for now I don't need to worry about the width of the paper since I can any size to it.
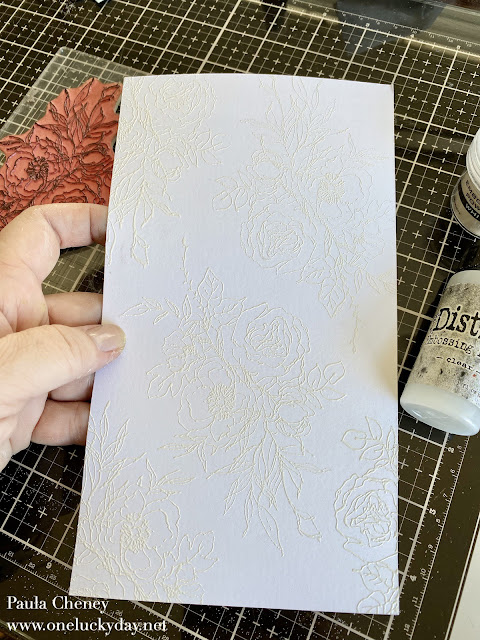
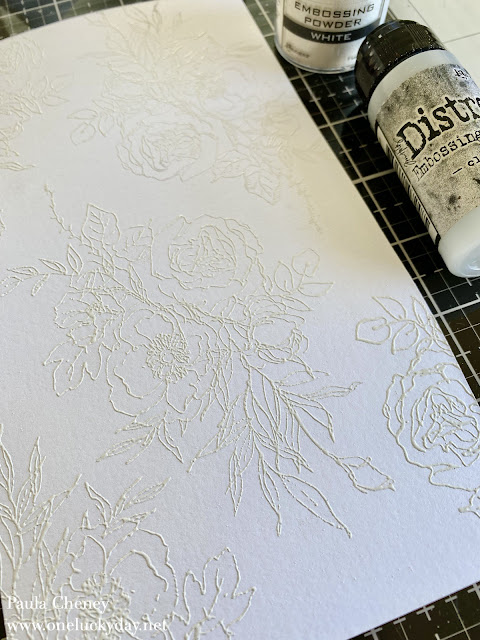
I used the Embossing Dabber to cover the Floral Outlines stamp with embossing ink.  Stamp the image onto the Watercolor paper and cover with white Embossing Powder.  Melt with an Embossing Gun.  Repeat the stamping process until you have created a repeating pattern.
For the next step, you will need a brush that can hold enough water to keep the ink flowing over the background.  
  1. Press Speckled Egg Distress Ink onto glass mat.  You will need a good amount of ink to cover the entire background.
  2. Dip brush into water and and pick up ink from glass mat. 
  3. Working quickly, cover the background with the Speckled Egg ink wash. Don't worry too much about it being even.  In the end, the variations in color will make it more interesting.
  4. Press Saltwater Taffy onto glass mat.
  5. Using the same brush (but rinsed out), pick up Saltwater Taffy and water to create a wash over the flowers.  Go back an add more ink to create variations in the flower petals.  By working all the flowers at the same time, once can be drying while working on another and vice versa.
You can see small spaces in between the leaves where I missed some blue.  I will go back and fill those in where need after I color the leaves.
I used Peeled Paint to color the leaves because I like the brightness of the green.  You could combine with Bundled Sage if you didn't want all the leaves this bright.
I still had some Saltwater Taffy Ink on the glass mat so I used my brush to pick up and flick it across the surface.  Love that little detail!
I cut another piece of watercolor paper the same length as the first.  Then using the same brush, I painted stripes down the length of the paper.  Once dry, I cut the strip and butted it up against the flower paper.  I used masking tape on the back to connect the two pieces before sewing on each side of the line.
I had previously painted the Framed Panel white and had it set aside.
I used Collage Medium to adhere the watercolor paper to the flat part of the panel.  Then added the frame over the top, concealing all the raw edges of the paper.

For the focal point, I used a Baseboard Lace Frame for the foundation, some ephemera from the Keepsakes pack and a Found Relative.
I used Distress Crayon to color her dress and flowers.  Then for good measure, I pressed Gathered Twigs Distress ink onto the glass mat and sprayed water into the ink to make it fluid.  I pressed the edges of the Found Relative photo into the ink and dried with a heat tool.  Since this is a coated card, I took repeated pressing, heating to get the worn look that I love (but I love the way it looks!).  I did avoid getting ink on her face.
Once I adhered the focal point, the white frame seemed bland, so I rubbed Dina Wakley Sterling paint over the frame to give it a bit of shine.  I just used my fingertip to rub the paint on, so it wouldn't look too perfect!
Tiny Clips are my favorite.  I thought the clip needed to "hold" something, so I got a bit of shredded cheesecloth and tucked it underneath.
The Saltwater Taffy is such a beautiful color.  I could not be happier to have this color to work with in more makes!


I'll be back soon with my last make from the live, the patchwork panel...where Saltwater Taffy finds it's peachy side...
Now carry on,
paula

Tuesday, March 1, 2022

"Just Hold On" with Saltwater Taffy

Hello Friends,

Happy to be here today to begin sharing the first of three projects I created for the new Distress Color.  This is a color I have been waiting for all year!  I knew this color was missing from the palette of Distress and I am so happy it is here to fill the void!  If you missed Tim's reveal of the new color, you can watch it HERE (swatches, samples and all).

Saltwater Taffy


Lets get started with the project for today!
Start by coloring at least five #8 tags.  I always like to color a few extra so I have a choice when putting the tags together.  The extra can always be stashed away for later. 
I use the Ranger Distress Heavystock tags that hold up to most wet mediums like ink and glue.  My colors of choice today are Salvaged Patina, Saltwater Taffy and Fossilized Amber but many combinations will work for the tags.  I have to say, this combination is one of my absolute favorites.
Once you have your tags colored and they are dry to the touch, put them in order as they will appear in the book. Then one by one, stamp and emboss the tags using the Floral Outline Stamp.  You only need small portions of the stamp (any of the three in the set will work).  The Saltwater Taffy Embossing Glaze looks mighty orange in the jar but as you can see, it's perfect once melted on the tags.
Once you have the embossing done it's time to sew the tags together.  I added a 1" strip of paper on the backside to keep the tags together before sewing (make sure you leave a bit of room so the tags can fold up).  Once tags are secure, sew down both sides.  Repeat, combining all five tags in one long strip.
NOTE: My sewing machine sews great on the top, but the back always looks terrible (need to have my machine serviced) so I know full well that I will be covering the sewing on the back with linen tape.  I'll show that part a little bit later.
Next, I cut and scored two pieces of Mixed Media Heavystock - you can make these any size you wish and they do not have to be even (meaning the fold does not have to be in the center).  Once cut, I stamped the Ornate background stamp using Saltwater Taffy Oxide Ink and let it dry completely.  
I stitched the edges of the insert, then stitched the insert directly into the seam (if you are a sewer, "stitch in the ditch" is the correct term).  I made two inserts, stitching them between tags 2-3 and tags 4-5.  If you are confused where to stitch the inserts in, fold your book up and the book will let you know, since they have to be sewn in the "valley" not the "mountain".
So here you go.  There is the paper strip (on the left) I used to connect the tags - bad stitching and all.  The Linen Tape on the right, wide enough to cover the paper and the stitching, giving me a cleaned up back as well as supporting the fold.
Once you have all your tags together, you can add any embellishments or words you wish.  You can use family photos or Paper Dolls like I did.  Ephemera, letters, numbers, Remnant Rubs, stickers, really anything!  
To keep the tag book closed, I wrapped rust colored idea-ology Velvet Ribbon around the book.  Here is the trick to making the knot smaller when using thick ribbon:
  1. Wrap ribbon around book so that it overlaps about 1".  Cut ribbon.
  2. Use a small amount of hot glue to connect the overlapped ribbon.  You should have created a "band" that slips off and on the book with ease.
  3. Cut another piece of ribbon about 3" long.
  4. Slip the 3" piece under the band and tie a knot.  Trim ends.
And there you have it.  You get a smaller knot that is easy to control.
I sewed the outside edge of the front and back tags so it matched the rest in the series.  
Create small collages with Worn Wallpaper cut out flowers (they come pre-cut in the package), ephemera and a photobooth photo.  I used a POSCA paint pent to add details to all the people.  Here, I added a pearl necklace.
Worn Wallpaper was added to the insert.  A piece of ephemera was folded over a stapled on).
Inside the insert I started a phrase that will continue onto other pages.  
I used 1/4" Scor-tape to keep the letters in place, then pressed them onto the insert.  You can sew across the top like I did or leave them as is.
Back of the insert.
Ephemera + Worn Wallpaper floral
Notice the pen work on her dress?  I love adding details like this.  A pink Classic Label makes a great halo.
I wasn't sure how to connect the ampersand and the word Grace, so I hand-cut a large flower from Worn Wallpaper and added it under the ampersand and over the word Grace. That gave the two things connectivity, so the ampersand didn't look as if it was just floating around on the tag.

For the second insert, I added more Worn Wallpaper (greens and blues) and another photobooth photo. BTW: all the seam binding/rayon ribbon was white and I have sprayed it with Saltwater Taffy!
I found this saying in the Clippings Sticker book so I felt she needed a crown on her head.  I cut this one using the Metallic Kraft-Stock from idea-ology.
This is something that I did BEFORE I ever sewed the insert into the book.  I used the new Bold Text 1 Thinlit die to cut a sentiment into the page.  I did add a piece of vellum over the back to obscure the view of the final tag.  Worn Wallpaper was added to the top of the page, combining the wallpaper sheets with a cut piece.
Here is a view of the back of the book once I finished adding all the Linen Tape strips.  You can see where I stitched the Mini Marque words to the pages and I'm fine with that!
I have made MANY tags books over the years and I will continue to make more because I just love them.  They are easy, forgiving, and can become almost anything you want them to be.  I think it was the perfect way to show off the new Distress color, Saltwater Taffy!  Don't you?

now carry on,
paula