
If there is one thing for sure, it's that I love to make Card Files. I've made many over the years and I still enjoy making all the cards, pockets and adding the details. One of the things I love about a Card File is that you can finish one set of cards and walk away. Then come back to start another set when it's convenient for you. This kind of set up feels easy and less stressful to me.
When I was asked to create a few things using the Christmas kit from Simon Says Stamp, I knew a Card File would be perfect for all the idea-ology Christmas Product in the kit. You also may have watched the free class with Tim and Heidi on the Simon Says Stamp YouTube channel today and seen this very Card File! Maybe you might be interested in making your own? If so, lets get started!

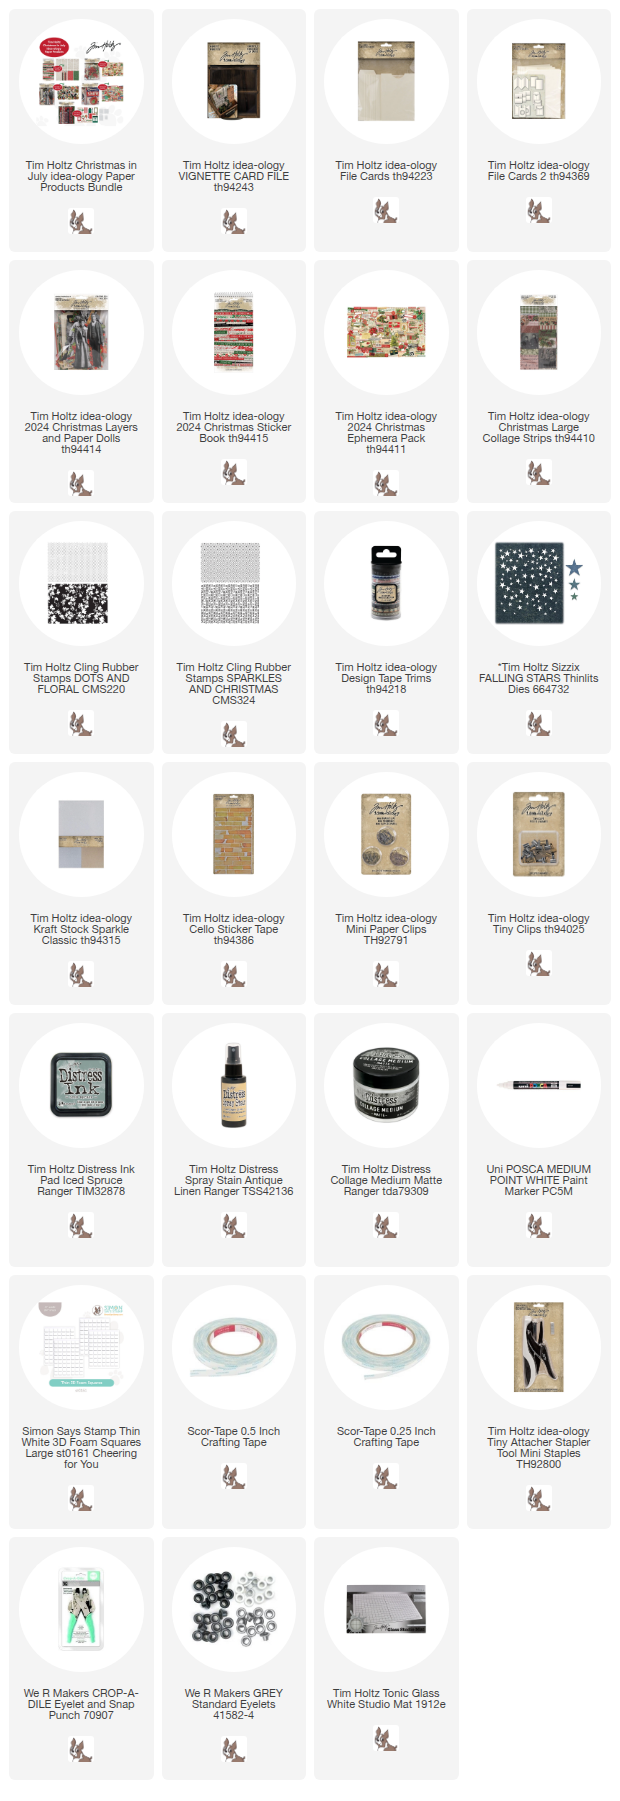
I have made a list of what I used from the Simon Says Stamp kit, just in case you purchased it. At the time of this posting, Simon had put together a group of the Tim Holtz products from the kit that you might check out if you don't have the kit or you may just have many of the things in your stash.
I have also listed below what I ADDED to create the Card File, since of course the Card File and its cards do not come in the kit.
Here is what I used from the kit:
Christmas Layers and Paper Dolls
Christmas Ephemera
Christmas Sticker book
Kraft Stock Sparkle
Cello Tape Stickers
Paper Clips
Tiny Clips
6 #8 white tags + 9 #5 tags
red and white string
red ribbon
Iced Spruce Distress Ink (all the stamping was done with this ink)
Collage Medium
Distress Crayons (colors from the kit + Fossilized Amber)
Snowflakes (but only a bit on some ephemera)
Rounded Slots Die
What I Added:
Card File
File Card packs 1 and 2
Christmas Collage Strips
Christmas backdrop paper (random leftovers I had on hand)
Stampers Anonymous background stamps- dots CMS220 + Sparkles and Christmas CMS324
Antique Linen Distress Spray Stain
Design Tape Trims (on the box)
Falling Stars Thinlit
STAMPING
All stamped cards/pockets were created the same way (much less confusion this way).
- Ink the portion of the stamp needed with Iced Spruce Distress Ink.
- Use a wet wipe to randomly wipe away the edge of the ink so it will look like the ink has faded along the bottom edge.
- Mist stamp with water from the Distress Sprayer.
- Stamp on surface (no block needed).
- Dry with heat tool, then spritz lightly with Antique Linen Distress Spray Stain. Dry again. Use a paper towel to remove the excess ink.

I'm going walk you through the cards/pockets made with the basic File Cards and then the cards/pockets made with the File Cards 2 pack. I did not use the pockets from the basic pack.
There is no "correct" order for working the cards. I usually start with the Tabbed Cards and work my way to the zig zag which take the most thought. Cards can be put into the Card File in any order.
FILE CARDS
(TH94223)
Tabbed Cards: Made with Collage Strips, Paper Dolls, Ephemera, Clippings, Christmas Sticker Book.
Notes: the dresses were colored with Distress Crayons. I added polka dots with a POSCA paint pen. The stars on the second dress were cut with the Falling Stars Thinlit die. I added them to the dress with Collage Medium (you just need some tweezers). It might seem tedious, but it was actually my favorite part of the entire project!
I clipped part of the left end of the banner to make it just a bit shorter so it would fit on the card.

Notes: These flat cards are so basic that little details make all the difference. The top card has a red stamp that has been stapled with a Tiny Attacher. The other two cards have Paper Clips with red ribbon.


Folded Cards: Made with both Collage Strips and Christmas Backdrops + Paper Clips, ephemera, Cello Tape and red/white string.
Notes: Same as the flat cards - detail matter on these folded cards. I started with the Collage Strips on each card then added a strip of Backdrop Paper to the side.

On the inside, I just looked for ephemera and layers that fit the space. I started with the boy and added the wreath around his neck. Then the Santa went perfectly with the telegram from Santa ephemera. The last card is just a combination of small ephemera pieces. I just figured out what combination fit on the card.

FILE CARDS 2
(TH94369)
Window Pockets: Stamping, Ephemera, Clippings, Cello TapeNotes: The window pockets can be tricky - if you cover them with paper then you have to cut out the circle (which is the tricky part). I think stamping is the perfect solution - slip a post it note into the pocket, then stamp. Remove the post it and you are good to go.
The transparency in the one window is from the Baseboards pack. I used Scor-tape to add it to the inside.
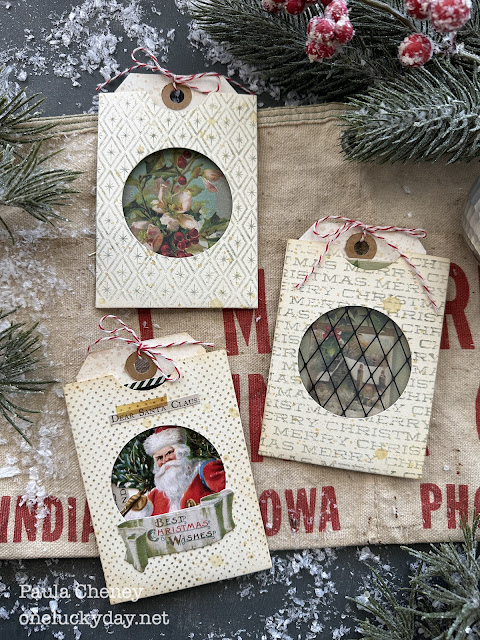 Window Pockets with added #5 tags: Ephemera, Clippings, Layers Santa, Sticker book

Notes: the ephemera was a easy pick for the window and the Santa was just a little fun. I admit, I had Santa in the pocket with the transparency and he looked like he was in jail so I changed him out, lol!
 Library Pockets: Backdrop Paper, ephemera, Paper Dolls, Clippings, Cello Tape

Notes: I added the Backdrop Paper to the front of each pocket and then added a piece of ephemera. Cello Sticker Tape always adds a little something by making it appear vintage!
 The length of the #5 tags had to be trimmed jut a bit - you can do this before stamping or after. The Paper Dolls were colored with Distress Crayons. I did spray the colored Paper Dolls with a Spray Fixative to seal the crayon. I do that when something will be handled a lot, like pulling the Paper Doll in and out of the pocket. Spray Fixative can be found at any art supply (like a Hobby Lobby or Michaels).
 Tall envelopes: Collage Strips, Backdrop Paper, ephemera, kraft stock sparkle, Falling stars die


Notes: These were so fun to make! First I added the Collage Strip to the fold at the top. Then I filled in the space on the side with Backdrop paper and strips from the ephemera pack. There are so many strips in the pack that there are plenty to choose from! I also added a few stars to the outside (with more on the inside).
 #5 tags: Ephemera, Layers, Classic stickers, Clippings, Kraft Stock Sparkle, Falling stars die

Notes: I cut the bow from the largest wreath, then replaced it on top of the wreath so it hangs on the side of the wreath.
Stars!! I just love all those little stars!
 Zig zag book: Layers, Ephemera, Tiny Clips

Notes: These zig zag books can be challenging - first you have to decide how you want to open them (pull to the left or right?) I decided to have them open by pulling them to with my left hand (the flashcard works like a tabbed pull.
I only "decorated" one side of the zig zag. The other side was just sprayed with Antique Linen Spray Stain. Tiny Clips were added to keep the little books closed while in the Card File.
 Book 1: Portrait (from Paper Doll pack), Ephemera, Collage Strips, Clippings, Cello Tape

Notes: When adding a wide Portrait to the zig zag, it's best to score it so that it will fold easily. I also find that using wide Scor-tape along the bottom edge is best to keep it in place.
 Book 2: Portrait (from Paper Doll pack), Ephemera, Collage Strips, Clippings, Cello Tape, Paper Clip


Notes: The small pieces of holly I added to the top hat and the ladies lapel came from a long holly strip found in the Layers Pack. I just clipped off what I needed and then carefully fussy cut the leaves I wanted. More Kraft Stock Sparkle stars were added to the tree.

Large Tags: SSS new Rounded Slot die, Backdrop paper, Ephemera, Layers, Cello Tape Stickers, eyelets, string
Notes: I used the new Rounded Slot die to create these large tags. I covered the #8 tag with Backdrop Paper, then ran the tag through my Vagabond with the die. I love the 5 little slots that it cuts! I added Scor-tape to the edge of the tag and added it to another (or you could use any cardstock if you don't have another #8 tag). I added the eyelet to give it a finished look, then started adding ephemera and the photobooth photos that come in the Paper Dolls pack (yes, I tinted them with Distress Crayons).

rounded Slot die tags

I guess I should mention the Card File itself. I used Collage Strips to cover the box and Design Tape in a dark green print on the top edge. After the Collage Strips were adhered to the box, I added Cello Tape over some of the seams or what appear to be seams.


Hope you like my Card File as much as I do!
And I'll see tomorrow with another Christmas project!
Now carry on,
paula
PS) if you missed the LIVE you can watch it on replay on the Simon Says Stamp YouTube Channel!
I saw your inspiration pieces on the live class yesterday, Paula! These are so gorgeous! Thank for your inspiration and all the fabulous tips you give! :)
ReplyDeleteThank you so much for this! I saw it on Heidi and Tim’s Live and hoped you would do a tutorial. I think I can create this card file as it doesn’t seem as overwhelming for a newbie like myself to try. Love this so much!
ReplyDelete