So fun to be here today talking about the newest color in the Distress Line, SPECKLED EGG! It is a color that I have wanted for so long and trust me, it is beautiful! I was able to create four projects for the new color Facebook Live. I will be blogging all four projects by the end of May so if you are interested in learning how I created any of them, please come back often to see the posts.
I stamped the gears using the Dapper stamp set and Vintage Photo Archival Ink - something you can do even after the paper is glued to the tag, since it's made from thickboard and will not bend.
I used Translucent Grit Paste and the 'Stitches' Stencil from Stampers Anonymous to add the X shapes to the tag. I sprinkled Speckled Egg Embossing Glaze over the top of the paste, tapped off the excess and let it dry. After about 30 minutes (when the paste was dry), I melted the glaze with the embossing gun.
The shelf is the next thing I created since it grounds the collage. I am using Etcetera Trims called 'Pinked' for the sawtooth edge it has. You will need three, 5" pieces, two skinny and one wide one.
The wide is the base, the skinny is glued directly on top and the last strip butts up against the straight side to create the shelf.
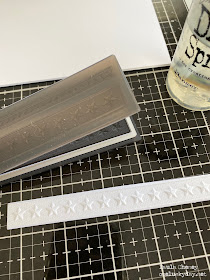
I used the Star Trim 3D folder and Watercolor cardstock to create the strip for the shelf.
A few important things to remember when using 3D folders:
1. Lightly spritz the back of the paper before you place it in the folder.
2. Run folder through the machine three times at an angle to create the best impression.
3. Once it's taken out of the folder, dry it with the heat tool before embossing.
Glaze as you normally would to complete the process.Just for fun, I tested to see what happened if you colored the watercolor paper first and then used the Embossing Glaze. The paper strip on the left had been colored with ink, run through the Vagabond machine, and then Glazed. The strip on the right is the white watercolor paper. As you can see, they are both good but the one on the right has some white showing. I liked that look better than the strip with the extra step of coloring the paper. Just a test, but worth taking into consideration.
I also did a few tests with just paper (no glaze involved) so I could see the difference in color depending on the paper you use. Both colors are great but the white of the watercolor paper is more true. Using Speckled Egg over Heavystock comes out a bit more green because of the base color of the paper... "manilla-lite" (as I like to call the color of Heavystock). So be aware that your paper choice may change the color just a tad. Personally I think it's like having two colors in one pad!
Anyway, lets get back to the project at hand. In the project I painted the wood pieces with Distress Paint then added the Star strip across the front, covering the middle strip completely. I did trim off one edge of the strip to make it fit just a bit better.
Here is the finished shelf on the tag. Walnut Stain Crayon was also added to the wood parts to make it look as if it was one piece.
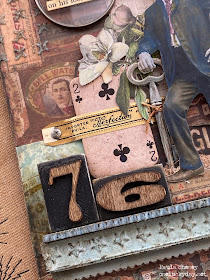
Once the shelf was secure, I moved on to the collage using pieces from Paper Dolls, Field Notes ephemera, Urban Layers, Junk Drawer Baseboards, Type Chips (1/2) and the wonderful Number Blocks.
I sanded the black edges of the Number Blocks and inked the numbers. The blocks are great for piling up and and really grounding a foundation. They work perfectly to balance the tall man in the composition.
You know me, always coloring the Paper Dolls! This guys suit is very dark so I decided to play that up by rubbing the crayon directly onto the suit and then rubbing away what I didn't need, leaving just a hint of blue. The crayon color really makes a difference when bringing him to life.
Once I had my man, I could go looking for a Clippings Sticker to fit the story I'm telling. To be honest, there were so many to choose from that it was HARD to choose just one! In the end, I had to go with this one because it just fit him and that nonchalant stance. The Optical Lens (one of my very favorite products) is perfect for the sentiment...and of course what I like best is that I could nail it to the wood board.I added the big card from Junk Drawer in that sweet spot above the six (he looks like he is ready to play some cards, right?). Then I had an idea, I'm in the midst of purging closets and drawers during lockdown and had run across a package of cigar bands I purchased a few years ago. I thought it was the perfect vintage item to add across the card!
I added the large flower to fill in the space above his arm. I told Tim, my guy is a "Renaissance Man": he loves grunge and flowers, lol. The Adornments Key was one of the last things I added. It fit perfectly between his hand and the Baseboard below.
Machinery Heads were a new addition to the line this year. I love the giant metal pieces to really bring a bit of industrial to any project. I rubbed the metal with white paint and once dry, pounced Mushroom Alcohol Ink over the surface to grunge it up.
Thank you for stopping by to see my project. Speckled Egg is a must have color, don't you agree?
Now carry on,
paula


A beautiful name for a gorgeous colour, cannot wait for mine to be delivered now! Your project is wonderful Paula, the embossing glaze looks fantastic on the different substrates. x
ReplyDeleteWoW Paula. This is incredible and how you used the new colour is amazing. I just love all the details in your piece. Thank you for sharing xxx
ReplyDeleteThank you for your beautiful samples of the wonderful new speckled egg.
ReplyDeleteI think this is my favorite color of distress ever! BTW, what the heck are the pins for?
ReplyDeleteAnother wonderful project!!! I'm hoping my order of the new color takes the fast train to get here :-)
ReplyDeleteWhen I saw your makes on the live today, it was all I could do to close my jaw. They are beautiful Paula. I only that one day I can have a fraction of your creative style. Just lovely and that colour ink?!?!, I have some on order :)
ReplyDeletesuch a beautiful project and who knew this soft gorgeous blue would work so well with the grungy look of Dapper xxx
ReplyDeleteAwesome makes for the release of the new color. You never cease to amaze me!
ReplyDeleteOh, Paula! All of your makes were my favorites on the reveal! You did a wonderful job showcasing the new color in its many mediums. What a great project; cannot wait to get a glimpse into the other projects, too. Great inspiration and tutorial, thank you❤️
ReplyDeleteI always love all you make but this is just fabulous! and a stunning showcase of the new Distress Ink. Speckled Egg is going to be such a favourite of mine ..... x
ReplyDeleteThis is such a great project. Those papers really do remind me of vintage cigar boxes so the find and addition of the cigar band is perfect! And that quote to go along with him ... you nailed it!! Can't wait for speckled egg to arrive. Thank you, Paula.
ReplyDelete