One of my favorite projects I've created this season is my Vignette Tray using the new Cathedral Windows from Stamper Anonymous. I have had so many questions about this project that I thought I better post a tutorial to show how I made it. Enjoy!
This is what the windows look like right out of the package. I used two large windows to construct the background in todays project.
Cathedral Windows come in a package that contains two large windows (4" x 6 1/2"), and four small windows (2 5/8" x 4 1/4").
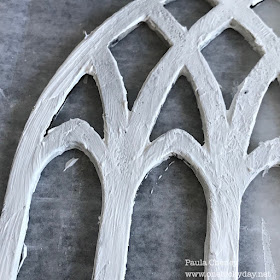
I painted the window with Opaque Crackle Texture Paste. The Texture Paster dries very fast so you have to work fast! It takes a bit of patience to get the brush in and out of the small areas at the top. No matter, it will be fine in the end.
Once dry, it has such great texture! I really looks like paint peeling off an old window.
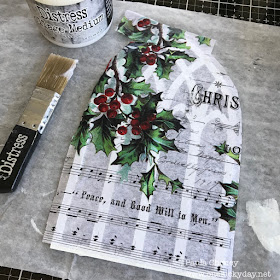
The second window I painted with white acrylic paint (one coat coverage of an acrylic paint is best in this case). I also cut a piece of Collage Paper to fit the window.
Starting with the painted window on the bottom. Use Collage Medium to not only glue the Collage Paper to the window, but also add a thin layer over the Collage Paper to strengthen. Don't worry about the patch job at the top (where the paper did not reach), when you add the window to the top you will never see the patch.
Use a Heat It Tool to dry the Collage Medium. This step is important because the heat shrinks the Collage paper as it dries and it becomes taut across the window frame.
Cut away the excess paper.
I used College Medium and clips to hold the frames together while they dry.
Once dry, remove the clips and wash over the parts of the frame with Distress Crayon and a wet brush to age.
I built a shelf using Etcetera Trims: two 5" scallops to make a thick top and two bracket pieces (4" + 5"). I glued everything together then painted with Picket Fence Distress Paint and let it dry. I came back and added Opaque Crackle and let it dry again.
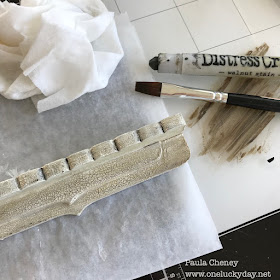
Just like the window, I came back a used a wash of Distress Crayon over the crackle to age the finish.
I am using a large Vignette Tray as my substrate so I used an awl and hammer to create the needed a hole in the tray for the lights. Make sure you have a a piece of wood or a self-healing mat board underneath so the awl does not damage what is underneath when you are hammering.
Next up is the paint - I love the "Ancient" color that Dina has in her Media paint line. The paint is thick, with one coat coverage and leaves a wonderful metallic glow. I painted the inside edges before I put the paper into the tray.
Add Design Tape to the edge of the tray. I picked this cute houndstooth that I thought went well with the pine/holly paper from the Christmas Paper Pad.
I threaded the new Tiny Lights from the back of the tray to the front. From there I wound them around in a circle and used scotch tape to adhere them to the tray.
You will need 5 bingo chips (or some kind of riser) for the window and shelf. Three of the five bingo chips were added to the back of the window frame and set aside to dry.
Once dry, adhere the window over the lights. Add the last two bingo chips to the back of the shelf made from Etcetera Trim and add it to the tray. This does create a gap between the tray and the shelf that is easy disguised with some batting.
Next up is the Woodland Tree! What you can't see here is that I gave the tree a bit of a haircut on the back side so it would sit on the shelf better. Test your tree placement before you move onto the next step. Once it was the right size, I sprayed the tree with Bundled Sage Distress Spray Stain and dried it with the Heat It Tool.
To color the Baubles, I placed a variety of sizes into a small plastic bag. I dripped Crimson Alcohol Ink into the bag and rolled the Baubles around. Once I could see they were all coated in ink, I dumped them out into a disposable plastic tray and threw away the plastic bag. I added Mushroom Alcohol Ink to a Blending Tool with a felt pad, then pounced over the red Baubles to age.
Use a hot glue to add the Baubles to the tree. I like to add the glue into the tree and then push the Bauble into the glue/branches.
A small Collage Brush works perfectly to paint on Collage Medium. Start at the top of the tree and pull down the tree with the brush so the glue stays on the top portion of the ornaments. When the Mica goes on it will only stick to the glue portion, leaving the bottom half of each ornament red (like snow has fallen from the sky).Sprinkle Distress Mica over the tree (do not press down) and let dry.
Adhere the tree to the shelf/window with hot glue. Use a Tonic Craft Scratcher to fluff up the batting around the tree.
Use Distress Crayons to color a Paper Doll. Because the girl I chose has a dark jacket on you cannot color her with the method I normally use. In this case take a dark color and rub the crayon directly onto the dark surface (her coat) to color. For the cheeks, hat and muff you can use the water brush to color.
Add a small block or some other kind of riser to help the Paper Doll stand out from the back.
Then simply glue her to the block next to the tree.
I did add a bit of glue at the bottom of the tray for some added Distress Mica.
Thank you for taking the time to read my tutorial. This has been a favorite project when people see it displayed in my classes so I hope you like it too! I love the Cathedral Windows - such a beautiful addition to the Etcetera line of tags and trims!
Now carry on,
paula


Thank you Paula for sharing this project!
ReplyDeleteYou are so creative and detail oriented.
I can't wait to gather my supplies and get busy!!!
Beautifully done... genius work, too!!!
ReplyDeleteGorgeous window, Paula!
ReplyDeleteIt's just so gorgeous!! I love it so much!
ReplyDeleteIt's beautiful! I love the deep red baubles on the tree. Thanks for the tutorial!
ReplyDeleteBeautiful, It would be great if you could just make a kit for us!!! love it.
ReplyDeletePaula, this is beautiful!!
ReplyDeleteI adore those Cathedral Windows & this project has really showcased them.
Stunning Paula. Thank you so much for inspiring me to open the packet and make something with these gorgeous windows! x
ReplyDeleteThis is stunning Paula and the window with the collage paper is just breathtakingly beautiful. Thank you for sharing all your techniques in this great tutorial. One to pin! Jennie x
ReplyDeleteWow! I love all of the little details. Stunning!
ReplyDeleteWhat a great tutorial. Thank you!
ReplyDeleteWhat a lovely job you did.Thank you for sharing.
ReplyDelete